
Project Rusty Revival (56k no way!)


Thread Starter
|
Diesel Wrench
Joined: Mar 2010
Posts: 512
Likes: 22
And thanks! Hopefully I can get the welds smoothed out today and get that headache rack welded on. All of the wood is stained and ready to put together, so possibly getting that put together too.
And, I got carried away last night and took a video to capture the sound of the VGT turbo...
HE351VE Cummins 12 Valve Sound - YouTube
---AutoMerged DoublePost---
Well, started out the day absolutely STOKED. The weather is so nice and cool I figured we could have a pretty productive day without sweating our asses off.
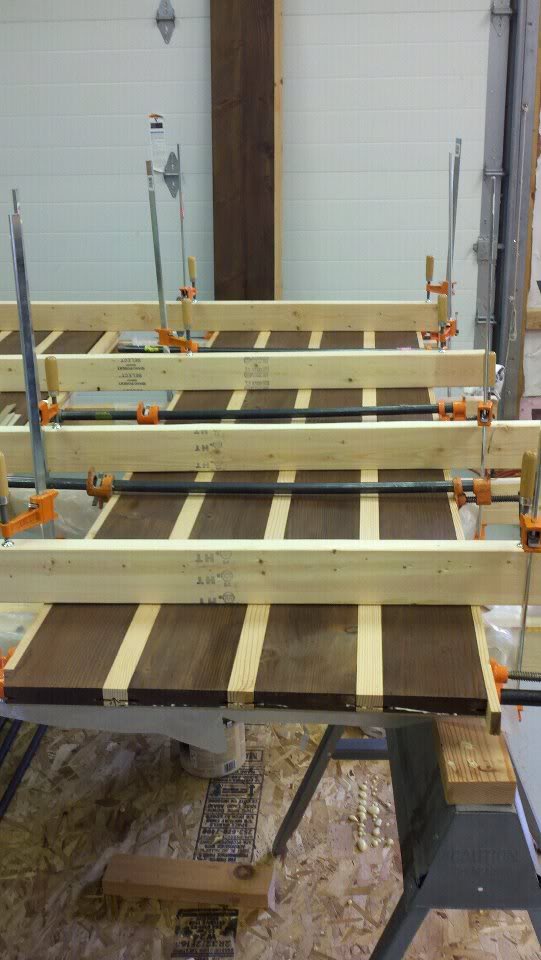
First thing, we got everything all laid out to begin gluing the wood together:
Then we ended up running out of 1/8" wood, so I had to go run and get some (a good 50 mile round trip to the lumber yard)

Then lunch time with the parents and help mom with computer time, so there went another hour

So, we get back out, get the 1/8" lumber cut and find out we cut it too wide

Trim that down and we're ready to rock.

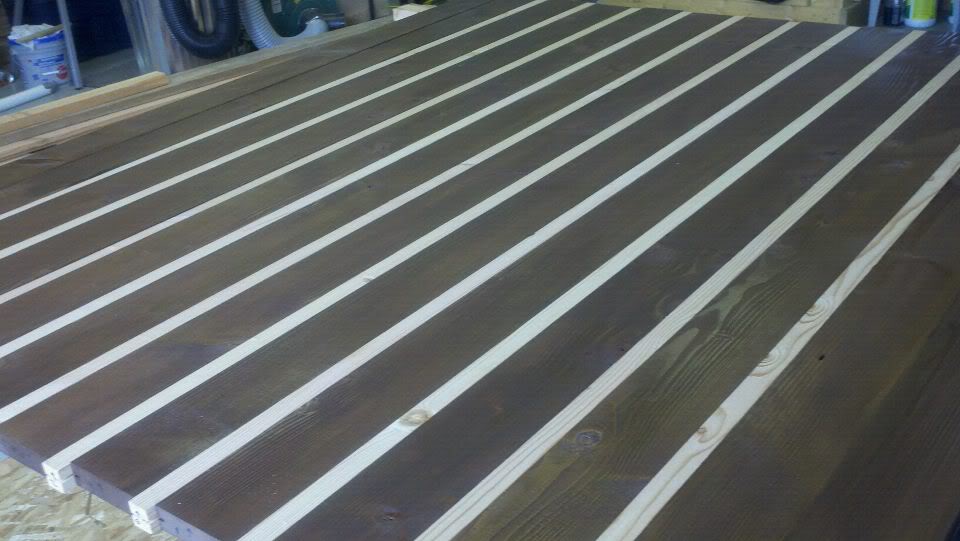
So, with everything set up, a plan formulated, and plenty of motivation we start gluing the slots in the wood. We used Gorilla glue, so it would be nice and strong and because it would help fill any holes. Good idea, but poorly executed. The glue foams and it ended up foaming out our joints. We wiped it off, but I still suspect that we just made some damn fancy fire wood.
This is how it ended up. It would have worked swell if we were using a different glue. So, we're down but not defeated. Luckily only 3 boards will be 'ruined' (or salvageable).
Gotta take the fails in stride and learn as we go, I guess.

Progress will be slow from here on out since I go back to my apartment (and my job
 ) tonight. But, when I have pics, I will be sure to update.
Last edited by mkriebs; Jul 20, 2012 at 02:37 PM. Reason: Automerged Doublepost
Thread Starter
|
Diesel Wrench
Joined: Mar 2010
Posts: 512
Likes: 22
Well, I have not been able to make any progress due to having to work, but I am sure my dad has gotten some things done. I have all of next weekend off, so I intend to head back and work my butt off. Going to order a couple tail/brake lights so we can get the holes cut for those, then I think the bed will be ready for sandblasting.
I've got some extra motivation at the moment since my precious Mustang, Sasha, decided to blow up/stop running! I need to get this bad boy on the road ASAP so I can have something fun to drive
Just thought I would stop by with a slight update, hope everyone is having a good week and will be keeping an eye out for progress pics in the next week or so!


Newbie
Joined: Jul 2012
Posts: 1
Likes: 1
hey man your 1990 dodge looks awesome, that is by far the coolest flatbed i have ever seen on a first gen cummins! i just finished restoring my 89 4x4, which just got back from paint with a shiny black on it! i like your paint scheme by the way, those colors look really good together! keep up the hard work man! i'm having a blast watching this truck come together! cant wait to c more pics!!!
i like your paint scheme by the way, those colors look really good together! keep up the hard work man! i'm having a blast watching this truck come together! cant wait to c more pics!!!
Thread Starter
|
Diesel Wrench
Joined: Mar 2010
Posts: 512
Likes: 22
Alright, since time is money, I traded off my shift tomorrow in favor of going back to the shop and working on Rusty. So let's see what I can get done in 3 days!
On the agenda is getting all the holes drilled in the bed for the lights, grind down all the welds, sand blast, use filler where filler is needed, and do some finish sanding. This means we will be able to drop the wood in, drill the bolt holes and ship the bed out to paint, ASAP!
That is ALL I am focusing on this weekend... assuming my ADD doesn't kick my ***.
---AutoMerged DoublePost---
Well, got a super late start this morning and didn't get much done on the bed. Spent most of the day running errands and planning (thought we had this all figured out!). The the parents had people over for dinner so I just screwed around in the garage after dinner.
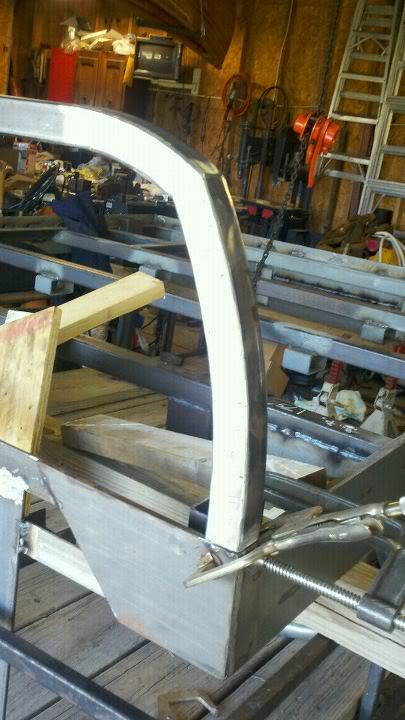
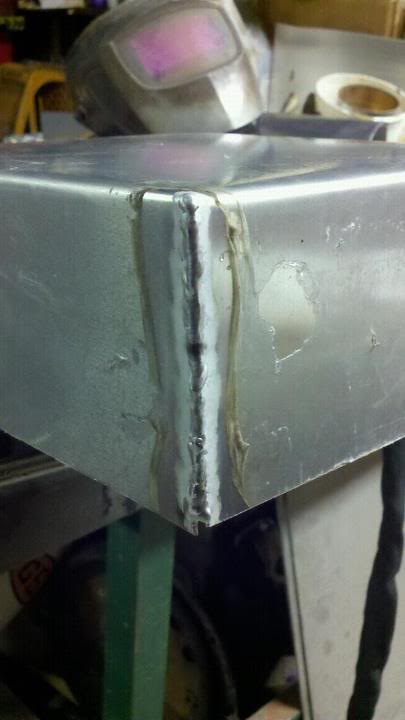
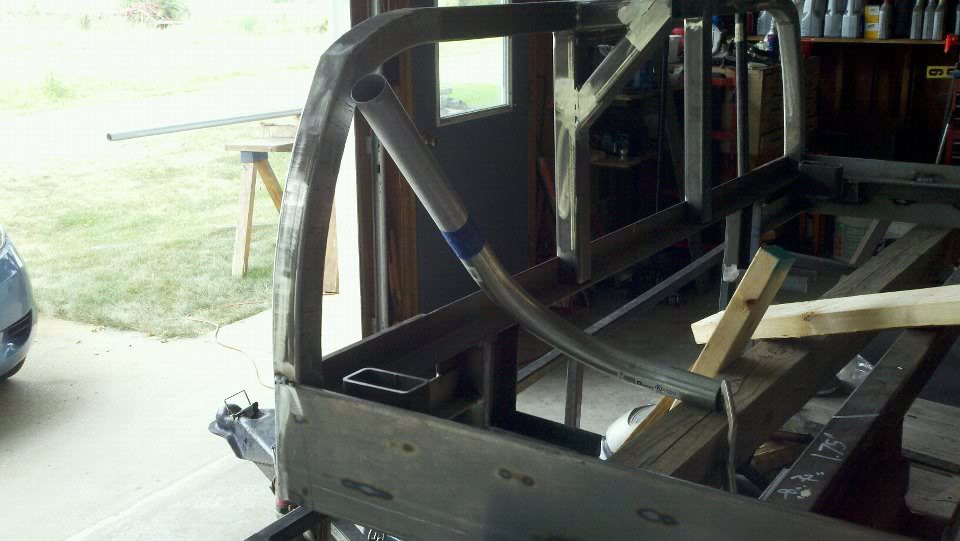
Got one of the holes drilled for the tail light, turned out good, but I will grab pics when we get all of em drilled out. Also got the headache bar smoothed out and tacked back on:
Then I started screwing around with the TIG welder... I had some thin aluminum that I wanted to use to make a coolant reservoir and windshield washer fluid reservoir. Turns out it's a bit too thin, so I just played around trying to get used to TIG welding again.
Just found out Dad will be gone for the morning tomorrow... so IDK how much will actually get done tomorrow I am sure I can find things to do, though.
---AutoMerged DoublePost---
Alright, kinda at a stand still today since dad had a conference at church and is getting ready to put my Grandma's house on the market he had to go to a few meetings with appraisers, etc...
So, I did some finishing on the corners, got the rest of the spare wheel holder cut out and ready to be drilled, got all the marks done to drill the tail light holes, and mocked up the fuel filler neck. Nothing horribly exciting, but alot of small work that I needed to get done.
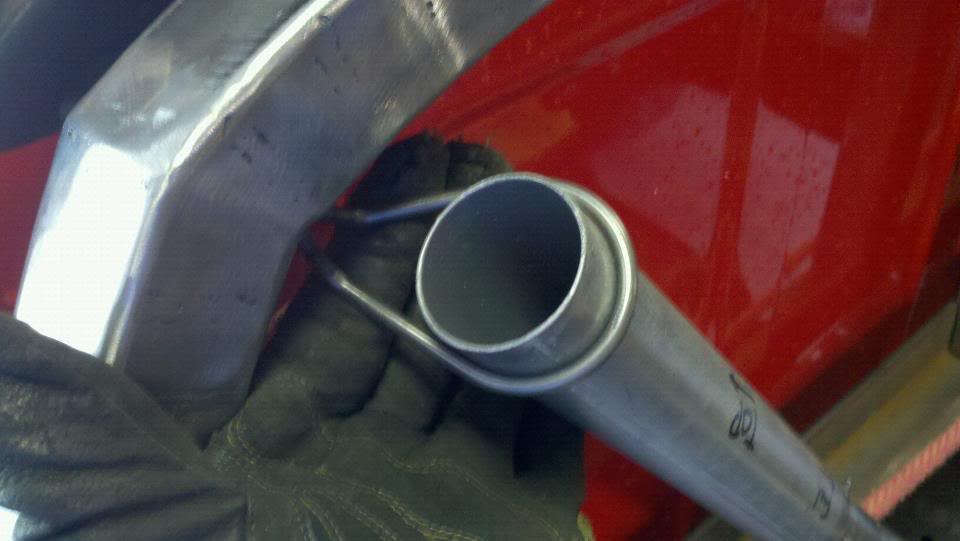
Here is the fuel filler neck so far...
As unproductive as this weekend feels, I am actually very close to being able to blast the bed!
Cut the rest of the holes, weld on the backer for the spare tire carrier, weld the headache bar on after test fitting, then were good to go!
---AutoMerged DoublePost---
Got the hanger for the fuel filler neck done up...
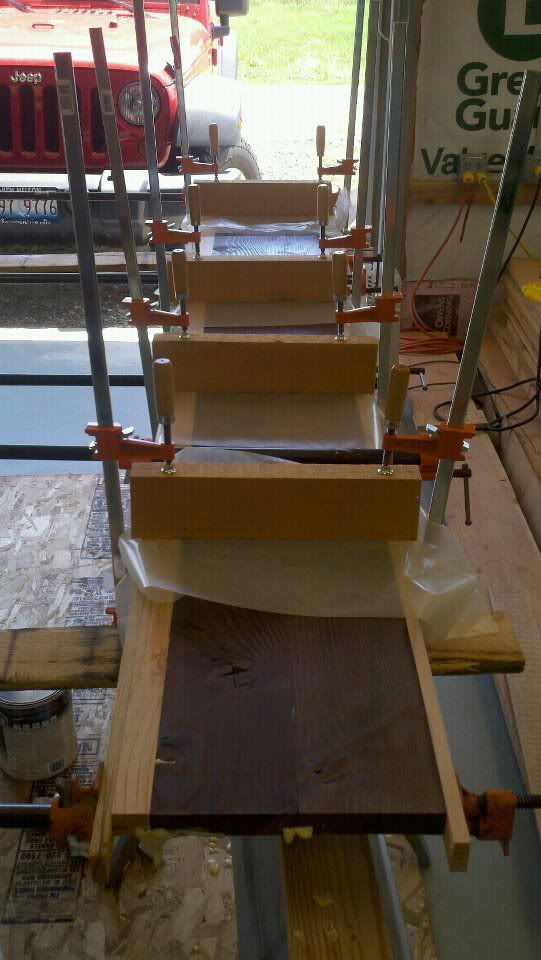
And got some of the wood glued together (successfully!)...
Came back home a day early now, just because I wasn't feeling well... Will be back working on Rusty this coming Friday... could possibly get it all blasted, me thinks... Then again, I am going to the truck pulls that night (motivation!).
On the agenda is getting all the holes drilled in the bed for the lights, grind down all the welds, sand blast, use filler where filler is needed, and do some finish sanding. This means we will be able to drop the wood in, drill the bolt holes and ship the bed out to paint, ASAP!
That is ALL I am focusing on this weekend... assuming my ADD doesn't kick my ***.
---AutoMerged DoublePost---
Well, got a super late start this morning and didn't get much done on the bed. Spent most of the day running errands and planning (thought we had this all figured out!). The the parents had people over for dinner so I just screwed around in the garage after dinner.
Got one of the holes drilled for the tail light, turned out good, but I will grab pics when we get all of em drilled out. Also got the headache bar smoothed out and tacked back on:
Then I started screwing around with the TIG welder... I had some thin aluminum that I wanted to use to make a coolant reservoir and windshield washer fluid reservoir. Turns out it's a bit too thin, so I just played around trying to get used to TIG welding again.
Just found out Dad will be gone for the morning tomorrow... so IDK how much will actually get done tomorrow
I am sure I can find things to do, though.---AutoMerged DoublePost---
Alright, kinda at a stand still today since dad had a conference at church and is getting ready to put my Grandma's house on the market he had to go to a few meetings with appraisers, etc...
So, I did some finishing on the corners, got the rest of the spare wheel holder cut out and ready to be drilled, got all the marks done to drill the tail light holes, and mocked up the fuel filler neck. Nothing horribly exciting, but alot of small work that I needed to get done.
Here is the fuel filler neck so far...
As unproductive as this weekend feels, I am actually very close to being able to blast the bed!
Cut the rest of the holes, weld on the backer for the spare tire carrier, weld the headache bar on after test fitting, then were good to go!
---AutoMerged DoublePost---
Got the hanger for the fuel filler neck done up...
And got some of the wood glued together (successfully!)...
Came back home a day early now, just because I wasn't feeling well... Will be back working on Rusty this coming Friday... could possibly get it all blasted, me thinks... Then again, I am going to the truck pulls that night (motivation!).
Last edited by mkriebs; Aug 4, 2012 at 09:55 PM. Reason: Automerged Doublepost
Thread Starter
|
Diesel Wrench
Joined: Mar 2010
Posts: 512
Likes: 22
I am thinking about moving the batteries into a box on the bed, between the stack and the spare tire. This will free up room for the overflow tank and the washer reservoir to be mounted under the hood, and possibly a little somethin' somethin' in the future
Got a few ideas, gotta see how things pan out in the near future, but I don't think I will be letting the cat outta the bag yet
---AutoMerged DoublePost---
What is the concensus on air to water intercoolers? I am trying to integrate the A/C back into the truck and will ultimately need to redesign the core support, which is no big deal. I need a new radiator regardless and I was spying the nice Aluminum units from Summit, they're about $130 and some of them come with trans coolers built in. I was thinking the trans cooler could be used for a heat exchanger for the A2W intercooler. I would build another reservoir to keep all of the fluid seperate from the engine, of course. I think this would let me run a more efficient radiator (thicker core), AND fit my A/C condenser back in. Not sure if the trans cooler would be efficient enough for the A2W intercooler or not, and I don't know if an A2W would be effective in daily driving...
I have a couple ideas, nothing I will be able to do for a little while, but I think it will be pretty badass if it works out the way I think it will
Last edited by mkriebs; Aug 9, 2012 at 11:03 AM. Reason: Automerged Doublepost
FormerVendor
Joined: May 2012
Posts: 103
Likes: 28
From: WALPOLE MA
[QUOTE=mkriebs;923585]I am thinking about moving the batteries into a box on the bed, between the stack and the spare tire. This will free up room for the overflow tank and the washer reservoir to be mounted under the hood, and possibly a little somethin' somethin' in the future
Just started on my aux battery tray. I am adding a second alt to the engine to power the two aux batteries. I am mounting them to my drivers side frame rail. My thought was that by putting them on the rail, I would save the room in the bed. Just a thought, cause I would hate to see that bed floor covered up.
Just started on my aux battery tray. I am adding a second alt to the engine to power the two aux batteries. I am mounting them to my drivers side frame rail. My thought was that by putting them on the rail, I would save the room in the bed. Just a thought, cause I would hate to see that bed floor covered up
.
Thread Starter
|
Diesel Wrench
Joined: Mar 2010
Posts: 512
Likes: 22
Just started on my aux battery tray. I am adding a second alt to the engine to power the two aux batteries. I am mounting them to my drivers side frame rail. My thought was that by putting them on the rail, I would save the room in the bed. Just a thought, cause I would hate to see that bed floor covered up.
.I can't put anything on the frame rail because I am thinking about my custom washer and coolant tanks and possibly that air to water intercooler... Passenger side of the engine is out for... well, you'll see


