THE 'HOW TO POLISH ALUMINUM' TUTORIAL

Thread Starter
|
Diesel Enthusiast
Joined: Jul 2008
Posts: 110
Likes: 16
From: Green Bay, WI
Alright guys.... got it written up for you. Enjoy and feel free to ask questions as they arise and I will be more then happy to answer.
THE HOW-TO-TUTORIAL ON POLISHING ALUMINUM
(VALVE COVERS OR WHATEVER YOU MAY HAVE)
Step One: REMOVAL : DRY � 60-80 grit with power (DA, Palm Sander etc)
Alright guys, this is probably the MOST important step. Nothing special to this at all, remove all old paint, and really dig into the metal on this one. Any mistake or laziness on this step is VERY apparent in your final result and it is the easiest step to do, so do it well. Remove paint and make sure you bottom out all pits, nicks, etc as you must have an �even� surface with no pitting left over. Leave a pitt or a knick on the surface and it carries through all the way to your mirror finish. (BAD)


Step Two: LEVELING: DRY � 120-180 grit by hand/block
Again, this one is pretty straight forward. It still is in �free-style� mode with no directional discipline. This step is to simply remove all the grooving left from the DA/Palm sander etc from the first step. Simply continue to sand whether by hand (preferably by block) to remove all the swirl circles left by step one.
Step Three: DISCIPLINED DIRECTIONAL SANDING: WET �220 grit by hand
This is where the hands start to hurt, the blisters form and the fun begins. Get a spray bottle, a bucket of water, and put on some old clothes. Begin sanding in one direction across your entire part. Before doing so, use your spray bottle filled with water and spray your sanding surface so its wet. Your bucket, dip the sanding paper in the bucket. You can NOT use too much water, but you can use too little. Continue sanding in one direction until you no longer see any other patterns formed on the surface except lines of sanding in the direction you are going. How to hold your sandpaper to get uniform pressure as well as directional sanding. (See how it is vertical path)


Step Four: PERPENDICULAR DIRECTIONAL SANDING: WET�400 grit by hand
After the previous step has been completed, you no longer see any other marking on the metal except the directional sanding from the last step, its time to move up to 400 grit. Spray your entire surface with the spray bottle to removal all of the liquid aluminum dust and debris. (Or simply dunk your part into your water bucket). We will now begin wet sanding again (so spray your clean surface, dip your 400 grit paper in your bucket) and begin sanding now perpendicular to your previous direction and continue to do so until all of your markings from �step three� are no longer visible. If you cheat on this cross-hatching and do not sand until all of the previous steps markings (scratches) are gone, you will begin to form micro pits and your finish product will NOT shine but have a white haze to it) Gentlemen, take your time and patience now. If you�ve think you�ve removed all of �step three� markings�.CONTINUE TO SAND because you haven�t. (Speaking from experience)
(Shown is now going horizontal and how the vertical groves have only been removed by 50%. Keep sanding until all vertical grooves are gone)

Step Five: PERP DIRECTIONAL SANDING � WET-600 grit by hand
Same as �step four� except with 600 grit. Change directions again to go �against the grain� of the 400 grit. Make sure to dunk your part(or spray off all aluminum debris) and apply water to clean surface and dip your paper before beginning. Continue with 600 grit until all of �step four� markings are gone and you can only see the directional markings of the 600 grit on the metal.
Step Six: PERP DIRECTIONAL SANDING � WET-800 grit by hand
Same as �step five� except with 800 grit. Change directions again to go �against the grain� of the 600 grit. Make sure to dunk your part(or spray off all aluminum debris) and apply water to clean surface and dip your paper before beginning. Continue with 800 grit until all of �step five� markings are gone and you can only see the directional markings of the 800 grit on the metal.
Step Seven: PERP DIRECTIONAL SANDING � WET-1000 grit by hand
Same as �step six� except with 1000 grit. Change directions again to go �against the grain� of the 800 grit. Make sure to dunk your part(or spray off all aluminum debris) and apply water to clean surface and dip your paper before beginning. Continue with 1000 grit until all of �step six� markings are gone and you can only see the directional markings of the 1000 grit on the metal.
DESCISION TIME: Show quality or just mirror finish? If show quality is desired continue to repeat �Step Seven� with both 1500 grit and then 2000 grit sand paper. All wet, all by hand. Before proceeding to Step Eight
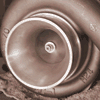
Step Eight: POLISHING TO MIRROR FINISH: Dry/Clean Metal
Alright guys, here�s were all the time and hard work pay off. On your clean metal surface, use old white cotton t-shirts (YES THEY WORK THE BEST AND ARE THE CHEAPEST�do not use terry clothes, microfiber or any other material besides 100% cotton weave) Give your t-shirt or rag a spray or two to moisten it to a damp feel. Take your mothers polish (personal preference of mine) and begin swirling polish in circles. It will start to blacken on the metal and that is GOOD. Continue and really put in some elbow grease hear. Average use should be about a dime size of polish cream on each surface of the valve cover. (Top, Side, Side, Side, Side) Use our finger picking through the t-shirt to apply and swirl. Then use the clean white spots on the t-shirt to remove the polish in a swirling motion. Once most of the polish cream is removed, again find a new �clean� white section of t-shirt and again swirl like your removing wax from a car.


Step Nine: ENJOY!!!! Put in front of face and wave to your mirrored image.


THE HOW-TO-TUTORIAL ON POLISHING ALUMINUM
(VALVE COVERS OR WHATEVER YOU MAY HAVE)
Step One: REMOVAL : DRY � 60-80 grit with power (DA, Palm Sander etc)
Alright guys, this is probably the MOST important step. Nothing special to this at all, remove all old paint, and really dig into the metal on this one. Any mistake or laziness on this step is VERY apparent in your final result and it is the easiest step to do, so do it well. Remove paint and make sure you bottom out all pits, nicks, etc as you must have an �even� surface with no pitting left over. Leave a pitt or a knick on the surface and it carries through all the way to your mirror finish. (BAD)
Step Two: LEVELING: DRY � 120-180 grit by hand/block
Again, this one is pretty straight forward. It still is in �free-style� mode with no directional discipline. This step is to simply remove all the grooving left from the DA/Palm sander etc from the first step. Simply continue to sand whether by hand (preferably by block) to remove all the swirl circles left by step one.
Step Three: DISCIPLINED DIRECTIONAL SANDING: WET �220 grit by hand
This is where the hands start to hurt, the blisters form and the fun begins. Get a spray bottle, a bucket of water, and put on some old clothes. Begin sanding in one direction across your entire part. Before doing so, use your spray bottle filled with water and spray your sanding surface so its wet. Your bucket, dip the sanding paper in the bucket. You can NOT use too much water, but you can use too little. Continue sanding in one direction until you no longer see any other patterns formed on the surface except lines of sanding in the direction you are going. How to hold your sandpaper to get uniform pressure as well as directional sanding. (See how it is vertical path)
Step Four: PERPENDICULAR DIRECTIONAL SANDING: WET�400 grit by hand
After the previous step has been completed, you no longer see any other marking on the metal except the directional sanding from the last step, its time to move up to 400 grit. Spray your entire surface with the spray bottle to removal all of the liquid aluminum dust and debris. (Or simply dunk your part into your water bucket). We will now begin wet sanding again (so spray your clean surface, dip your 400 grit paper in your bucket) and begin sanding now perpendicular to your previous direction and continue to do so until all of your markings from �step three� are no longer visible. If you cheat on this cross-hatching and do not sand until all of the previous steps markings (scratches) are gone, you will begin to form micro pits and your finish product will NOT shine but have a white haze to it) Gentlemen, take your time and patience now. If you�ve think you�ve removed all of �step three� markings�.CONTINUE TO SAND because you haven�t. (Speaking from experience)
(Shown is now going horizontal and how the vertical groves have only been removed by 50%. Keep sanding until all vertical grooves are gone)
Step Five: PERP DIRECTIONAL SANDING � WET-600 grit by hand
Same as �step four� except with 600 grit. Change directions again to go �against the grain� of the 400 grit. Make sure to dunk your part(or spray off all aluminum debris) and apply water to clean surface and dip your paper before beginning. Continue with 600 grit until all of �step four� markings are gone and you can only see the directional markings of the 600 grit on the metal.
Step Six: PERP DIRECTIONAL SANDING � WET-800 grit by hand
Same as �step five� except with 800 grit. Change directions again to go �against the grain� of the 600 grit. Make sure to dunk your part(or spray off all aluminum debris) and apply water to clean surface and dip your paper before beginning. Continue with 800 grit until all of �step five� markings are gone and you can only see the directional markings of the 800 grit on the metal.
Step Seven: PERP DIRECTIONAL SANDING � WET-1000 grit by hand
Same as �step six� except with 1000 grit. Change directions again to go �against the grain� of the 800 grit. Make sure to dunk your part(or spray off all aluminum debris) and apply water to clean surface and dip your paper before beginning. Continue with 1000 grit until all of �step six� markings are gone and you can only see the directional markings of the 1000 grit on the metal.
DESCISION TIME: Show quality or just mirror finish? If show quality is desired continue to repeat �Step Seven� with both 1500 grit and then 2000 grit sand paper. All wet, all by hand. Before proceeding to Step Eight
Step Eight: POLISHING TO MIRROR FINISH: Dry/Clean Metal
Alright guys, here�s were all the time and hard work pay off. On your clean metal surface, use old white cotton t-shirts (YES THEY WORK THE BEST AND ARE THE CHEAPEST�do not use terry clothes, microfiber or any other material besides 100% cotton weave) Give your t-shirt or rag a spray or two to moisten it to a damp feel. Take your mothers polish (personal preference of mine) and begin swirling polish in circles. It will start to blacken on the metal and that is GOOD. Continue and really put in some elbow grease hear. Average use should be about a dime size of polish cream on each surface of the valve cover. (Top, Side, Side, Side, Side) Use our finger picking through the t-shirt to apply and swirl. Then use the clean white spots on the t-shirt to remove the polish in a swirling motion. Once most of the polish cream is removed, again find a new �clean� white section of t-shirt and again swirl like your removing wax from a car.
Step Nine: ENJOY!!!! Put in front of face and wave to your mirrored image.
 Ineed to do somepolishin my self. Nice Write up