
High Pressure fuel testing *

Thread Starter
|
Super Moderator
Joined: Oct 2007
Posts: 14,872
Likes: 764
From: Houston, Tx

IMPORTANT: If you were not referred to this test from another diagnostic, do not perform this procedure. Only perform this test when the fuel is more than 18�C (65�F) .
1. Were you Referred here from one of the following diagnostics?
o DTC P1094
o Surges/Chuggles in Symptoms
o Rough, Unstable, or Incorrect Idle in Symptoms
o Fuel Injector Balance Test with Tech 2
o If you answered Yes, go to the Fuel Pressure Regulator Graphing after step 55.
o If you answered No, go to Step 2.
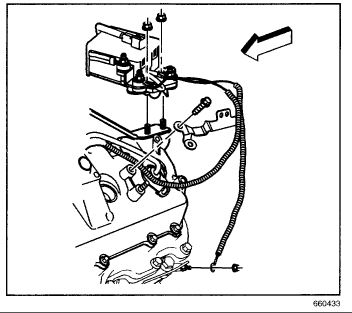
2. Remove the air duct from the air cleaner assembly and the turbo inlet.
3. Remove the air intake pipe. Refer to Air Intake Pipe Replacement.
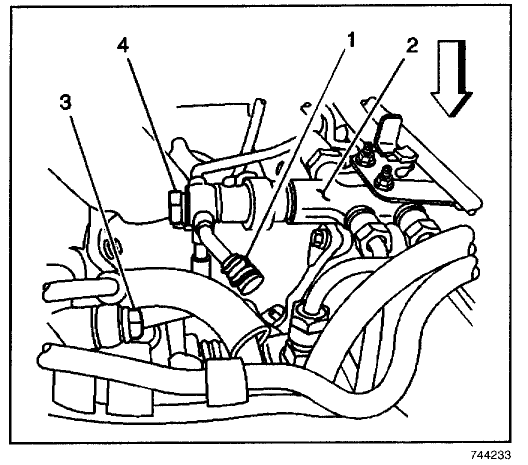
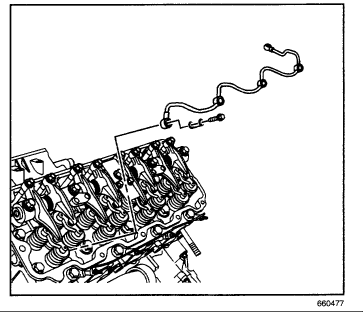
4. Remove the fuel injection pump fuel return rubber hose from the junction block (2). Cap the fitting on the block with a 3/8 inch rubber cap (1) to prevent fuel leakage.
5. Attach a rubber hose (1) with a barbed fitting to the fuel injection pump return hose and insert the other end into a 1 gallon clean fuel container (2).
6. Remove the retaining clip from the fuel return line.
7. Using the J 44581 Fuel Line Disconnect Tool, disconnect the fuel return line from the fuel junction block.

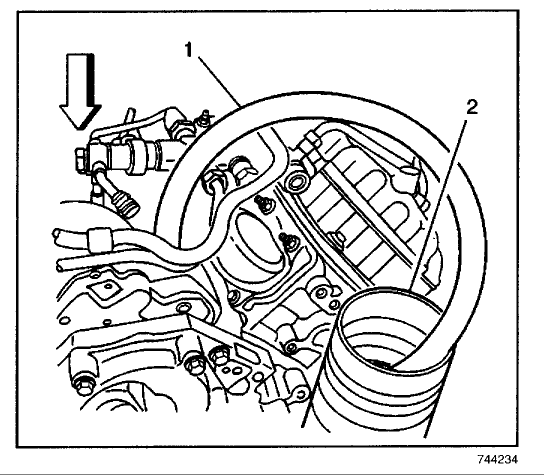
8. Connect a 3/8 inch hose (1) on the fuel return fitting and place the other end of the hose into a 100 ml (3.38 oz) container (2) for measuring liquids.
9. Remove the ignition 1 relay using the J 43244 Relay Puller Pliers.
10. Crank the engine in 15 second intervals, with one minute cooling time between, until fuel starts to flow into the measurement container.
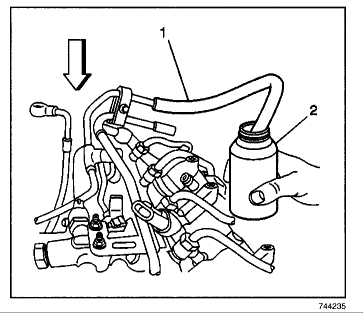
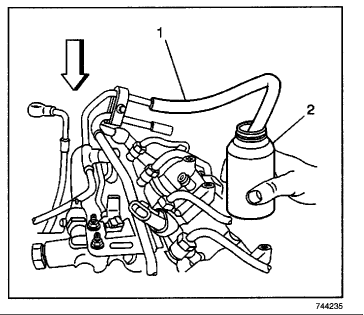
11. Elevate the hose to retain fuel in the hose, and empty the measurement container (2) into a suitable fuel container. Install the hose in the measurement container. IMPORTANT: The engine cranking speed must be more than 150 RPM .
12. Crank the engine for 15 seconds . IMPORTANT: Do not include the fuel from the fuel injection pump return hose in the measurement procedure.
13. Measure the quantity of fuel in the container.
o If there is more than 35 ml (1.2 oz) in the measurement container, go to step 19.
o If there is less than 35 ml (1.2 oz) in the measurement container, replace the fuel injection pump. Refer to Fuel Injection Pump Replacement. After the replacement, go to step 14.
IMPORTANT: Ensure there are no fuel leaks from moved or changed components while performing this test.
14. Ensure that the engine is still set up as it was in steps 2 through 8.
15. Crank the engine in 15 second intervals, with one minute cooling time between, until fuel starts to flow into the measurement container.
16. Elevate the hose to retain fuel in the hose, and empty the measurement container (2) into a suitable fuel container. Install the hose in the measurement container. IMPORTANT: The engine cranking speed must be more than 150 RPM .
17. Crank the engine for 15 seconds . IMPORTANT: Do not include the fuel from the fuel injection pump return hose in the measurement procedure.
18. Measure the quantity of fuel in the container.
o If there is more than 35 ml (1.2 oz) in the measurement container, go to step 19.
o If there is less than 35 ml (1.2 oz) in the measurement container, go to step 52.
19. Remove the glow plug controller/relay.

20. Remove the fuel line retainers.
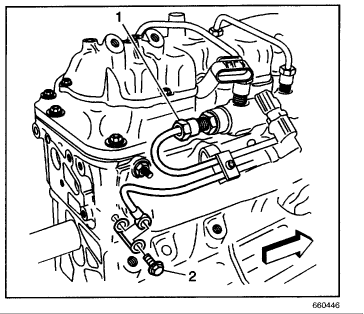
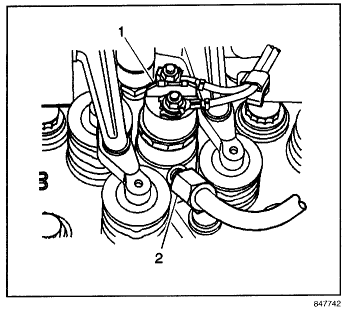
21. Remove the banjo bolt (2) from left rear cylinder head.

22. Install the black hose (1) of the J 45873 to the left rear cylinder head and install the other end of the hose into one of the J 45873 graduated cylinders
23. Remove the banjo bolt (3) from the leak-off block.
1. Were you Referred here from one of the following diagnostics?
o DTC P1094
o Surges/Chuggles in Symptoms
o Rough, Unstable, or Incorrect Idle in Symptoms
o Fuel Injector Balance Test with Tech 2
o If you answered Yes, go to the Fuel Pressure Regulator Graphing after step 55.
o If you answered No, go to Step 2.
2. Remove the air duct from the air cleaner assembly and the turbo inlet.
3. Remove the air intake pipe. Refer to Air Intake Pipe Replacement.
4. Remove the fuel injection pump fuel return rubber hose from the junction block (2). Cap the fitting on the block with a 3/8 inch rubber cap (1) to prevent fuel leakage.
5. Attach a rubber hose (1) with a barbed fitting to the fuel injection pump return hose and insert the other end into a 1 gallon clean fuel container (2).
6. Remove the retaining clip from the fuel return line.
7. Using the J 44581 Fuel Line Disconnect Tool, disconnect the fuel return line from the fuel junction block.
8. Connect a 3/8 inch hose (1) on the fuel return fitting and place the other end of the hose into a 100 ml (3.38 oz) container (2) for measuring liquids.
9. Remove the ignition 1 relay using the J 43244 Relay Puller Pliers.
10. Crank the engine in 15 second intervals, with one minute cooling time between, until fuel starts to flow into the measurement container.
11. Elevate the hose to retain fuel in the hose, and empty the measurement container (2) into a suitable fuel container. Install the hose in the measurement container. IMPORTANT: The engine cranking speed must be more than 150 RPM .
12. Crank the engine for 15 seconds . IMPORTANT: Do not include the fuel from the fuel injection pump return hose in the measurement procedure.
13. Measure the quantity of fuel in the container.
o If there is more than 35 ml (1.2 oz) in the measurement container, go to step 19.
o If there is less than 35 ml (1.2 oz) in the measurement container, replace the fuel injection pump. Refer to Fuel Injection Pump Replacement. After the replacement, go to step 14.
IMPORTANT: Ensure there are no fuel leaks from moved or changed components while performing this test.
14. Ensure that the engine is still set up as it was in steps 2 through 8.
15. Crank the engine in 15 second intervals, with one minute cooling time between, until fuel starts to flow into the measurement container.
16. Elevate the hose to retain fuel in the hose, and empty the measurement container (2) into a suitable fuel container. Install the hose in the measurement container. IMPORTANT: The engine cranking speed must be more than 150 RPM .
17. Crank the engine for 15 seconds . IMPORTANT: Do not include the fuel from the fuel injection pump return hose in the measurement procedure.
18. Measure the quantity of fuel in the container.
o If there is more than 35 ml (1.2 oz) in the measurement container, go to step 19.
o If there is less than 35 ml (1.2 oz) in the measurement container, go to step 52.
19. Remove the glow plug controller/relay.
20. Remove the fuel line retainers.
21. Remove the banjo bolt (2) from left rear cylinder head.
22. Install the black hose (1) of the J 45873 to the left rear cylinder head and install the other end of the hose into one of the J 45873 graduated cylinders
23. Remove the banjo bolt (3) from the leak-off block.
Thread Starter
|
Super Moderator
Joined: Oct 2007
Posts: 14,872
Likes: 764
From: Houston, Tx
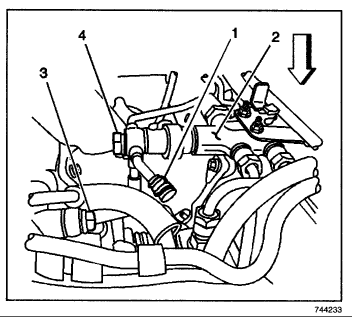
- Install the other black hose (1) of the J 45873 to the leak-off block (2) and install the other end of the hose into another J 45873 graduated cylinders.
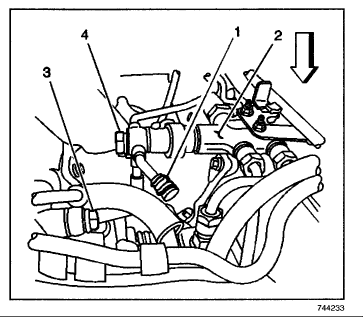
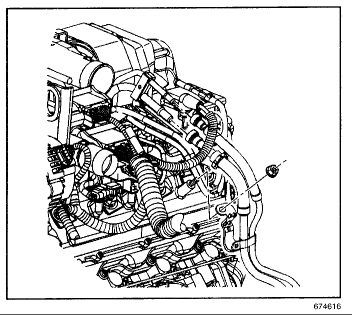
- Remove the banjo bolt (4) from the junction block (2).
- Crank the engine for 15 seconds while observing the fuel pressure relief valve on the junction block for fuel leakage.
-
- If fuel is leaking from the fuel pressure relief valve, replace the fuel pressure relief valve.
- If no fuel is leaking from the fuel pressure relief valve, go to step 27.

- Crank the engine in 15 second intervals, with one minute cooling time between, until fuel starts to flow into one or both of the J 45873 graduated cylinders (1).
- Elevate the hoses (2) to retain the fuel in the hoses, and empty the graduated cylinders into a suitable container.
- Install the hoses (2) into 2 of the graduated cylinders (1). IMPORTANT: The engine cranking speed must be more than 150 RPM .
- Crank the engine for 15 seconds .
- Measure the quantity of fuel in each of the graduated cylinders. If there is a difference of 10 ml or more between the 2 cylinders, remove the valve cover from the bank with the higher volume. If the 2 cylinders are within 10 ml , perform steps 32 through 42 on BOTH banks. IMPORTANT: When the fuel injector pressure lines are removed, debris will fall into the fuel injector inlet fitting. Vacuum the debris from the inlet fitting of the fuel injector
- Remove the return line from injectors.
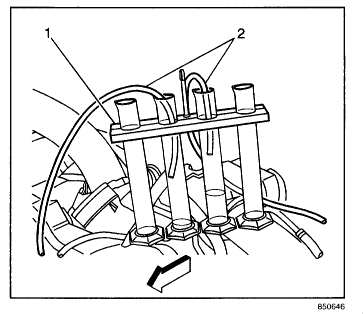
- Install the four yellow hoses (2) from the J 45873 to the injectors (1) and the other end of the hoses into each of the J 45873 graduated cylinders.
- Install the four injector supply lines. Tighten Tighten the supply lines to 44 N.m (32 lb ft) .
- Install the fuel supply hose. Push the hose in until it locks.
- Install the black hoses from the J 45873 into the same container that the fuel injection pump return hose is in. Prime the fuel system 30 times to remove air from the fuel system. Air will be forced out of the system within 2 minutes .
- Crank the engine in 15 second intervals, with one minute cooling time between, until fuel starts to flow into one or more of the graduated cylinders.
- Elevate the four hoses to retain the fuel in the hoses, and empty the 4 graduated cylinders into a suitable container.
- Install the hoses in the graduated cylinders in numerical order. IMPORTANT: The engine cranking speed must be more than 150 RPM .
- Crank the engine for 15 seconds .
- Measure the quantity of fuel in each of the graduated cylinders.
-
- If there is more than 4 ml of fuel flow from any fuel injector(s), replace the high flowing fuel injector(s).
- If no fuel injector has a flow of more than 4 ml, install the valve cover. After installing the valve covers, go to step 43
- Repeat steps 36 through 41 until no fuel injectors have more than 4 ml of fuel flow.
- Were both banks of fuel injectors tested with steps 36 through 42?
-
- If the answer is YES, go to step 52.
- If the answer is NO go to step 44.
- Reassemble the fuel return line and valve cover. Refer to applicable procedures.
- Ensure that the hoses are still installed as they were in steps 22 through 25.
- Prime the fuel system 30 times to remove the air from the fuel system. Air will be forced out of the system within 2 minutes .
- Crank the engine in 15 second intervals, with one minute cooling time between, until fuel starts to flow into one or both of the J 45873 graduated cylinders (1).
- Elevate the hoses (2) to retain the fuel in the hoses, and empty the graduated cylinders into a suitable container.
- Install the hoses (2) into 2 of the graduated cylinders (1). IMPORTANT: The engine cranking speed must be more than 150 RPM .
- Crank the engine for 15 seconds while observing the fuel pressure relief valve for fuel leaks. If the relief valve leaks, replace the relief valve and repeat steps 47 through 50
- Measure the quantity of fuel in each of the graduated cylinders. If there is more than 16 ml of fuel in either of the 2 cylinders, perform steps 36 through 42 on the bank of fuel injectors with the high fuel flow, Then go to step 52. If both of the cylinder have less than 16 ml of fuel, go to step 52.
- Start and idle the engine. You may have to prime the fuel system before the engine will start.
- Connect a scan tool.
- Command the fuel pressure control to 160 MPa with a scan tool.
-
- If the fuel pressure is more than 145 MPa , the system is OK.
- If the fuel pressure is unable to increase to more than 145 MPa , replace the fuel injection pump.
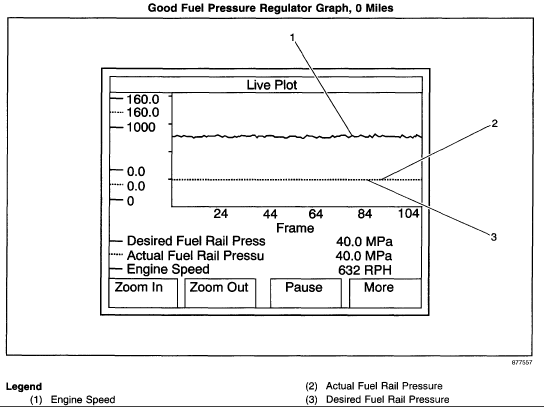
Good Fuel Pressure Regulator Graph, 0 Miles
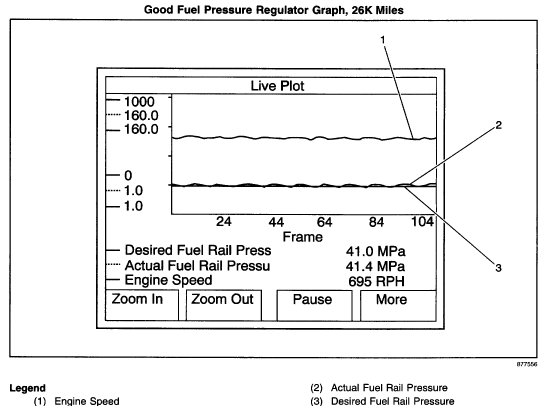
Good Fuel Pressure Regulator Graph, 26K Miles
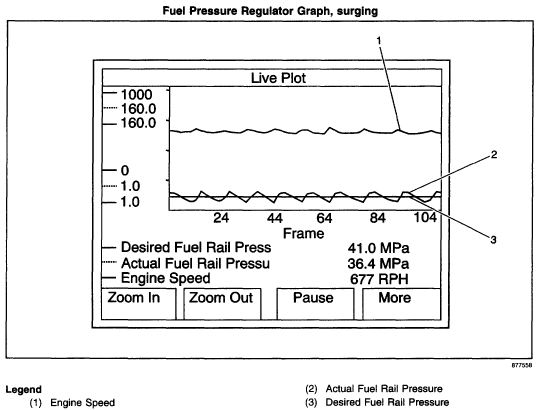
Fuel Pressure Regulator Graph, Surging
- Set up the scan tool in the following format:
- The Engine Speed Min/Max range is 0 to 1000 RPM .
- The Actual Fuel Rail Pressure Min/Max range is 1.0 to 160 MPa .
- The Desired Fuel Rail Pressure Min/Max range is 1.0 to 160 MPa .
- Start and idle the engine.
- Observe the live plot for sharp changes in the Actual Fuel Rail Pressure above and below the Desired fuel rail pressure while performing one of the following actions:
-
- Idling the engine.
- Shifting the transmission from Park to Drive, and back to Park.
- Turning the steering wheel from lock to lock.
- Turning the air conditioning ON and OFF.
- If there is a violent fluctuation in the Actual Fuel Rail pressure, as seen in the third Graphic above, replace the fuel pressure regulator.

Thread
Thread Starter
Forum
Replies
Last Post
RatsMC
Chevy/GMC 6.2L and 6.5L
19
May 4, 2015 05:25 PM


