
PSD Hitch relocation

Thread Starter
|
Diesel Enthusiast
Joined: Dec 2009
Posts: 303
Likes: 7
From: Woodlawn, TN
So finally got around to movin my hitch forward a little bit. As my truck see's some street and towing duty still, I only moved it about 2 1/2 inches, but I had to do something. The factory position loads up the rear end really bad and almost completely takes the weight off my front end.
Just thought I'd share the steps a guy has to take.
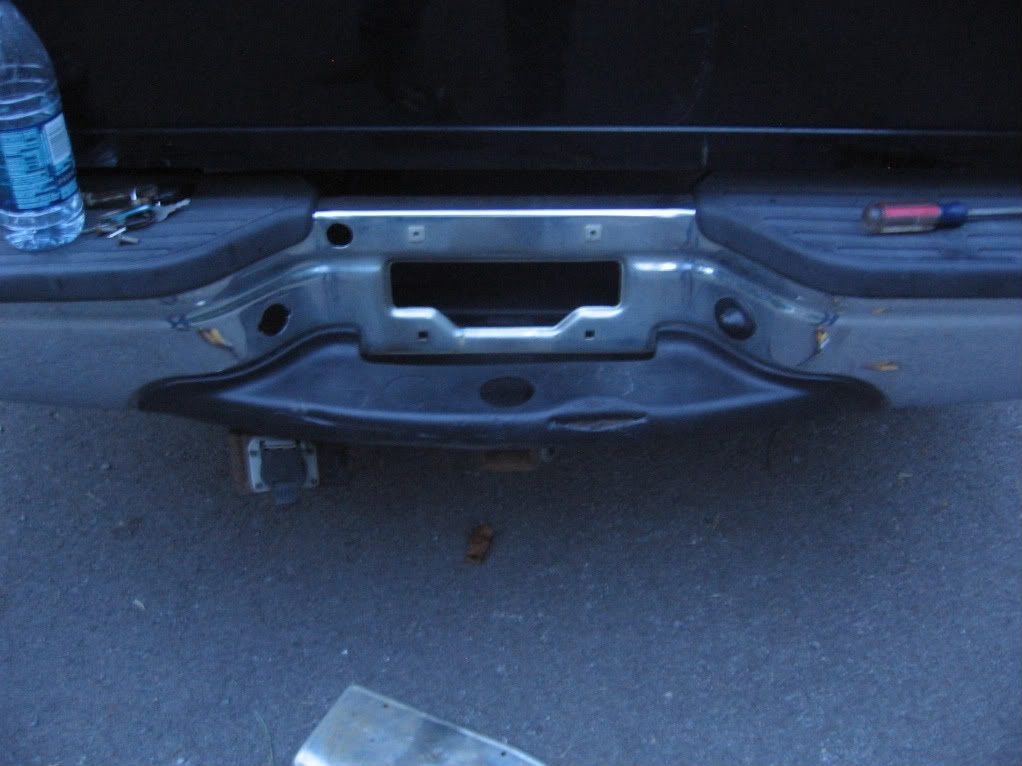
Here is the before picture.

I C-clamped the hitch to the frame, so I didn't have to fight with working around jackstands, and sprayed the hardware down with PB-Blaster before I got started.
If your spare tire is still in the factor bracket, now would be a good time to remove it, while waiting on the PB-Blaster.
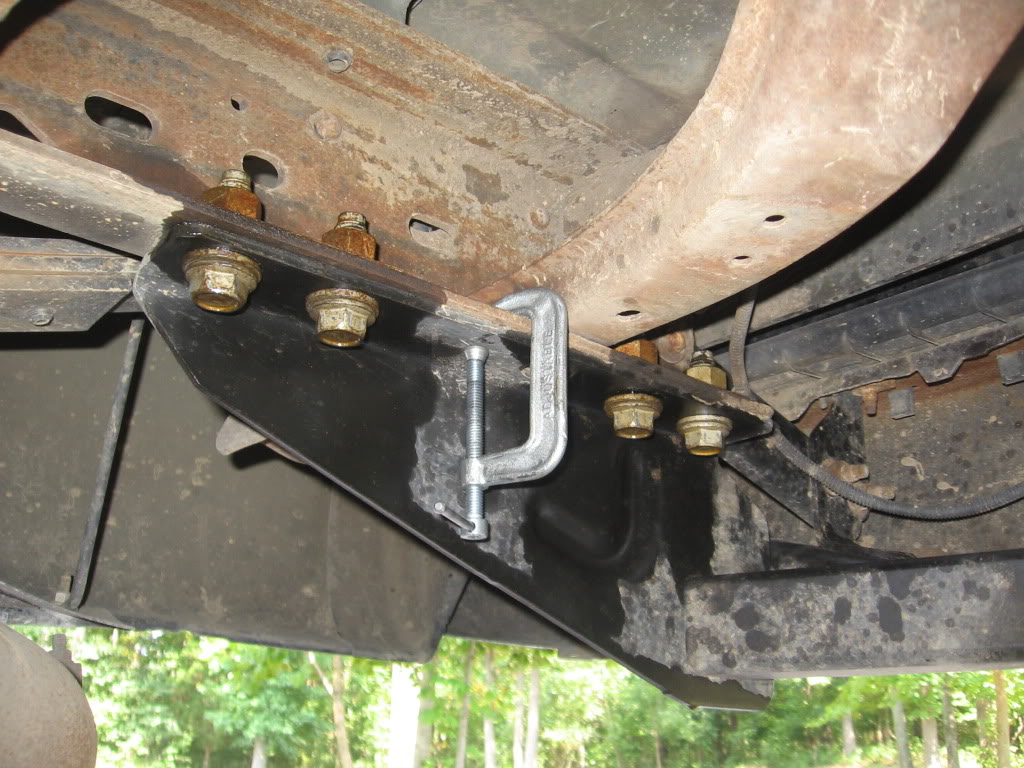
The bolts are 15/16ths, and on top of each set of two is a plate with the nuts welded to it. Quite a bit of torque on these bolts. I had to use the handle off my floorjack to have a long enough cheater to get them started.
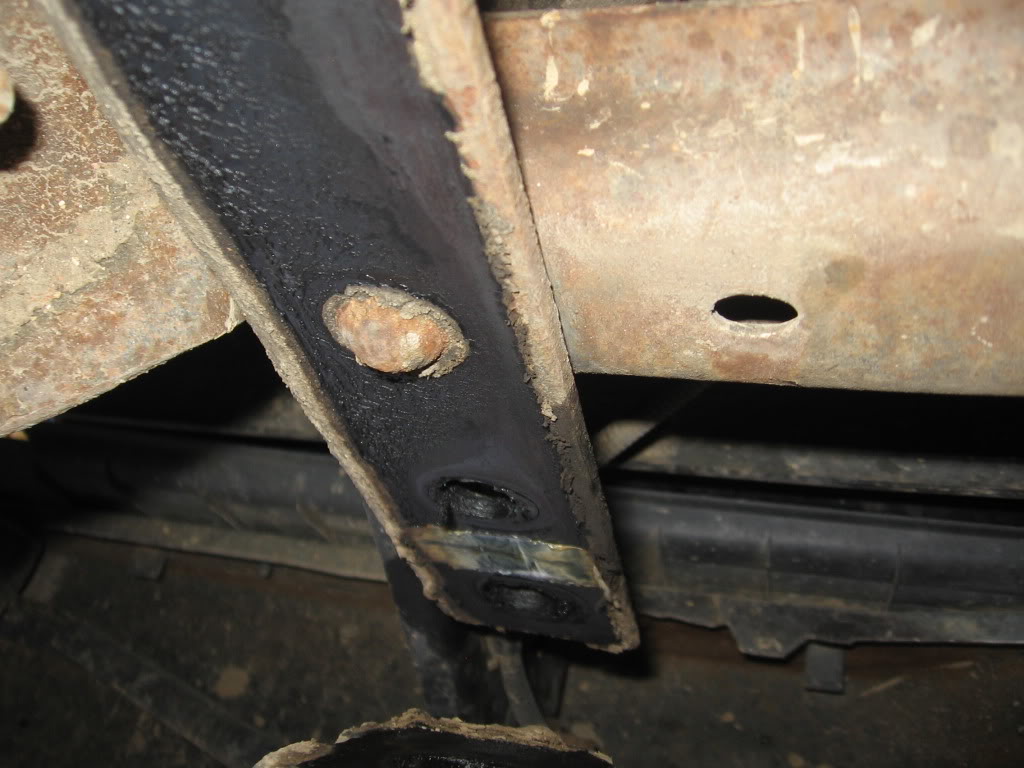
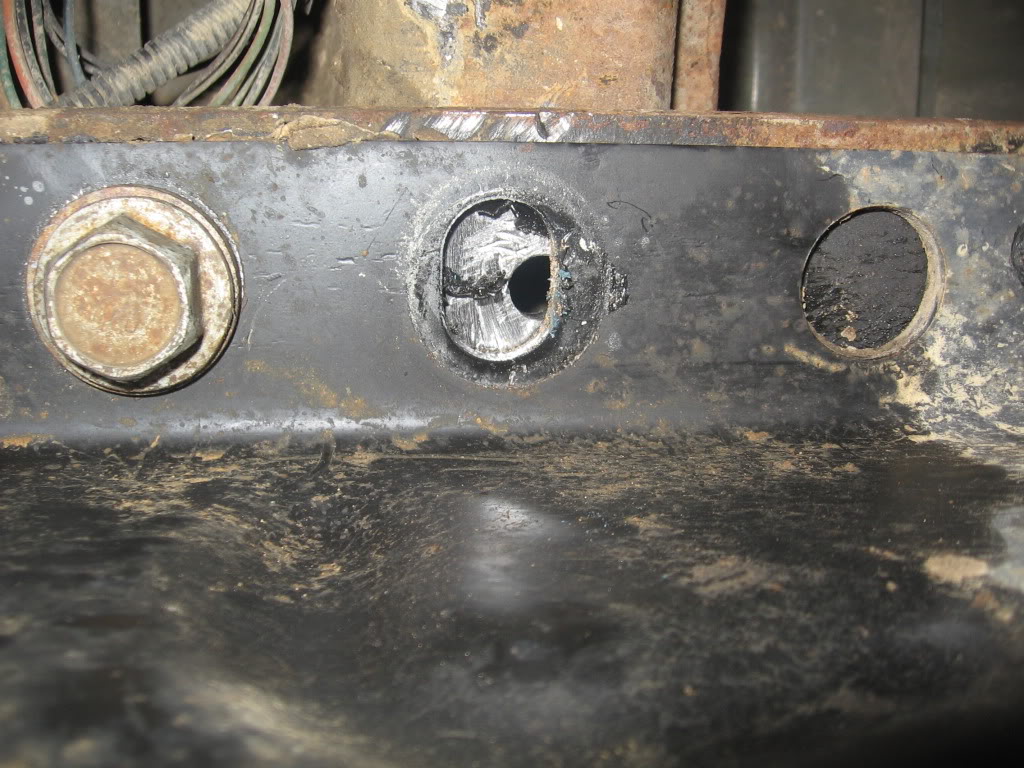
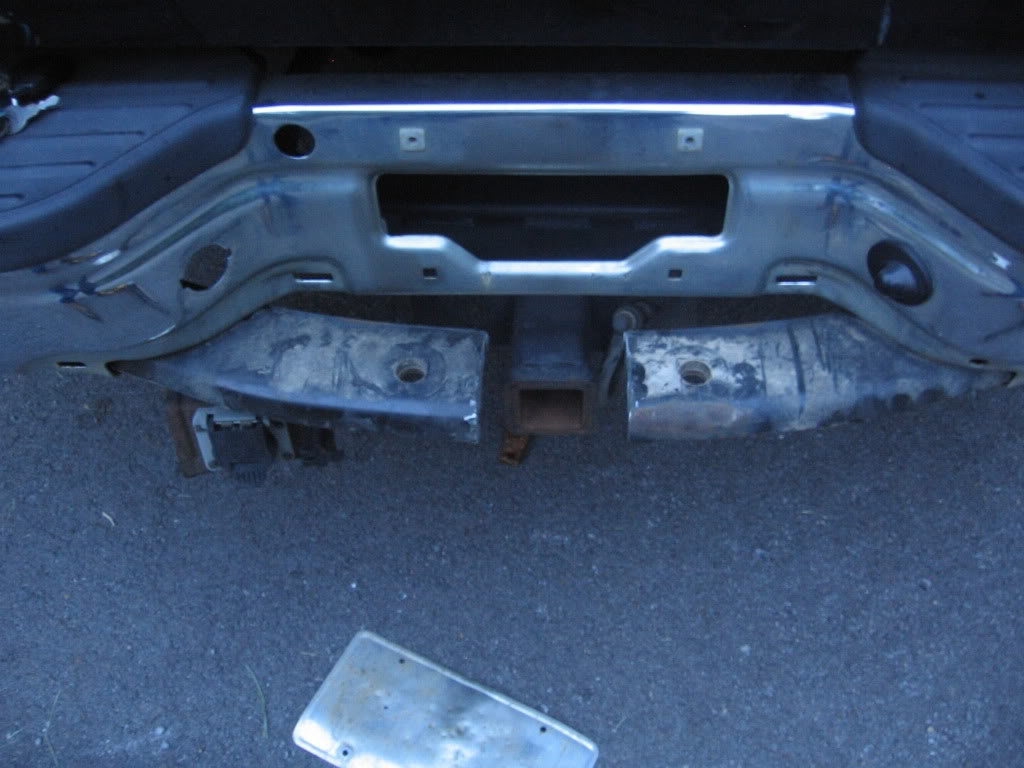
Once all the hardware is removed, drop the C-clamps and hitch and you'll find a large rivet on each frame rail, that the spare tire bracket is secured with. As there is a relief cut in the hitch that'll be moving forward with the hitch, and this is about where your new bolt hole will be, you'll need to remove this rivet. As I said, it's pretty large, so I ground it down close to the frame before drilling, and used a 3/8ths bit to punch the center out.
One the rivet is out of the way, slide your hitch back into place and loosely clamp it back to the frame. I just moved the hitch forward one bolt hole, which amounts to 2 5/8ths inches. Once it's in position, you'll have virgin frame under the forward hole for the front bolt set, and the forward hole of the rear set nearly lines up with the hole from the rivet you've removed. Installing a couple of bolts into the hitch at this point will give you a good template to drill your holes through, and will keep everything lined up.
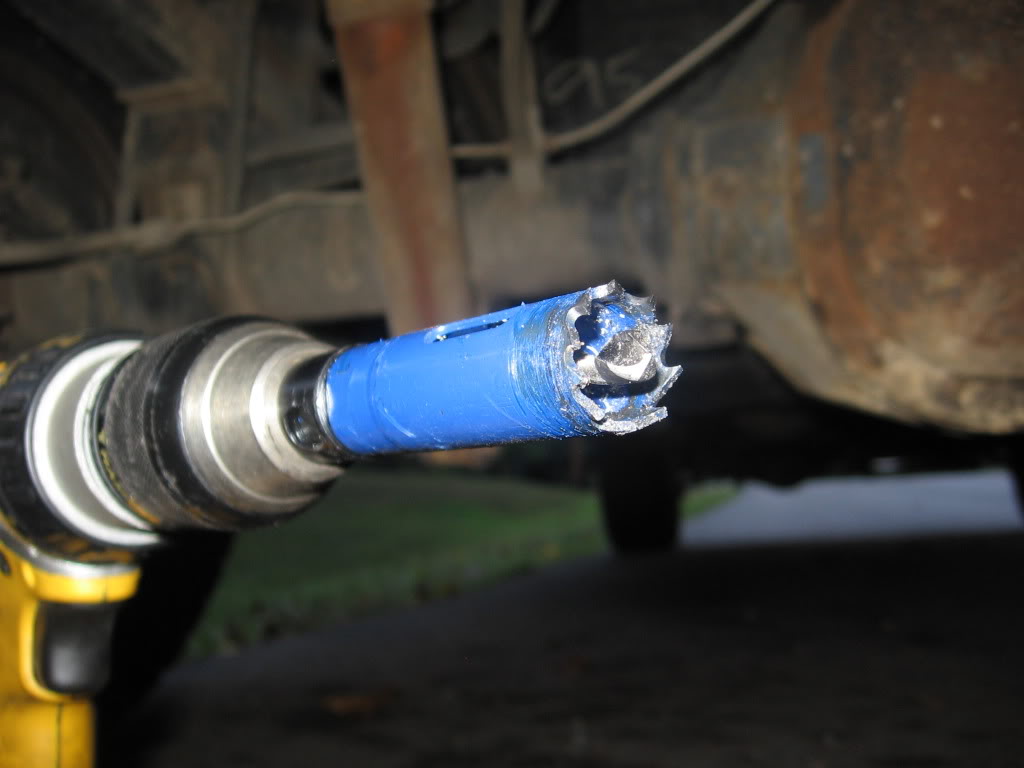
To drill the holes, I used a metal capable 3/4" hole saw. Whichever bit you find yourself using, you're not gonna want to go bigger than 3/4. In my case I needed to remove the drill bit from the center of the hole saw, as it was trying to bind against the old rivet hole when I drilled the rear holes. As your hitch is in place the hole saw won't need that center bit anyway, the hitch will hold you in place.
Now as we can see in this picture...
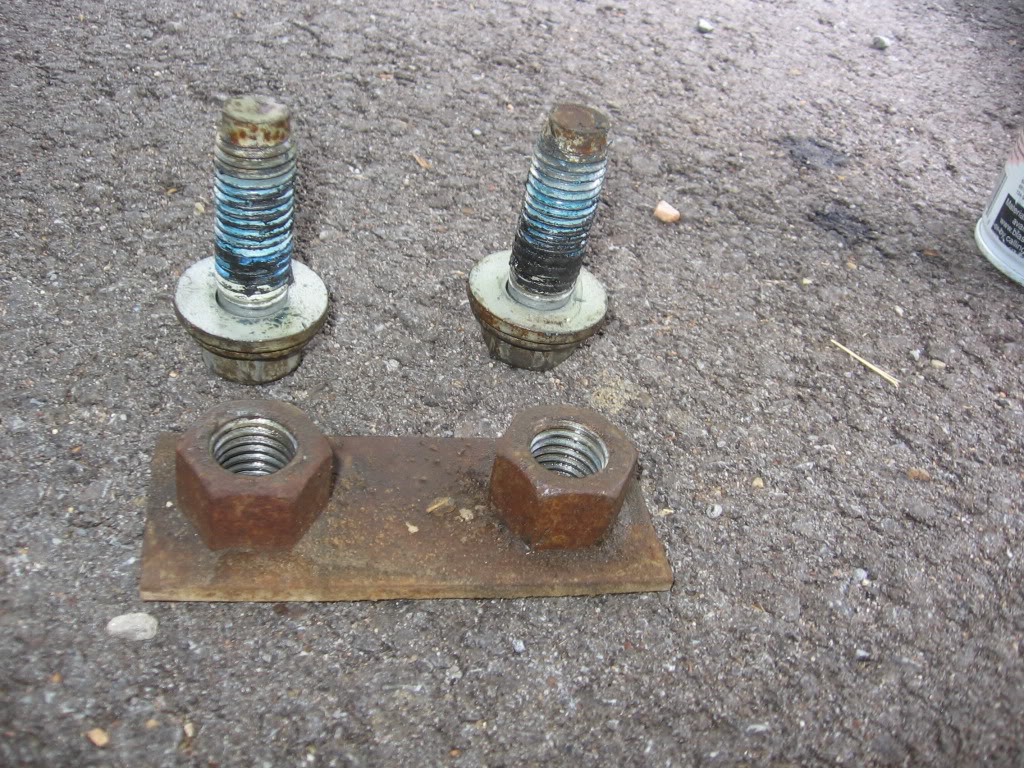
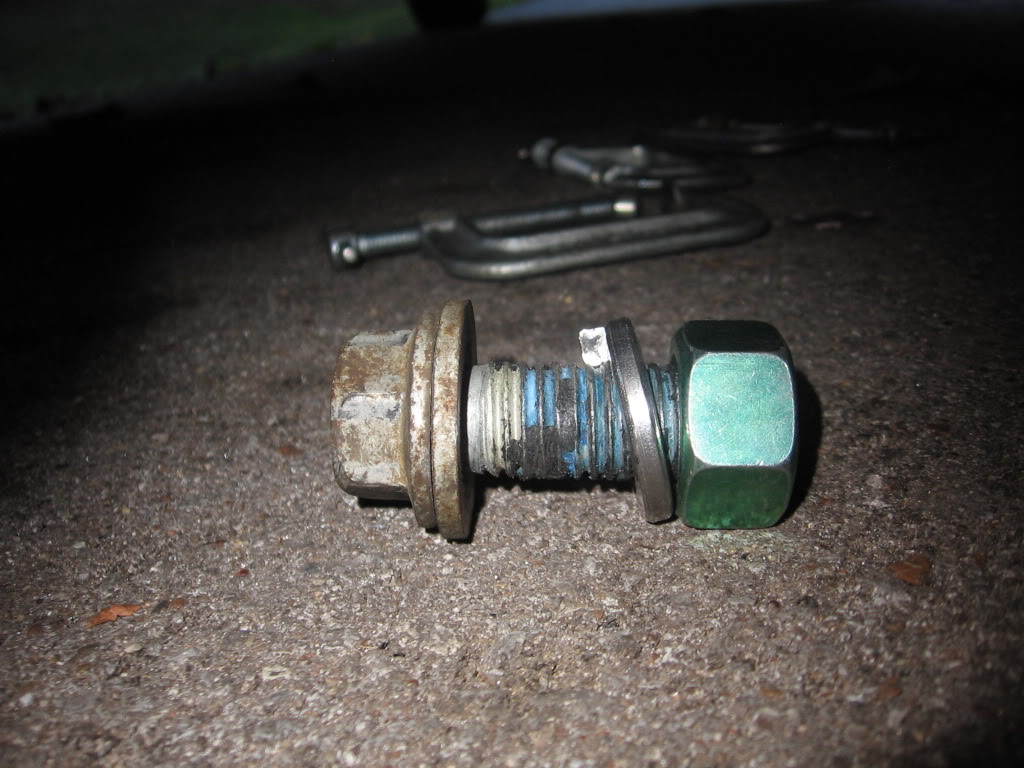
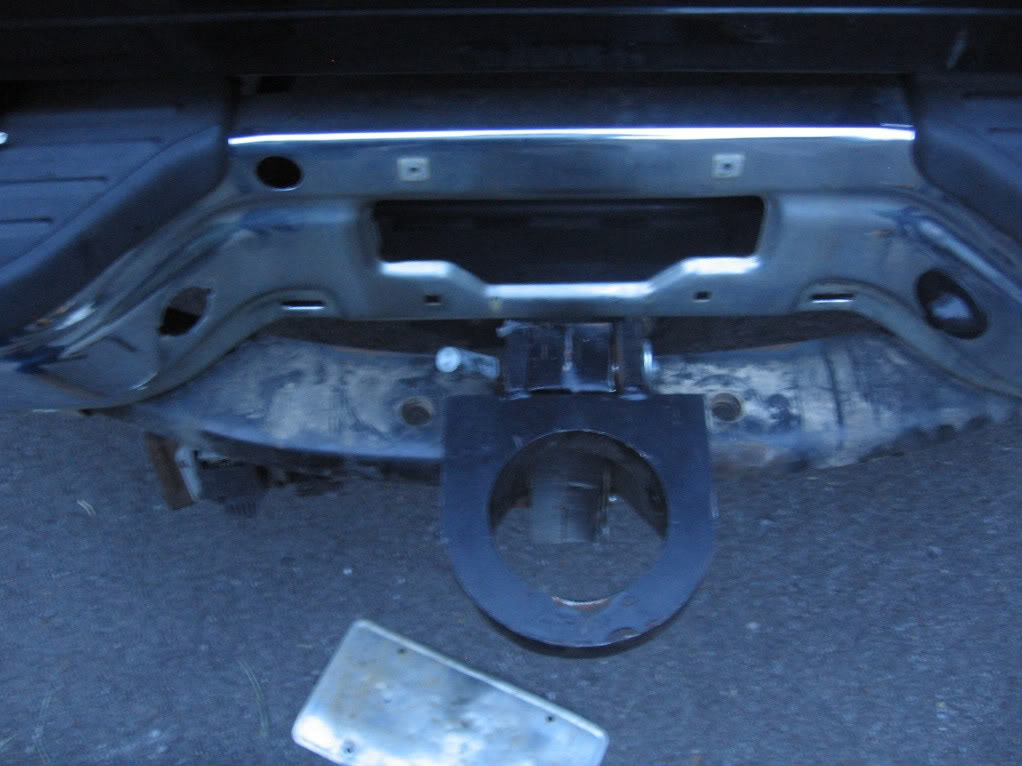
The forward bolt set will reuse the factory nutplate, but the arm from the spare tire carrier will not allow us to span the rear bolt set's bolt holes with the factory nut plate. I retained the nutplate on the back bolt of the rear set, and placed a nut on the forward bolt of the rear set. The nut will need to be a 3/4" coarse #10 thread. (take a bolt to the hardware store with you to be sure). Nut size I picked up took a 1 1/8th deepwell socket. Also place a lock washer between the nut and spare tire carrier arm, as you now have a bolt through multiple layers of unjoined steel, and the nut will want to back off.
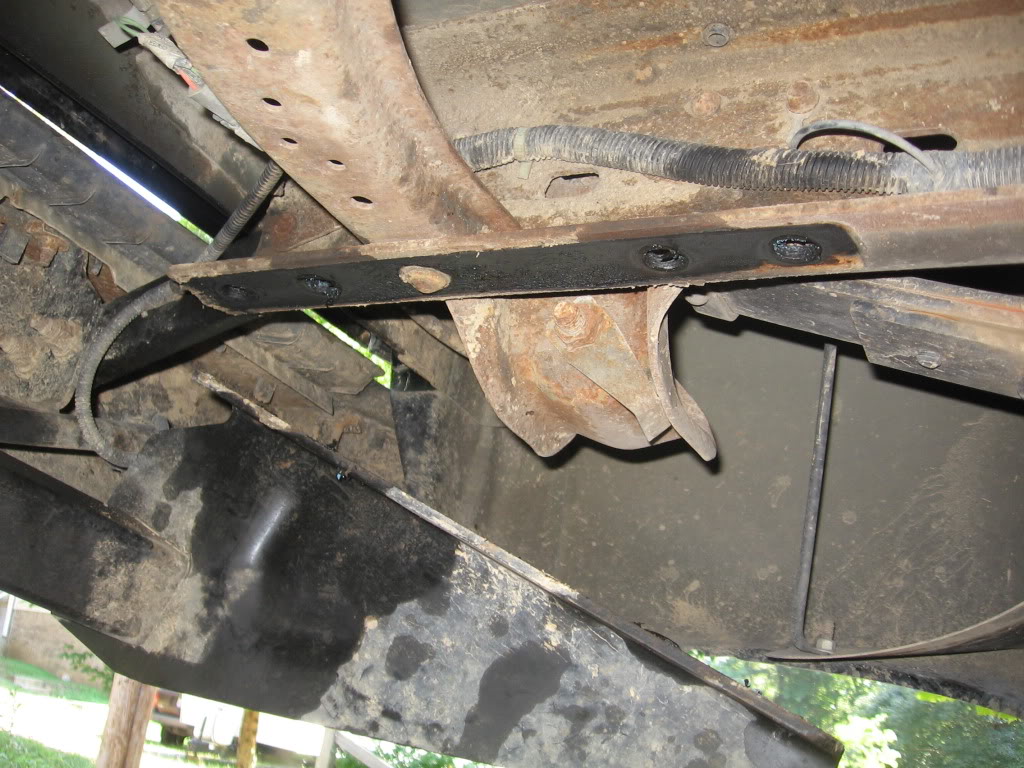
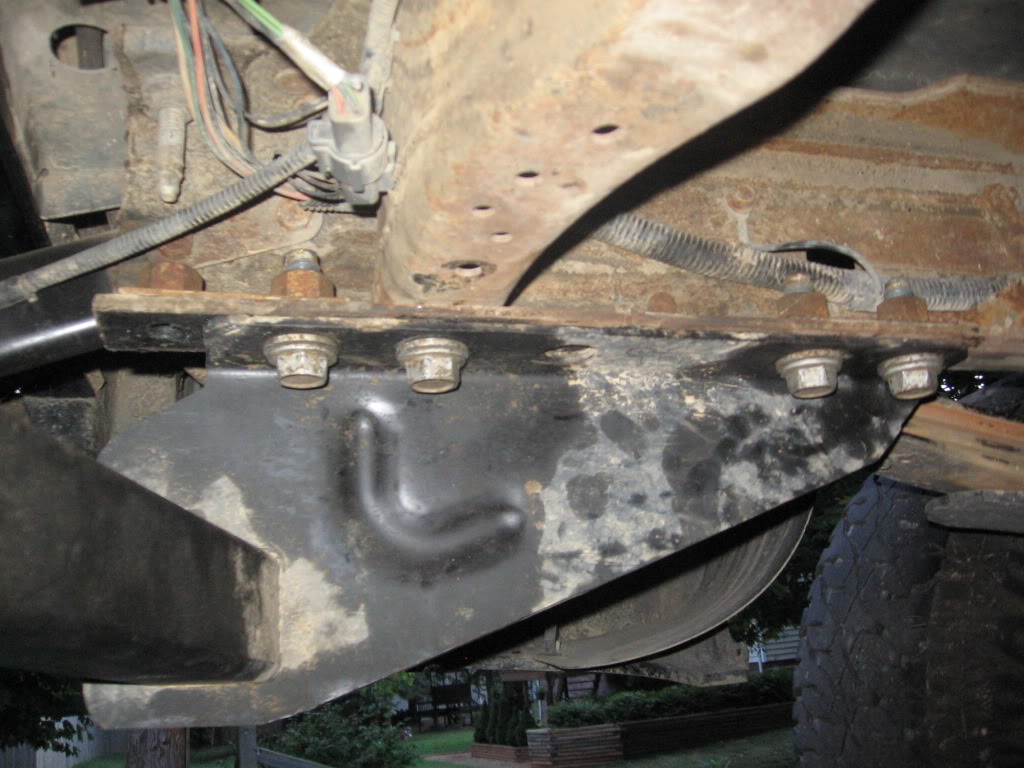
Once everything is bolted back into place, and heavily torqued, this is what you should see.
You're done under the truck. Your hitch assembly is now 2 5/8" forward of the factory location
If you need more than this I'd recommend removing the receiver portion from the hitch, moving it forward until it's flush with the cross-beam and rewelding it. The receiver portion protrudes a good 4" back from the cross-beam of the hitch. Moving the receiver portion forward on the beam will also help easy the load on the beam. This will probably be my next step once I remove the bumper and install a roll pan. For now, it's functionally balanced between street truck and pulling.
Now, depending on your pulling hitch, you'll need to trim the back bumper before you can install it. You won't need to trim anything to install a regular trailer hitch, but the vertical arm found on most pulling hitches won't clear the center section of the bumper.
This is where I got a little redneck, but since my factory rear bumper is a cosmetic piece at best, I'm not to worried about it. Plus if the trimming is done this way, it can be hidden very easily.
There is a single piece of plastic covering the steel on the center section, grab it from under the bumper at one end, and gently and firmly pull strait back, then repeat on the other side. It will "un-clip" from the bumper and pull right off.
Once you've removed the plastic, pick your favorite cutting tool, and go to work. I opted to cut through the center section completely, so I will be able to utilize a closer fitting hitch than this one, without anymore trimming. Just make sure you mark the width and approximate the depth before you begin.
Now that you've removed the steel, install your hitch, and go PLAY!!!
Once you're done playing, clip the plastic piece you removed earlier, back over the center section. And this will completely hide the redneck cutting that has taken place on your rear bumper.
So, once again...
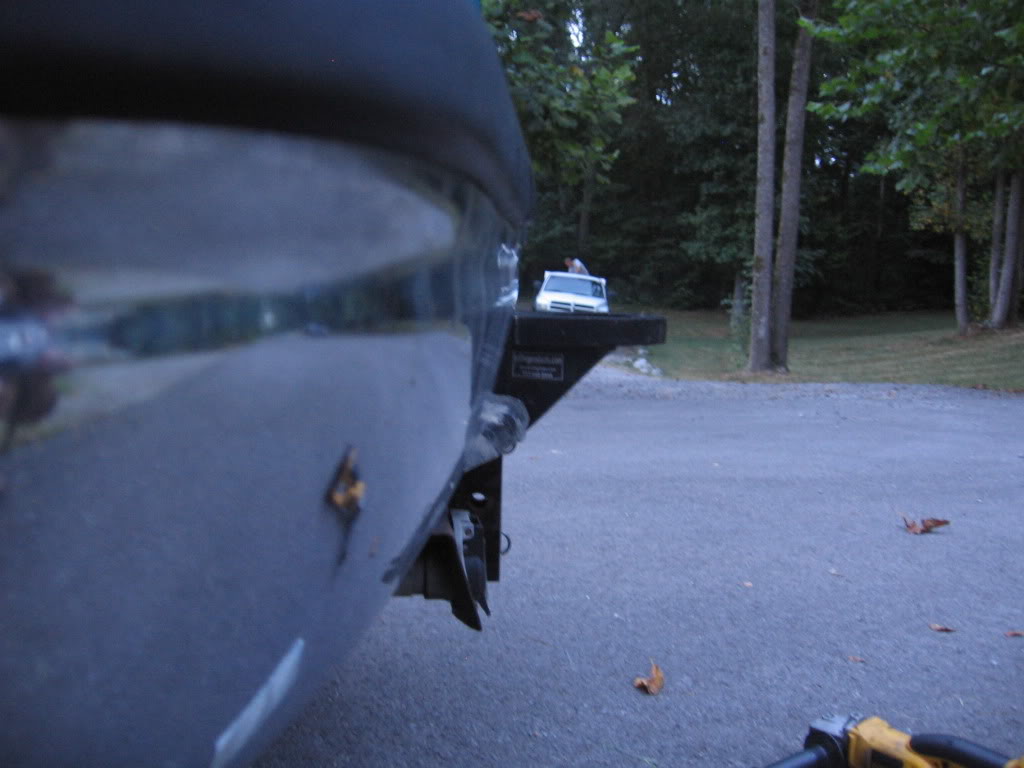
Before
And after
To recap the tools you'll need.
A quality drill.
A quality grinder.
1/2" drive ratchet.
15/16" socket.
1 1/8" deepwell socket or end-wrench.
Long cheater bar.
3/8" drill bit.
3/4" drill bit/hole saw.
C-clamps (2 each).
Safety glasses. :thumb:
You'll need to buy (2) #10 coarse 3/4" nuts and (2) 3/4" lockwashers. Buy (4) of each if you plan to discard the factory nut plate on the rear bolt set.
Just thought I'd share the steps a guy has to take.
Here is the before picture.
I C-clamped the hitch to the frame, so I didn't have to fight with working around jackstands, and sprayed the hardware down with PB-Blaster before I got started.
If your spare tire is still in the factor bracket, now would be a good time to remove it, while waiting on the PB-Blaster.
The bolts are 15/16ths, and on top of each set of two is a plate with the nuts welded to it. Quite a bit of torque on these bolts. I had to use the handle off my floorjack to have a long enough cheater to get them started.
Once all the hardware is removed, drop the C-clamps and hitch and you'll find a large rivet on each frame rail, that the spare tire bracket is secured with. As there is a relief cut in the hitch that'll be moving forward with the hitch, and this is about where your new bolt hole will be, you'll need to remove this rivet. As I said, it's pretty large, so I ground it down close to the frame before drilling, and used a 3/8ths bit to punch the center out.
One the rivet is out of the way, slide your hitch back into place and loosely clamp it back to the frame. I just moved the hitch forward one bolt hole, which amounts to 2 5/8ths inches. Once it's in position, you'll have virgin frame under the forward hole for the front bolt set, and the forward hole of the rear set nearly lines up with the hole from the rivet you've removed. Installing a couple of bolts into the hitch at this point will give you a good template to drill your holes through, and will keep everything lined up.
To drill the holes, I used a metal capable 3/4" hole saw. Whichever bit you find yourself using, you're not gonna want to go bigger than 3/4. In my case I needed to remove the drill bit from the center of the hole saw, as it was trying to bind against the old rivet hole when I drilled the rear holes. As your hitch is in place the hole saw won't need that center bit anyway, the hitch will hold you in place.
Now as we can see in this picture...
The forward bolt set will reuse the factory nutplate, but the arm from the spare tire carrier will not allow us to span the rear bolt set's bolt holes with the factory nut plate. I retained the nutplate on the back bolt of the rear set, and placed a nut on the forward bolt of the rear set. The nut will need to be a 3/4" coarse #10 thread. (take a bolt to the hardware store with you to be sure). Nut size I picked up took a 1 1/8th deepwell socket. Also place a lock washer between the nut and spare tire carrier arm, as you now have a bolt through multiple layers of unjoined steel, and the nut will want to back off.
Once everything is bolted back into place, and heavily torqued, this is what you should see.
You're done under the truck. Your hitch assembly is now 2 5/8" forward of the factory location
If you need more than this I'd recommend removing the receiver portion from the hitch, moving it forward until it's flush with the cross-beam and rewelding it. The receiver portion protrudes a good 4" back from the cross-beam of the hitch. Moving the receiver portion forward on the beam will also help easy the load on the beam. This will probably be my next step once I remove the bumper and install a roll pan. For now, it's functionally balanced between street truck and pulling.
Now, depending on your pulling hitch, you'll need to trim the back bumper before you can install it. You won't need to trim anything to install a regular trailer hitch, but the vertical arm found on most pulling hitches won't clear the center section of the bumper.
This is where I got a little redneck, but since my factory rear bumper is a cosmetic piece at best, I'm not to worried about it. Plus if the trimming is done this way, it can be hidden very easily.
There is a single piece of plastic covering the steel on the center section, grab it from under the bumper at one end, and gently and firmly pull strait back, then repeat on the other side. It will "un-clip" from the bumper and pull right off.
Once you've removed the plastic, pick your favorite cutting tool, and go to work. I opted to cut through the center section completely, so I will be able to utilize a closer fitting hitch than this one, without anymore trimming. Just make sure you mark the width and approximate the depth before you begin.
Now that you've removed the steel, install your hitch, and go PLAY!!!
Once you're done playing, clip the plastic piece you removed earlier, back over the center section. And this will completely hide the redneck cutting that has taken place on your rear bumper.
So, once again...
Before
And after
To recap the tools you'll need.
A quality drill.
A quality grinder.
1/2" drive ratchet.
15/16" socket.
1 1/8" deepwell socket or end-wrench.
Long cheater bar.
3/8" drill bit.
3/4" drill bit/hole saw.
C-clamps (2 each).
Safety glasses. :thumb:
You'll need to buy (2) #10 coarse 3/4" nuts and (2) 3/4" lockwashers. Buy (4) of each if you plan to discard the factory nut plate on the rear bolt set.
Diesel Enthusiast
Joined: Jan 2009
Posts: 144
Likes: 6
From: Morgantown WV
Looks good. You can move it a lot more if you take the bumper off. Use the front holes on the frame for the rear holes in the hitch. Then drill the frame for the front holes. Moves it like eleven inches.
Thread Starter
|
Diesel Enthusiast
Joined: Dec 2009
Posts: 303
Likes: 7
From: Woodlawn, TN
I'll have to go look again, but I'm thinkin if I go that much forward with the hitch I'd be cutting something else out of the way that I didn't want to. If not, I suppose a guy that doesn't tow might as well.

Diesel Wrench
Joined: Mar 2010
Posts: 512
Likes: 22
Nice! Wonder how much difference that will make? Been considering doing this to my truck, but I want a more substantial difference, like 10" or so,  . Just not sure how the hitch would work for normal towing on the street...
. Just not sure how the hitch would work for normal towing on the street...
Thread Starter
|
Diesel Enthusiast
Joined: Dec 2009
Posts: 303
Likes: 7
From: Woodlawn, TN
Yeah, once I have a roll pan it'll go way up under there.
The only reason I moved it that little bit, was to try to get something out of it, and I didn't feel like cuttin off the exhaust hangars. I still have full length exhaust.
And I don't know if it'll make much difference. Sometimes you just gotta tweak stuff a little.
If I'd have known I was gonna have that much fun though, I probably woulda waited 'til I had a roll pan and another truck to tow with.

Thread
Thread Starter
Forum
Replies
Last Post
dajain
Diesel In Distress - Support Ticket
4
Mar 20, 2015 01:24 PM


