
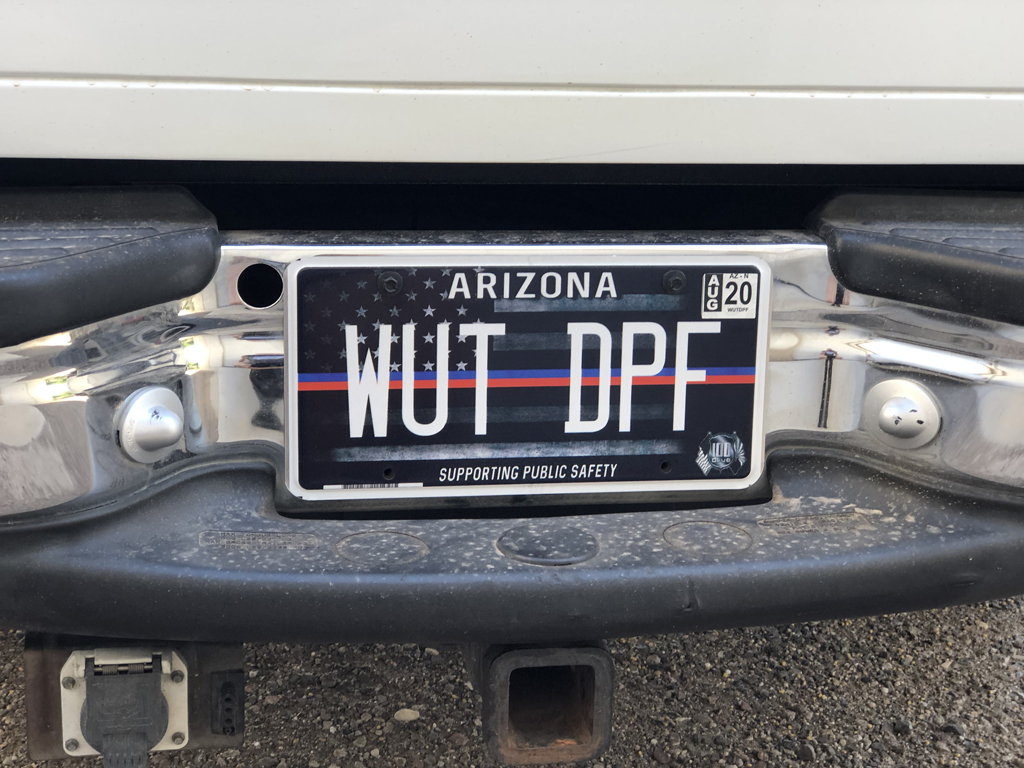
Project: WUT DPF


With growth in business, the addition of employees, changes in what I needed to do every day...and sadly with the prevalence of FB and IG...I've mostly been away from the forums for a while. Now that I've gone back to my roots in this industry with a 2000 7.3L project, it seemed fitting to come back to the forums that got me hooked on this stuff to begin with. Kind of a "full circle" thing I guess. Personally, I hate Facebook for truck stuff, the forums will always be more functional and useful, even if they are not the way of the future.
The Readers Digest version, getting hassled by the EPA when we had stayed as far away from all the "d*l*t*" stuff as possible pissed me off...enough to sell my 2017 F450 and go "old school". Losing the NHRDA and selling my 7.3L race truck certainly left me with the itch to work on something, and it wasn't going to have a bunch of emissions BS. I knew I wanted to do a lowered street build, and managed to find a pretty clean 175k mile 2000 F250 CC 2WD out of TX (maybe someone here will recognize it). With that, project WUT DPF was born.
The truck came to me with:
"USA" Turbocharger (horribly laggy)
Unknown Fuel System (DI maybe?, old for sure)
Very Old FASS HD pump
Sniper Chip
AFE Stage II Intake Kit
Banks Power Elbow and 4" Exhaust
ISSPRO Gauges
Bunch of Modified Wiring (engine, headlights, etc)
Stock Lariat Wheels with BFG ATs
Welded in Gooseneck and Receiver Hitches (grrrr!)
2005+ Nose Conversion and Reflexxion Cowl Hood
Backflip Tonneau Cover
Here are some "as received" pictures:
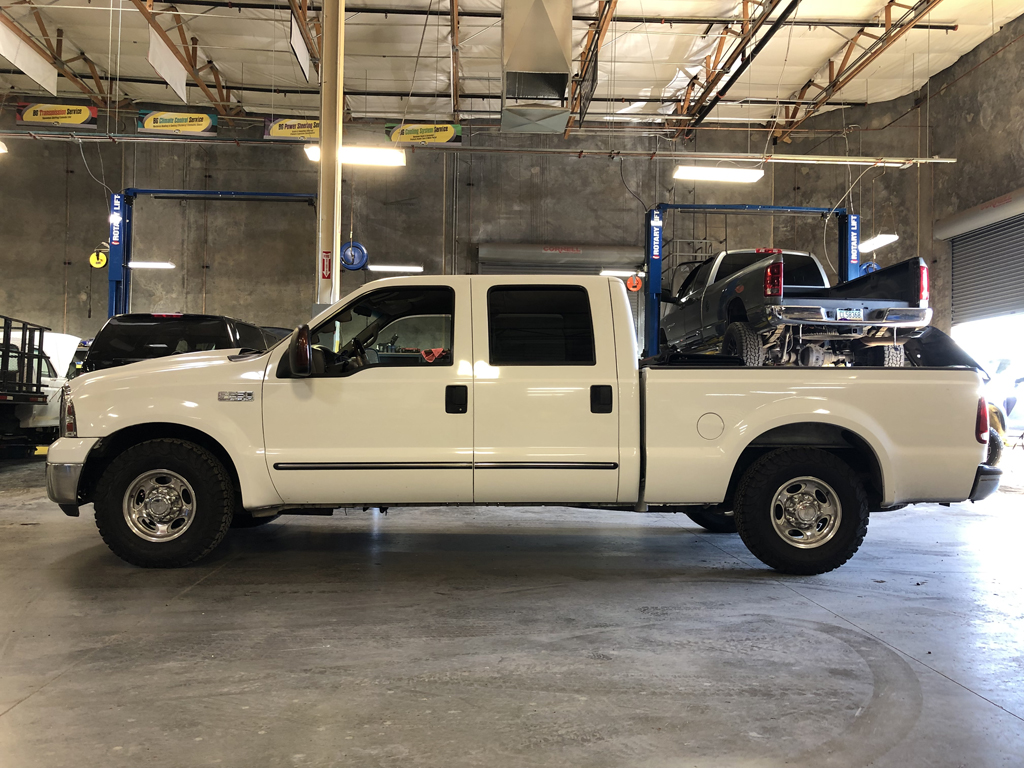
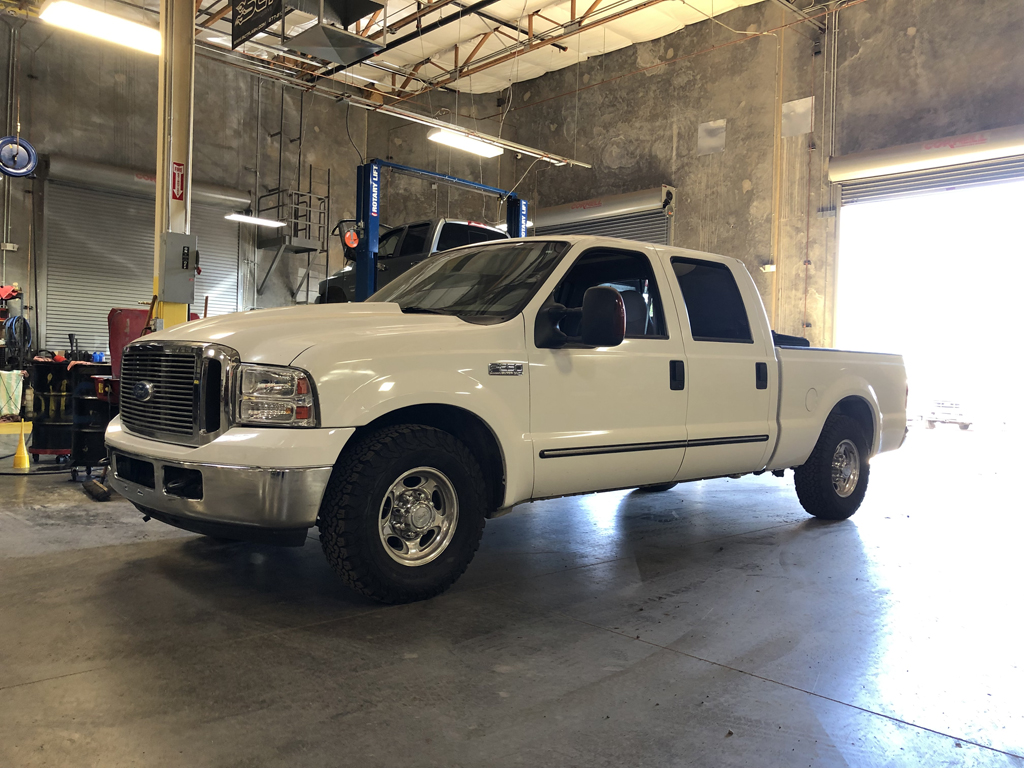
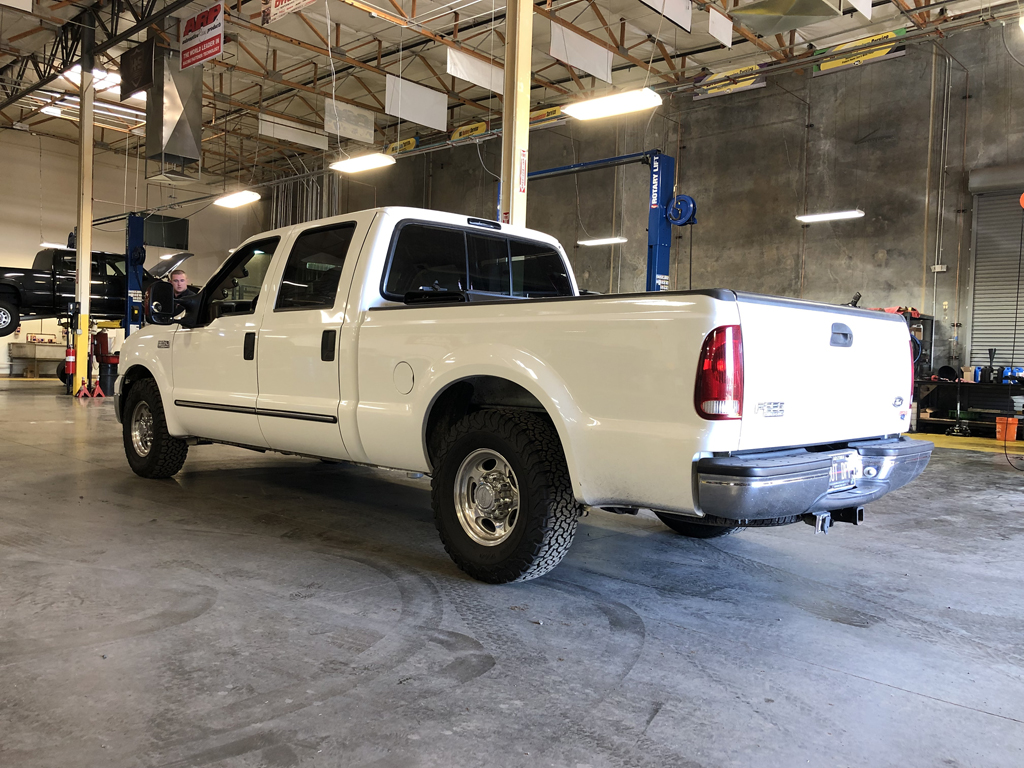
The outside of the truck shows 20 years and 176k miles of driving. It is dirty underneath, there are small dents in the sheet metal, the paint is not great...pretty much what you would expect. I bought the truck because the interior was really clean for its age (from what I could tell in the pictures), and so far I haven't been too disappointed. The engine did have a noticeable miss when cold, which was significantly improved with a BG oil treatment and bottle of HSS Stiction Eliminator (enough of a bandaid to tolerate driving it for a while). The trans shifts extremely hard, and I'm not 100% certain why, but we did find 2 broken springs in the valve body that have been fixed (but it hasn't driven yet). Overall, it will be a solid base for a "restoration/modification" project.
I will do follow-up posts by category of work (to get caught up) and then try to be better about making update posts more often. Going to try to spend more time here too...
The Readers Digest version, getting hassled by the EPA when we had stayed as far away from all the "d*l*t*" stuff as possible pissed me off...enough to sell my 2017 F450 and go "old school". Losing the NHRDA and selling my 7.3L race truck certainly left me with the itch to work on something, and it wasn't going to have a bunch of emissions BS. I knew I wanted to do a lowered street build, and managed to find a pretty clean 175k mile 2000 F250 CC 2WD out of TX (maybe someone here will recognize it). With that, project WUT DPF was born.
The truck came to me with:
"USA" Turbocharger (horribly laggy)
Unknown Fuel System (DI maybe?, old for sure)
Very Old FASS HD pump
Sniper Chip
AFE Stage II Intake Kit
Banks Power Elbow and 4" Exhaust
ISSPRO Gauges
Bunch of Modified Wiring (engine, headlights, etc)
Stock Lariat Wheels with BFG ATs
Welded in Gooseneck and Receiver Hitches (grrrr!)
2005+ Nose Conversion and Reflexxion Cowl Hood
Backflip Tonneau Cover
Here are some "as received" pictures:
The outside of the truck shows 20 years and 176k miles of driving. It is dirty underneath, there are small dents in the sheet metal, the paint is not great...pretty much what you would expect. I bought the truck because the interior was really clean for its age (from what I could tell in the pictures), and so far I haven't been too disappointed. The engine did have a noticeable miss when cold, which was significantly improved with a BG oil treatment and bottle of HSS Stiction Eliminator (enough of a bandaid to tolerate driving it for a while). The trans shifts extremely hard, and I'm not 100% certain why, but we did find 2 broken springs in the valve body that have been fixed (but it hasn't driven yet). Overall, it will be a solid base for a "restoration/modification" project.
I will do follow-up posts by category of work (to get caught up) and then try to be better about making update posts more often. Going to try to spend more time here too...
After some basic maintenance and a good looking over, I decided to start with the lowering kit. I knew the truck would be down for a bit for this, but I didn't know that my **** retentive, OCD, jackass self would kick in so badly. What was supposed to just be an installation of a DJM 3/5 drop kit snowballed into months of work. It still isn't on the road yet, but I'm happy with how this has gone so far. The rest of this story will be told in pictures with captions...see below!

Decided that doing the back would be easier with the bed removed. What isn't shown, because I forgot to take the "before" picture, is the goofy pop-up gooseneck hitch that left a gigantic hole in the bed. The hitch was bolted to two very large and heavy braces that were welded across the frame. Once the bed was off, removing that crap became the priority. Then after that was gone, I realized what 20 years of dirt and grime look like, I realized that the receiver hitch was welded in (scary if you ask me) and it just took off from there.

Here you can see the axle, leaf springs, brake lines and e-brake cables removed. The next step was knocking all of the rivets off for the front leaf spring hangers, rear leaf spring hangers and shock mounts. I also backpulled the wiring harness so the frame was totally bare. The bumper was removed, the welded receiver hitch cut off and the whole frame cleaned and prepped. What happened to just installing the lowering kit?

Frame painted, finally starting to feel like I'm moving in the right direction.

DJM Front Hangers, OE Rear Hangers, DJM Rear Shackles and Brand New OE Leaf Springs Installed...progress!

DJM Front Hangers (in "lowest" position)

DJM Rear Shackles (in "lowest" position)

99% done with all new brakes, new bearings, new 3.55 gears, 08-10 finned diff cover, Helwig sway bar, Curt Class V hitch, new spare tire hoist and a new Curt trailer plug.
Now...on to the front...
Decided that doing the back would be easier with the bed removed. What isn't shown, because I forgot to take the "before" picture, is the goofy pop-up gooseneck hitch that left a gigantic hole in the bed. The hitch was bolted to two very large and heavy braces that were welded across the frame. Once the bed was off, removing that crap became the priority. Then after that was gone, I realized what 20 years of dirt and grime look like, I realized that the receiver hitch was welded in (scary if you ask me) and it just took off from there.
Here you can see the axle, leaf springs, brake lines and e-brake cables removed. The next step was knocking all of the rivets off for the front leaf spring hangers, rear leaf spring hangers and shock mounts. I also backpulled the wiring harness so the frame was totally bare. The bumper was removed, the welded receiver hitch cut off and the whole frame cleaned and prepped. What happened to just installing the lowering kit?
Frame painted, finally starting to feel like I'm moving in the right direction.
DJM Front Hangers, OE Rear Hangers, DJM Rear Shackles and Brand New OE Leaf Springs Installed...progress!
DJM Front Hangers (in "lowest" position)
DJM Rear Shackles (in "lowest" position)
99% done with all new brakes, new bearings, new 3.55 gears, 08-10 finned diff cover, Helwig sway bar, Curt Class V hitch, new spare tire hoist and a new Curt trailer plug.
Now...on to the front...
I wasn't ready to pull the cab, so the front of the truck wasn't getting the "clean and paint" level of work that the back did. At some point the cab will come off so I can do the engine, and the rest of the frame. For now, the front just got the suspension and I had to fight my OCD every step of the way.

Looks funny with no front suspension!

New OE Radius Arms and DJM 3" Drop I-Beams Installed

New OE Coil Springs and DJM Shocks Installed
Don't know why, but I stopped taking pictures after the above. The front end also got all new OE steering linkage and ball joints as well. The spindles were fine, but they got all new bearings, seals and brakes like the rear.

First time on the ground in almost 3 months.
Time to move on to the engine!
Looks funny with no front suspension!
New OE Radius Arms and DJM 3" Drop I-Beams Installed
New OE Coil Springs and DJM Shocks Installed
Don't know why, but I stopped taking pictures after the above. The front end also got all new OE steering linkage and ball joints as well. The spindles were fine, but they got all new bearings, seals and brakes like the rear.
First time on the ground in almost 3 months.
Time to move on to the engine!
It's in my plans to do an engine build, but I don't have time for that right now. I just needed to get the engine running good enough to daily drive and clean up some stuff I didn't care for. Of course, like everything, I could have done just what was "needed", but that's now how my stupid brain works.

Removed AFE Stage II
Removed "USA" Turbo with Banks Power Elbow (and rest of rusty exhaust...my OCD doesn't like rust)
Removed Leaky Modified OE Turbo Pedestal
Removed Modified and Greasy Intake "Spider"
Removed Unknown Regulated Return
Removed Injectors (half stamped "reman", several not working well)
Removed Glow Plugs
Removed Mismatched Batteries
Removed Squished/Rubbed Modified Headlight Wiring
Removed FASS HD Pump and Wiring
Removed Modified Engine Wiring Harness
Removed Unknown Age UVC Gaskets and Harnesses

Installed Modified Stock Turbo (from my old Race Truck PMR Motor)
- Rebuilt with 360� Thrust Bearing and 7x7 Billet Wheel
- Banks 1.0 Turbine Housing with Wastegate
- Original ATS (pre Purple Palace) Ported Compressor Housing
- Banks Big Head Actuator
Installed New Non-EBV Pedestal
Installed Driven Diesel Fuel Bowl Delete Regulated Return
Installed Full Force Diesel 180/0% Single Shots
Installed Lightly Used Glow Plugs from my old Race Engine
Installed Lightly Used UVC Gaskets and Harnesses from my old Race Engine
Installed Cleaned Up (unnecessary wires removed) Engine Wiring Harness from my old Race Engine
Installed Lightly Used Matching Optima Batteries from my old Race Truck
Installed New S&B Filters Intake Kit (not shown)
Installed Intake "Spider" From my old PMR Race Engine

Just Another View

You can see the fuel tank in the first picture with the bed off, and like everything else, it was filthy with 20 years of dirt. Scrubbed the crap out of it, inside and out and it looks brand new.
Of course, there has to be something between the fuel tank and the regulated return. Since I still had the AirDog I from my race truck, I started there. This pump is one of the originals, from back in the day when Charlie was first running the company, and it was always rock solid in the race truck. Hopefully it brings good "ju ju" to this project. Sorry, no pictures.

After the AirDog I used one of our Driven Diesel Dual Bosch fuel delivery kits. Normally this setup would have a pre-filter, but that isn't necessary with the AirDog. Right now I'm just running one of the pumps along with the AirDog to get the truck up and running. Future plans will require the second pump for sure, so it's just a bit of wiring away from being up and running.
After the pictures above, I decided I was going to run dual crankcase breathers to a catch can. I moved the driver side valve cover to the passenger side and I installed modified the E-Series van valve cover I had on my race engine to fit on the driver side. They will be tied to a catch can and then back to the crankcase breather, since that is one of the things our local emissions inspectors look at. I'm currently waiting on the parts to finish plumbing the crankcase vent, after which I can finish installing the passenger side intercooler tube and the S&B intake tube and the engine portion will be done.
Engine fired up and ran beautifully. Forgot how much I love the sound of a nice single shot 7.3L.
More to come...
Removed AFE Stage II
Removed "USA" Turbo with Banks Power Elbow (and rest of rusty exhaust...my OCD doesn't like rust)
Removed Leaky Modified OE Turbo Pedestal
Removed Modified and Greasy Intake "Spider"
Removed Unknown Regulated Return
Removed Injectors (half stamped "reman", several not working well)
Removed Glow Plugs
Removed Mismatched Batteries
Removed Squished/Rubbed Modified Headlight Wiring
Removed FASS HD Pump and Wiring
Removed Modified Engine Wiring Harness
Removed Unknown Age UVC Gaskets and Harnesses
Installed Modified Stock Turbo (from my old Race Truck PMR Motor)
- Rebuilt with 360� Thrust Bearing and 7x7 Billet Wheel
- Banks 1.0 Turbine Housing with Wastegate
- Original ATS (pre Purple Palace) Ported Compressor Housing
- Banks Big Head Actuator
Installed New Non-EBV Pedestal
Installed Driven Diesel Fuel Bowl Delete Regulated Return
Installed Full Force Diesel 180/0% Single Shots
Installed Lightly Used Glow Plugs from my old Race Engine
Installed Lightly Used UVC Gaskets and Harnesses from my old Race Engine
Installed Cleaned Up (unnecessary wires removed) Engine Wiring Harness from my old Race Engine
Installed Lightly Used Matching Optima Batteries from my old Race Truck
Installed New S&B Filters Intake Kit (not shown)
Installed Intake "Spider" From my old PMR Race Engine
Just Another View
You can see the fuel tank in the first picture with the bed off, and like everything else, it was filthy with 20 years of dirt. Scrubbed the crap out of it, inside and out and it looks brand new.
Of course, there has to be something between the fuel tank and the regulated return. Since I still had the AirDog I from my race truck, I started there. This pump is one of the originals, from back in the day when Charlie was first running the company, and it was always rock solid in the race truck. Hopefully it brings good "ju ju" to this project. Sorry, no pictures.
After the AirDog I used one of our Driven Diesel Dual Bosch fuel delivery kits. Normally this setup would have a pre-filter, but that isn't necessary with the AirDog. Right now I'm just running one of the pumps along with the AirDog to get the truck up and running. Future plans will require the second pump for sure, so it's just a bit of wiring away from being up and running.
After the pictures above, I decided I was going to run dual crankcase breathers to a catch can. I moved the driver side valve cover to the passenger side and I installed modified the E-Series van valve cover I had on my race engine to fit on the driver side. They will be tied to a catch can and then back to the crankcase breather, since that is one of the things our local emissions inspectors look at. I'm currently waiting on the parts to finish plumbing the crankcase vent, after which I can finish installing the passenger side intercooler tube and the S&B intake tube and the engine portion will be done.
Engine fired up and ran beautifully. Forgot how much I love the sound of a nice single shot 7.3L.
More to come...
Closed loop crankcase vent is done. Used a DRIVERS SIDE valve cover on the passenger side, with the vent assembly facing the rear. Used an E-Series van drivers side valve cover on the drivers side, but had to cut and significantly shorten the oil fill tube. Both vents merge into a single 3/4" hose, which is connected to a Mishimoto universal catch can. The outlet of the catch can is connected to the OEM CCV adapter in the middle of the intake, which I rotated 180�. Pics below...should know how it works soon.

Passenger Side CCV Connection

Drivers SIde CCV Connection

OEM CCV Housing (flipped) And My CCV T-Fitting Behind It

Mishimoto Catch Can Mounted Behind Drivers Front Tire
Passenger Side CCV Connection
Drivers SIde CCV Connection
OEM CCV Housing (flipped) And My CCV T-Fitting Behind It
Mishimoto Catch Can Mounted Behind Drivers Front Tire
Typical of every truck I own, modify one thing and you have to mess with something else. Every lowered truck I've had required exhaust work to make sure I didn't listen to the axle banging the pipe, or pipe scraping speed bumps, etc. This one is no different. I've loved the fit and finish of MagnaFlow exhaust forever, so I ordered their latest 7.3L S.S. kit for this truck. This kit didn't come with a muffler, so I ordered the longest S.S. diesel muffler MagnaFlow makes, and for good measure, I added a FloPro Twister resonator to make sure I don't have cab drone. To keep things "tucked" nicely, I didn't use the pipe they supply that has an offset to lower the muffler, I just ran straight back. Of course, that put the tailpipe inlet at the wrong location, so I had to cut and shorten the inlet end of the tailpipe. While I was at it, I added some pipe at the top of the tailpipe to give more room in front and behind the axle. Finally, I cut the offset pipe to make a custom turndown that tucks almost entirely above the body line. I still need to double check the tailpipe, when I was doing that part I already had 6+ hours on the system and forgot to hang the spare tire first...so I may need to modify it some more for clearance.

Cut 1 shortened the inlet of the pipe. Cuts 2 & 3 reflect the section added to spread the pipe away from the axle.

Welded up and ready to go in. Can't take credit for the welding, that's a talent I have not yet learned.

Cut line on the offset pipe to make the custom turndown tip.

Custom turndown tip welded to the tailpipe.

FloPro Twister right after the trans crossmember.

Big MagnaFlow Muffler

Tailpipe fit over the axle and custom rear hanger.

Tailpipe with Turndown almost entirely hidden.
Really hoping the spare fits, should have time to mess with that later today.
Cut 1 shortened the inlet of the pipe. Cuts 2 & 3 reflect the section added to spread the pipe away from the axle.
Welded up and ready to go in. Can't take credit for the welding, that's a talent I have not yet learned.
Cut line on the offset pipe to make the custom turndown tip.
Custom turndown tip welded to the tailpipe.
FloPro Twister right after the trans crossmember.
Big MagnaFlow Muffler
Tailpipe fit over the axle and custom rear hanger.
Tailpipe with Turndown almost entirely hidden.
Really hoping the spare fits, should have time to mess with that later today.
Finally got the exhaust finished, wheels and tires mounted and after sitting for months...a really good inside and out cleaning! It's nice to be driving my truck again, and not the shop van. Still lots more on the "to do" list.


Little comparison of progress from where the truck started to today.
Little comparison of progress from where the truck started to today.
No major updates, just some small stuff I had to do because I was used to driving newer trucks with more "creature comforts" for the last 6 years.

GenTex HomeLink Rear View Mirror, because I can't stand garage door remotes on my visors!


2008+ OEM Heated Trailer Tow Mirrors, because the 99-07 mirrors are just too small after you've had these! So far, just the mirror motors are hooked up, and they operate backwards (push the control right, mirror moves left). I haven't had time to investigate that. The UP/DOWN is perfect.
The smoked lenses on the mirrors are from Amazon. They have a white "running light" that switches to a moving orange when the turn signal is activated.
Next on the agenda is going into all of the doors. Each one will be a project:
- New OEM Door Lock Actuator
- New OEM Power Window Regulator/Motor Assembly
- Old Window Tint Removal and Glass Replacement if Scratched
- Thorough Cleaning of All Surfaces
- Sound Deadening (prep for stereo work)
- New Door Handles (rears all the way around)
- Finish Mirror Wiring (front doors)
I was going to do white PTM door handles, but now with the black wheels I will probably leave them black for contrast.
Ordered stuff to start the stereo setup this weekend. Head unit will probably get put in soon, the stock one SUCKS, I need my music collection (USB memory stick) back!
GenTex HomeLink Rear View Mirror, because I can't stand garage door remotes on my visors!
2008+ OEM Heated Trailer Tow Mirrors, because the 99-07 mirrors are just too small after you've had these! So far, just the mirror motors are hooked up, and they operate backwards (push the control right, mirror moves left). I haven't had time to investigate that. The UP/DOWN is perfect.
The smoked lenses on the mirrors are from Amazon. They have a white "running light" that switches to a moving orange when the turn signal is activated.
Next on the agenda is going into all of the doors. Each one will be a project:
- New OEM Door Lock Actuator
- New OEM Power Window Regulator/Motor Assembly
- Old Window Tint Removal and Glass Replacement if Scratched
- Thorough Cleaning of All Surfaces
- Sound Deadening (prep for stereo work)
- New Door Handles (rears all the way around)
- Finish Mirror Wiring (front doors)
I was going to do white PTM door handles, but now with the black wheels I will probably leave them black for contrast.
Ordered stuff to start the stereo setup this weekend. Head unit will probably get put in soon, the stock one SUCKS, I need my music collection (USB memory stick) back!
Magaged to get a little time on the truck this weekend. Finally got the garbage stock CD changer out and a decent head unit in. Actually amazing how much better the stock crappy speakers sound with a clean head unit. Now I've at least got BlueTooth Phone, NAV and my USB Music Collection back!

A little wiring progress work on the adapter harness.

Head unit installation complete. Will have to go back in to connect RCAs when I get around to amplifiers and such, but good enough for now.

Pulled the instrument cluster and A/C controls and upgraded to LEDs since I had the dash trim off. The picture sucks, but you can tell how much brighter they are during the day, which makes them much easier to see. May have to dim at night, but I'm not worried about that.
A little wiring progress work on the adapter harness.
Head unit installation complete. Will have to go back in to connect RCAs when I get around to amplifiers and such, but good enough for now.
Pulled the instrument cluster and A/C controls and upgraded to LEDs since I had the dash trim off. The picture sucks, but you can tell how much brighter they are during the day, which makes them much easier to see. May have to dim at night, but I'm not worried about that.
Discovered something interesting, as I finally drove the truck at night. All of the "warning lights" are about 10-20% lit, all the time. Apparently there is enough voltage on those circuits to partially light the LEDs due to them having no load like a filament type bulb. I guess I'm going to be playing around in a dark shop trying to figure out the best fix for this. Crap!


