
3rd Gen Tech: Isspro EV2 Gauge Install

Thread Starter
|
Newbie
Joined: Apr 2009
Posts: 8
Likes: 0
From: Phoenix, AZ
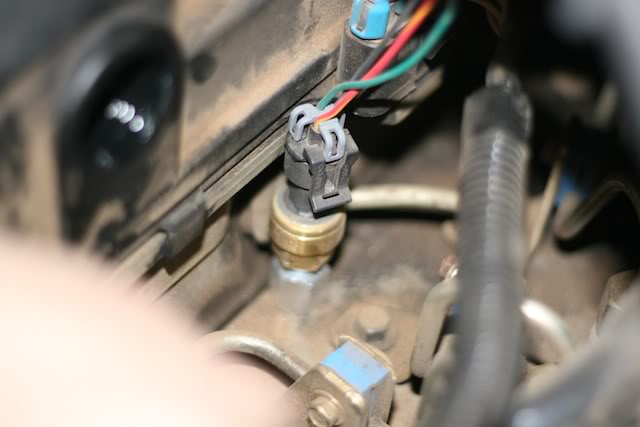
Boost Gauge
The boost gauge sender was a relatively simple install. You'll thread the sender into a boost bolt the same as you would with a mechanical gauge. I'd suggest using teflon tape on the boost bolt and the sender. Just make sure that you don't cover up holes. There isn't much clearance back there due to the injector lines but after a little finagling it'll go right in.
The hardest part about this was getting the picture, and it's still crappy.
---AutoMerged DoublePost---
Transmission Oil Temperature Gauge
I wanted to get the most accurate reading so I purchased a replacement transmission line from Diesel Manor with a sender port already installed.
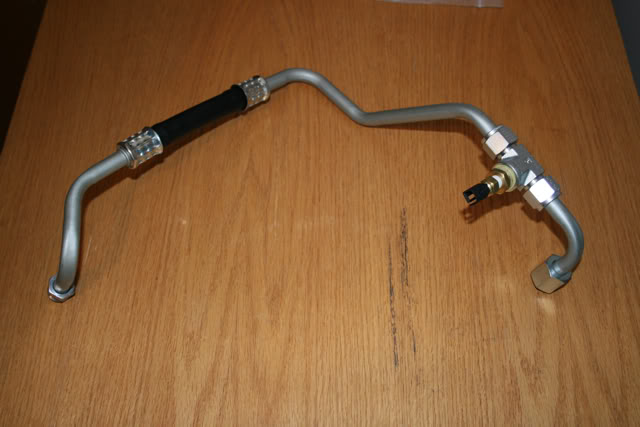
Installation was pretty straightforward. Clearances are a little tight around the transmission due to the front driveshaft but take your time and you'll get it no problem. Just make sure you have a drip pan as you'll lose a decent amount of fluid when you remove the old line.
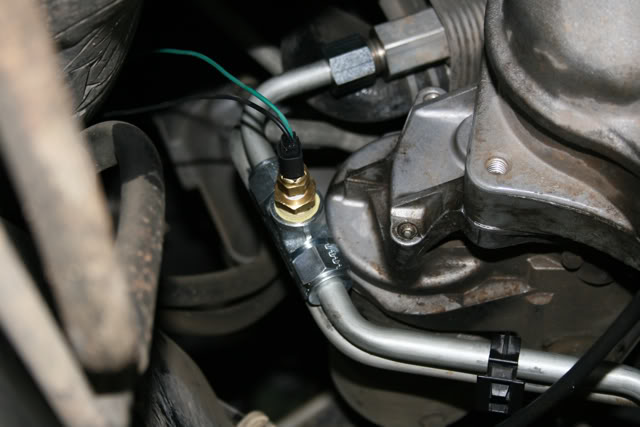
Terminate your two wires going to the sender and you're done.
---AutoMerged DoublePost---
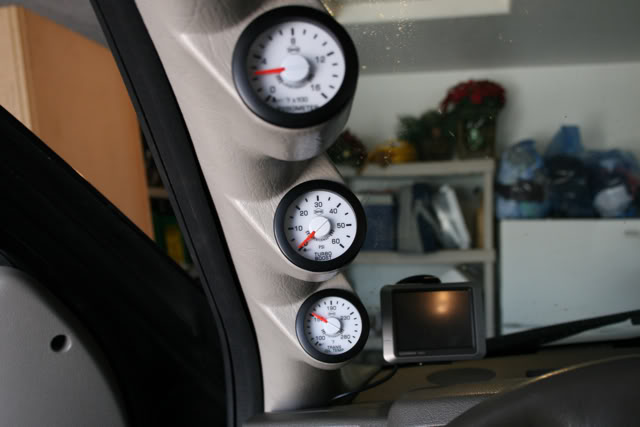
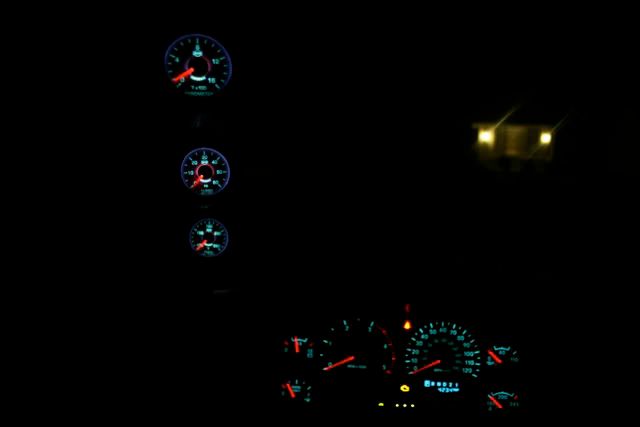
Finished Product
Gauges wired, Weather Pack connectors terminated, and wires secured.
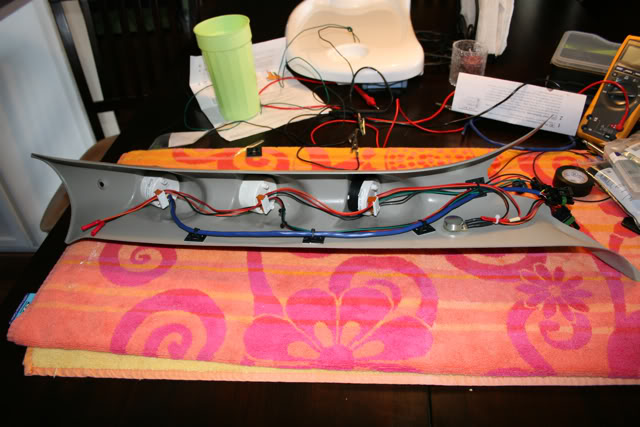
Weather Pack connectors.

Stick a fork in it.
The boost gauge sender was a relatively simple install. You'll thread the sender into a boost bolt the same as you would with a mechanical gauge. I'd suggest using teflon tape on the boost bolt and the sender. Just make sure that you don't cover up holes. There isn't much clearance back there due to the injector lines but after a little finagling it'll go right in.
The hardest part about this was getting the picture, and it's still crappy.
---AutoMerged DoublePost---
Transmission Oil Temperature Gauge
I wanted to get the most accurate reading so I purchased a replacement transmission line from Diesel Manor with a sender port already installed.
Installation was pretty straightforward. Clearances are a little tight around the transmission due to the front driveshaft but take your time and you'll get it no problem. Just make sure you have a drip pan as you'll lose a decent amount of fluid when you remove the old line.
Terminate your two wires going to the sender and you're done.
---AutoMerged DoublePost---
Finished Product
Gauges wired, Weather Pack connectors terminated, and wires secured.
Weather Pack connectors.
Stick a fork in it.
Last edited by 65StangBoy; Nov 27, 2009 at 01:12 PM. Reason: Automerged Doublepost


Diesel Bomber

Joined: Nov 2009
Posts: 1,058
Likes: 53
From: Sanford, Colorado
Very nicely done. I too am very particular about my wiring and like a nice clean job wires hidden as much as possible. Those are some very nice lookin gauges. Really wantin to get me a set cant wait to get some installed. But good post and good work 

Diesel Enthusiast
Joined: Aug 2008
Posts: 358
Likes: 23
From: Twin Falls, ID
Very nice indeed. I looked your post up as I'm trying to wire mine right now. . . .
I would like to find a switched ignition wire under the dash.
I would like to find a switched ignition wire under the dash.
Last edited by millco; Mar 20, 2010 at 03:51 AM.
Diesel Enthusiast
Joined: Aug 2008
Posts: 358
Likes: 23
From: Twin Falls, ID
He did an awesome job!
All I would add is that if you find the pink with a yellow stripe wire under the dash by the parking brake mechanism (In the large bundle of wires) or the same wire at the cigarette lighter then you have your switched ignition wire! Oh, and on mine the wire for the dash lights after the dimmer was on the back of the headlight switch. The switch on mine was screwed in so don't go prying on them. There is two orange with a brown stripe wires on the back of the switch. On mine it was the one closest to the outside of the vehicle. Hope this helps someone a little.
The trouble I ran into was purely mechanical. My Jacobs brake is already tapped for the egt probe. After getting the plug out and measuring for proper depth to get the tip in the center; I discover that the hole is something like 1/4" pipe thread I guess I will see if I can get a reducing bushing down to the 1/8" that as far as I know is the most popular size for probes.....
 (Oh, and I wasn't too impressed with the 3/4" slice in the nice boot around the shifter cable at the firewall. That is where the sloppy tech at the dealer cut to run the wires inside the cab when he installed the Jacobs. I wonder how much noise and air comes through there. I'll have to come up with a repair for that little 'dealer add-on'!)
All I would add is that if you find the pink with a yellow stripe wire under the dash by the parking brake mechanism (In the large bundle of wires) or the same wire at the cigarette lighter then you have your switched ignition wire! Oh, and on mine the wire for the dash lights after the dimmer was on the back of the headlight switch. The switch on mine was screwed in so don't go prying on them. There is two orange with a brown stripe wires on the back of the switch. On mine it was the one closest to the outside of the vehicle. Hope this helps someone a little.
The trouble I ran into was purely mechanical. My Jacobs brake is already tapped for the egt probe. After getting the plug out and measuring for proper depth to get the tip in the center; I discover that the hole is something like 1/4" pipe thread
I guess I will see if I can get a reducing bushing down to the 1/8" that as far as I know is the most popular size for probes..... (Oh, and I wasn't too impressed with the 3/4" slice in the nice boot around the shifter cable at the firewall. That is where the sloppy tech at the dealer cut to run the wires inside the cab when he installed the Jacobs. I wonder how much noise and air comes through there. I'll have to come up with a repair for that little 'dealer add-on'!)
Last edited by millco; Mar 20, 2010 at 04:05 AM.

Thread Starter
|
Newbie
Joined: Apr 2009
Posts: 8
Likes: 0
From: Phoenix, AZ
I've tapped exhaust manifolds twice now. The first time, on my truck, I didn't grease the tap flutes and results with a lot of shavings in the manifold. The second time, on a friends truck, I greased the flutes and it caught probably 80% of the shavings. I ended up wiping off the grease and reapplying about every half turn, definitely worth the extra time.

Thread
Thread Starter
Forum
Replies
Last Post
CHAMP31707
For Sale
0
Jun 1, 2015 04:03 PM
CGwill
24 Valve 2nd Gen Dodge Cummins 98.5-02
0
Jan 26, 2015 02:10 AM


