
3rd Gen Tech: Firestone Air Bag Install

Thread Starter
|
Diesel Wrench
Joined: Dec 2008
Posts: 683
Likes: 80
From: Black Canyon City,AZ
After installing my KORE 2" leveling kit, I decided I would install an airbag kit to help keep the truck from squatting while towing. My tuck is a 1ton, but by the time a load is on the overloads, the truck already has a noticeable nose in the air attitude.
I decided on the Firestone kit for my truck, cost being the major deciding factor, but personal product reviews from people I know who tow more weight than I do, and have had success with this product, were also contributing factors.
Here are the Downloadable installation instruction for this kit:
http://www.fsip.com/pdfs/RR/installation/2299.pdf
The kit takes about 2-3 hours maximum to install.
The Firestone air bag kit # 2299 fits all 2003-2007 Dodge 2500, 3500 2WD and 4WD. So this is the kit I ordered.
.

The picture on the box and on most websites is misleading. Your kit will not mount like the picture on the box, I think that picture is for a Ford. There is no drilling of the frame for this kit. The only holes you have to drill are for the air fittings, which go in the rear bumper.
Before you begin, It may help for you to remove your Spare tire from underneath the truck, as I did.
Lay out all the parts for ease in pre-assembly.
The instructions pretty much have you do the Driver�s side first, then repeat the steps for the passenger side.
I chose to save some time and limit the amount of crawling under and back out from the truck by preassembling everything and taking it with me under the truck. In this pic, everything is laid out and oriented for the Driver and passenger side, respectively. Note the heat shield on the passenger side group for the exhaust.
.

There are 2 identical axle brackets. On each end of the axle bracket are 2 different widths, a wide one for Diesel engines, and a narrow one for Gasoline engines.
My finger is pointing to the �Wide� end in the photos below. Identifying this end is important, as it is the end that will fit snugly between the U-bolts on the truck�s suspension. It also helps you orient which hole to bolt the air bag to for Driver and passenger sides.
First, this is an Axle bracket oriented for Driver�s side install.
.
.

This is a bracket oriented for Passenger side install.
.
.

The holes you see in the center of the Axle bracket are used to attach the Airbag to the Axle mount.
You will use the holes furthest away from the end my finger is pointing to.
At this time, just hand tighten the bolts that hold the bag to the axle bracket. They are the 3/8-16 X �� flange head bolts in the small parts bag. They take a 9/16� socket.

Next, install the air fitting in the air inlet/stud of the air bag. Tighten as securely as you can, there will be an opportunity later when the bag is installed to tighten further if it�s not as tight as you want it. This requires a 9/16� deep socket, or wrench.

Repeat these pre- assembly steps for the passenger side.

Next, locate and pre- install the 10MM X 30MM flat tapered shoulder bolts to the upper air bag brackets. These brackets are also identical.

I decided on the Firestone kit for my truck, cost being the major deciding factor, but personal product reviews from people I know who tow more weight than I do, and have had success with this product, were also contributing factors.
Here are the Downloadable installation instruction for this kit:
http://www.fsip.com/pdfs/RR/installation/2299.pdf
The kit takes about 2-3 hours maximum to install.
The Firestone air bag kit # 2299 fits all 2003-2007 Dodge 2500, 3500 2WD and 4WD. So this is the kit I ordered.
.
The picture on the box and on most websites is misleading. Your kit will not mount like the picture on the box, I think that picture is for a Ford. There is no drilling of the frame for this kit. The only holes you have to drill are for the air fittings, which go in the rear bumper.
Before you begin, It may help for you to remove your Spare tire from underneath the truck, as I did.
Lay out all the parts for ease in pre-assembly.
The instructions pretty much have you do the Driver�s side first, then repeat the steps for the passenger side.
I chose to save some time and limit the amount of crawling under and back out from the truck by preassembling everything and taking it with me under the truck. In this pic, everything is laid out and oriented for the Driver and passenger side, respectively. Note the heat shield on the passenger side group for the exhaust.
.
There are 2 identical axle brackets. On each end of the axle bracket are 2 different widths, a wide one for Diesel engines, and a narrow one for Gasoline engines.
My finger is pointing to the �Wide� end in the photos below. Identifying this end is important, as it is the end that will fit snugly between the U-bolts on the truck�s suspension. It also helps you orient which hole to bolt the air bag to for Driver and passenger sides.
First, this is an Axle bracket oriented for Driver�s side install.
.
.
This is a bracket oriented for Passenger side install.
.
.
The holes you see in the center of the Axle bracket are used to attach the Airbag to the Axle mount.
You will use the holes furthest away from the end my finger is pointing to.
At this time, just hand tighten the bolts that hold the bag to the axle bracket. They are the 3/8-16 X �� flange head bolts in the small parts bag. They take a 9/16� socket.
Next, install the air fitting in the air inlet/stud of the air bag. Tighten as securely as you can, there will be an opportunity later when the bag is installed to tighten further if it�s not as tight as you want it. This requires a 9/16� deep socket, or wrench.
Repeat these pre- assembly steps for the passenger side.
Next, locate and pre- install the 10MM X 30MM flat tapered shoulder bolts to the upper air bag brackets. These brackets are also identical.
Thread Starter
|
Diesel Wrench
Joined: Dec 2008
Posts: 683
Likes: 80
From: Black Canyon City,AZ
Continued:
Now, it’s time to jump under the truck and get to work installing this kit!
Take the preassembled parts and lay them out at the rear of each rear tire.
Make sure to take the small parts bag, tools and instructions as well.
The bump stops (They call them “Jounce Bumpers” in the directions) on both sides must be removed. This is where the upper bracket for the air bag installs. 15MM

Once both sides are removed, install the upper Air Bag Frame bracket. I used a torx 40 for this, although an allen wrench can be used as well. These need to be tightened tight at this time.
Driver’s side.
.

Passenger side.
.

Next, install the airbag lower bracket assembly. You will want to insert the upper stud/air inlet to the hole of the upper frame bracket that will allow the best vertical alignment of the bag. For my truck, this was the rearward hole. You will have to collapse the bag to accomplish this step, and it is easier to swing in from the front on the driver’s side, due to the shock being in the way at the rear of the axle.
.

.
Next, **** the lower bracket at an angle, so that the wide end will fit between the u-bolts.

You may have to tap the bracket into place due to the snug fit. I just used the handle of the �” ratchet for this.
.

Next, install the u-bolt for the Lower Air Bag axle mount that came in the kit.
.

Place the star washer and stud nut on the air inlet/stud. Hand tighten it. Spin the air bag until the locating “Button” drops into it’s hole. Now tighten the nut on the stud. 1-1/8” wrench or deep socket.
.

.
Repeat the steps for the passenger side, the only differences are the air bag and lower mount will swing in easiest from the back, due to shock location, and don’t forget to place the heat shield on prior to swinging the assembly into place. Although it doesn't show it, I positioned mine forward at about a 45 degree angle to block any radiated heat from the exhaust while the truck was in motion.

.
Place the lower axle saddles on the u-bolt for driver and passenger side and snug them down.
.

Now, it’s time to jump under the truck and get to work installing this kit!
Take the preassembled parts and lay them out at the rear of each rear tire.
Make sure to take the small parts bag, tools and instructions as well.
The bump stops (They call them “Jounce Bumpers” in the directions) on both sides must be removed. This is where the upper bracket for the air bag installs. 15MM
Once both sides are removed, install the upper Air Bag Frame bracket. I used a torx 40 for this, although an allen wrench can be used as well. These need to be tightened tight at this time.
Driver’s side.
.
Passenger side.
.
Next, install the airbag lower bracket assembly. You will want to insert the upper stud/air inlet to the hole of the upper frame bracket that will allow the best vertical alignment of the bag. For my truck, this was the rearward hole. You will have to collapse the bag to accomplish this step, and it is easier to swing in from the front on the driver’s side, due to the shock being in the way at the rear of the axle.
.
.
Next, **** the lower bracket at an angle, so that the wide end will fit between the u-bolts.
You may have to tap the bracket into place due to the snug fit. I just used the handle of the �” ratchet for this.
.
Next, install the u-bolt for the Lower Air Bag axle mount that came in the kit.
.
Place the star washer and stud nut on the air inlet/stud. Hand tighten it. Spin the air bag until the locating “Button” drops into it’s hole. Now tighten the nut on the stud. 1-1/8” wrench or deep socket.
.
.
Repeat the steps for the passenger side, the only differences are the air bag and lower mount will swing in easiest from the back, due to shock location, and don’t forget to place the heat shield on prior to swinging the assembly into place. Although it doesn't show it, I positioned mine forward at about a 45 degree angle to block any radiated heat from the exhaust while the truck was in motion.
.
Place the lower axle saddles on the u-bolt for driver and passenger side and snug them down.
.
Last edited by wildcat; Dec 14, 2008 at 08:13 PM. Reason: add'l info
Thread Starter
|
Diesel Wrench
Joined: Dec 2008
Posts: 683
Likes: 80
From: Black Canyon City,AZ
Now, tighten all mounting connections, starting with the Lower Axle Air Bag Mounting bolt.
Note: I was able to get my driver�s side tightened without removing the brake line Tee.
.

.

.
Then tighten the air line/stud nut, and finally the air bag u-bolt nuts.
Now is a good time to tighten the air fittings on top of the air bag, as well.
Next, Install one end of the red air line tube into the air fitting. Be sure to press Firmly downward, the line will lock into the fitting.
.

Route the line in a safe manner to the rear bumper. Be aware of sources of heat, abrasion, and sharp edges. Cut the air line at correct length.
.

For the Passenger side, start by placing the heat sleeve over the line first.
.

.
.
Seat the air line in the air fitting, pressing firmly downward.

.
.
Pull the heat sleeve down to the top of the fitting.
.

.
.
Route the line to the rear bumper, away from heat, abrasion and sharp edges. Because this was the passenger side, I routed the line between the bed and bed cross member to keep it from heat. Cut the line air line at the correct length.
.

You will have enough line left over for a spare, incase one of your lines becomes damaged.
.

Drill 2 holes in the rear bumper (5/16�) and install air fittings, using a washer on each side. Tighten fittings into bumper using (2) �� wrenches.

Note: I was able to get my driver�s side tightened without removing the brake line Tee.
.
.
.
Then tighten the air line/stud nut, and finally the air bag u-bolt nuts.
Now is a good time to tighten the air fittings on top of the air bag, as well.
Next, Install one end of the red air line tube into the air fitting. Be sure to press Firmly downward, the line will lock into the fitting.
.
Route the line in a safe manner to the rear bumper. Be aware of sources of heat, abrasion, and sharp edges. Cut the air line at correct length.
.
For the Passenger side, start by placing the heat sleeve over the line first.
.
.
.
Seat the air line in the air fitting, pressing firmly downward.
.
.
Pull the heat sleeve down to the top of the fitting.
.
.
.
Route the line to the rear bumper, away from heat, abrasion and sharp edges. Because this was the passenger side, I routed the line between the bed and bed cross member to keep it from heat. Cut the line air line at the correct length.
.
You will have enough line left over for a spare, incase one of your lines becomes damaged.
.
Drill 2 holes in the rear bumper (5/16�) and install air fittings, using a washer on each side. Tighten fittings into bumper using (2) �� wrenches.
Thread Starter
|
Diesel Wrench
Joined: Dec 2008
Posts: 683
Likes: 80
From: Black Canyon City,AZ
Continued
Now connect the lines to the rear of the bumper fittings, by pressing them firmly into fittings.

Air the air bags up to 70 PSI, and check for leaks using a squirt bottle filled with soapy water.
If you have any leaks, be sure to let the air pressure out of the bags before attempting to correct.
Once all leaks have been sealed, or no leaks were detected, lower the pressure in the bags to 5PSI.
That’s pretty much it!
Feel free to comment or ask questions as usual!
Now connect the lines to the rear of the bumper fittings, by pressing them firmly into fittings.
Air the air bags up to 70 PSI, and check for leaks using a squirt bottle filled with soapy water.
If you have any leaks, be sure to let the air pressure out of the bags before attempting to correct.
Once all leaks have been sealed, or no leaks were detected, lower the pressure in the bags to 5PSI.
That’s pretty much it!
Feel free to comment or ask questions as usual!
Last edited by wildcat; Dec 14, 2008 at 03:35 PM.
Diesel Fan
Joined: Dec 2008
Posts: 26
Likes: 0
From: Tempe, AZ
Excellent write up with pictures. Reminded me of when I did mine.
One thing I did notice in all your pictures... your truck is really clean! One of big issues with install write ups with good photography is that the pictures show all the dirt, but not yours.
One thing I did notice in all your pictures... your truck is really clean! One of big issues with install write ups with good photography is that the pictures show all the dirt, but not yours.
Last edited by MegaPat; Dec 14, 2008 at 08:14 PM. Reason: Adding comments


Super Moderator
Joined: Oct 2007
Posts: 14,872
Likes: 764
From: Houston, Tx


Jeez ur making me want to go take some pics for some dmax mods. keep up the good work bill

Diesel Fan
Joined: Dec 2008
Posts: 16
Likes: 2
From: AZ
Great write up, saved me some time reading it before I installed mine. I couldn't figure out where to put the air fittings, as I have two boys that climb on the bumper, so this is what I came up with:
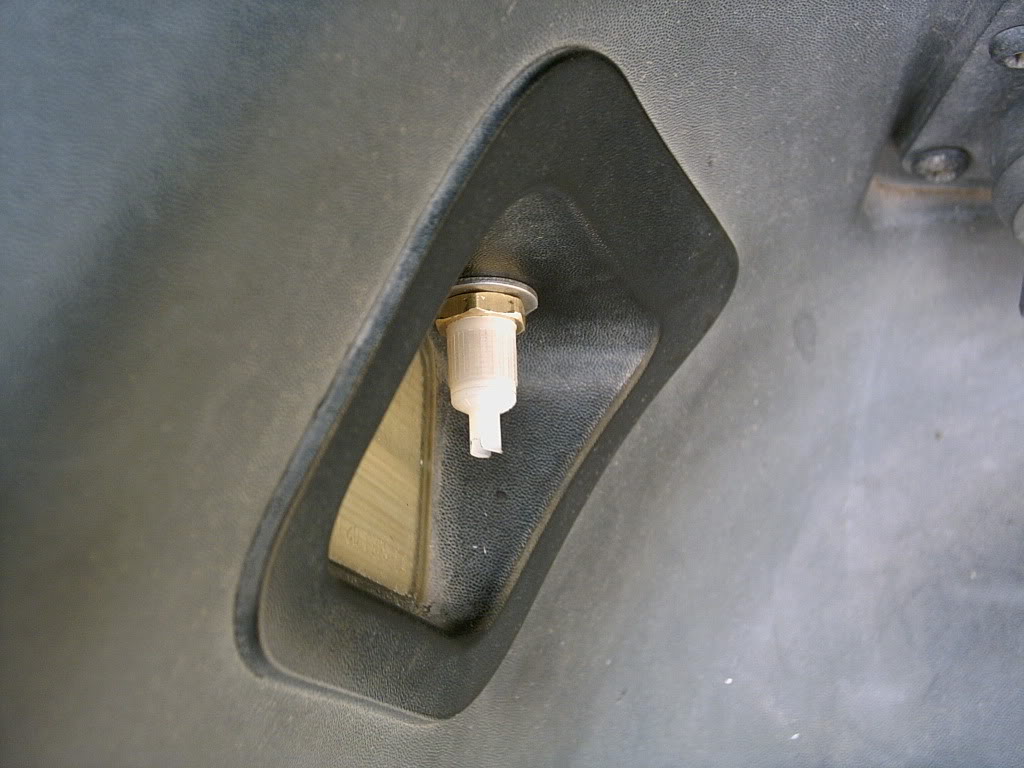

This way, the are recessed in the license plate light, and have some protection. For tomorrow, truck washing day, it is ugly
This way, the are recessed in the license plate light, and have some protection. For tomorrow, truck washing day, it is ugly


