
Head Gasket and Studs install

Thread Starter
|
Super Moderator
Joined: Oct 2007
Posts: 14,872
Likes: 764
From: Houston, Tx

Re-assembly:
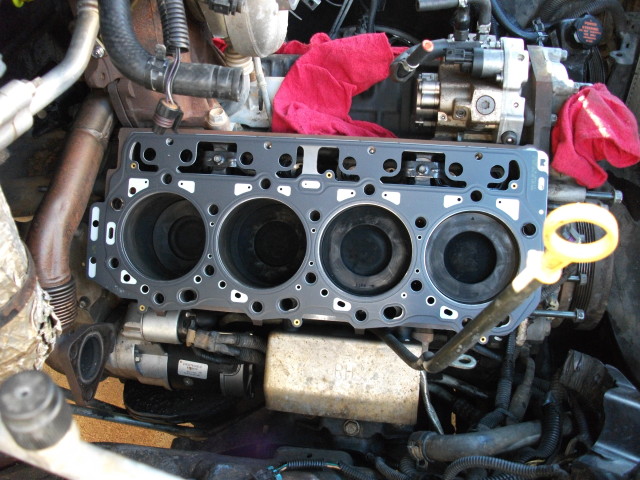
after getting my head checked and prepped at a local shop, i prepped my deck surface with a 3M roloc bristle disc. I suggest practicing using the bristle disk on your exhast manifolds or using it to clean the engine sealant off of your upper valve covers before using it on your block since it is still very abrasive.
I chose grade B head gasket because that was the gasket thickness used previously on the on the motor.
The heads them selves aren't that heavy they're just awkward to handle and place on the engine by yourself.
There was no room to install the studs into the block and use them as guides to drop the head onto because of the clearence problems associated on the passenger side especially. on the driver side you will have to install the stud at the same time, on the back against the firewall, you are placing the head into the block because the fire wall will not let you install the stud or even remove the head bolt without firewall modifications
The instructions on the ARP studs say to torque down head head stud one at a time in sequence to 125 ftlbs. then loosen one and re torque it to 125 ftlbs and continue doing that through the rest of the studs in sequence. In total you will loosen and tighten the head studs 3 times to 125 ftlbs for a total of torquing the studs 4 times to 125 ftlbs. after that i let them sit for 24 hours and made sure they all were still at 125 ftlbs by torquing them down to 125 again.
Last edited by 2500HeavyDuty; Dec 20, 2009 at 10:59 PM.
Thread Starter
|
Super Moderator
Joined: Oct 2007
Posts: 14,872
Likes: 764
From: Houston, Tx
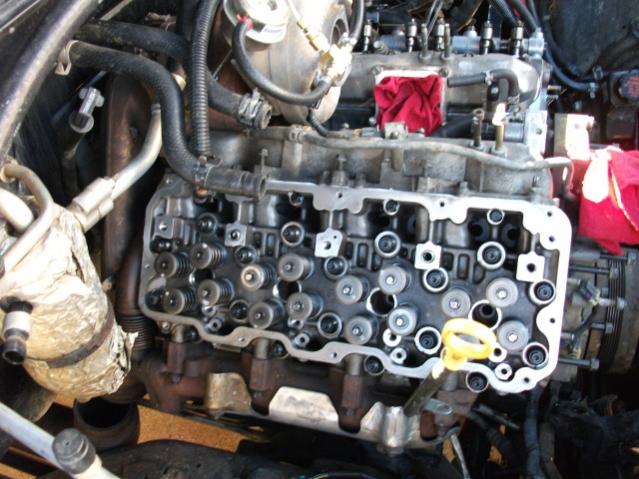
After the heads have been re torqued in went and installed the push rods and rockers and adjusted the valve lash.
Notice the orientation of the valve bridges.
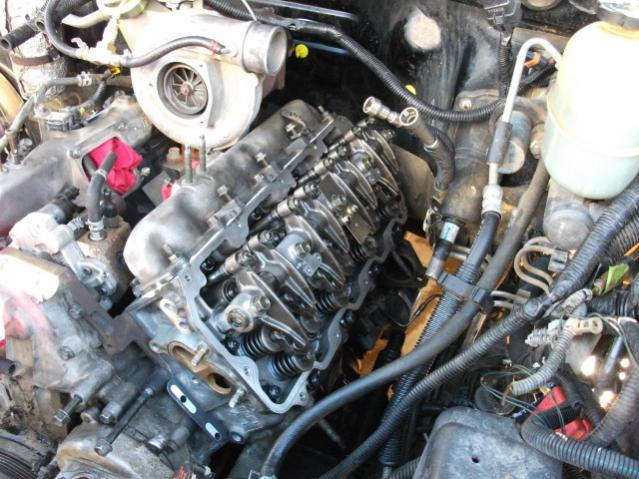
There will be a marker on the balencer and one on the block when they are aligned the number one cylinder will be at top dead center (Note the #1 cylinder is on the passenger front and the #2 is on the driver side front)
The stock lash is .012"
i checked in my factory service manual for the lb7 motor and it said when cylinder 1 is at top dead center on the compression stroke you can adjust the valves:
Cylinder 1 intake and exhaust
Cylinder 2 Exhaust
Cylinder 3 intake
Cylinder 5 Intake
Cylinder 6 Intake
Cylinder 7 Exhaust
Cylinder 8 Exhaust.
and then you can rotate the engine one revolution to bring the number one cylinder to the exhaust stroke and then you can adjust these valves:
Cylinder 2 Intake
Cylinder 3 Exhaust
Cylinder 4 Intake and Exhaust
Cylinder 5 Exhaust
Cylinder 6 Exhaust
Cylinder 7 Intake
Cylinder 8 intake.
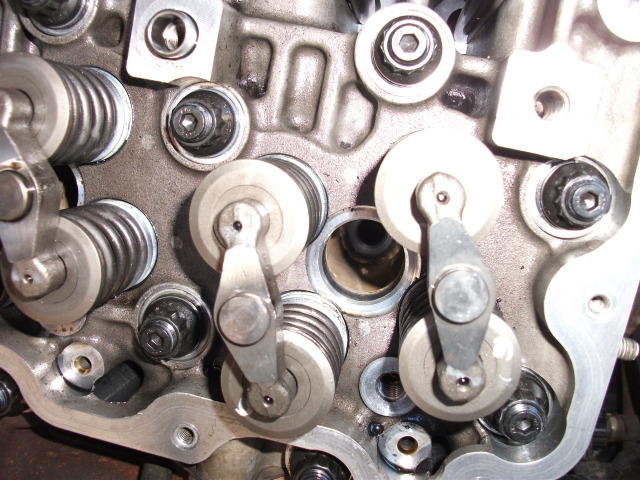
And the valve clearance lock nut is torqued down to 15lb ft or 21nm.
the intake valve has the smaller rocker and the exhaust has the longer rocker
The rest is remembering how to put everything back together its not too hard it will come back to you. valve train then the injectors, fuel rails, injector lines, fuel supply and return lines, and any line associated with fuel must go on first, then the coolant lines and cooling system and the accessories can be put back on along with the manifolds and down pipe.
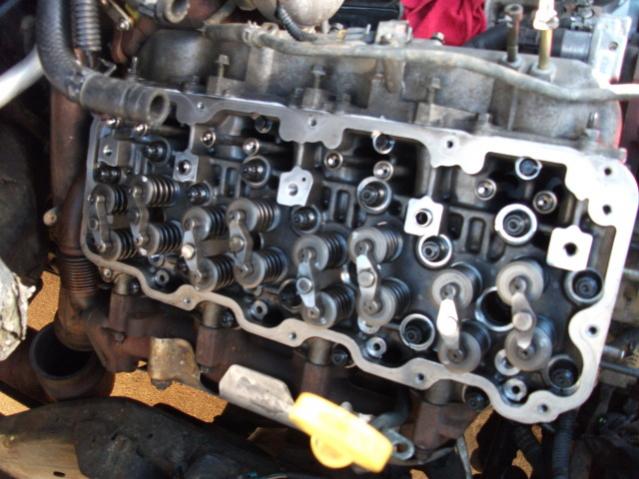
Notice the orientation of the valve bridges.
There will be a marker on the balencer and one on the block when they are aligned the number one cylinder will be at top dead center (Note the #1 cylinder is on the passenger front and the #2 is on the driver side front)
The stock lash is .012"
i checked in my factory service manual for the lb7 motor and it said when cylinder 1 is at top dead center on the compression stroke you can adjust the valves:
Cylinder 1 intake and exhaust
Cylinder 2 Exhaust
Cylinder 3 intake
Cylinder 5 Intake
Cylinder 6 Intake
Cylinder 7 Exhaust
Cylinder 8 Exhaust.
and then you can rotate the engine one revolution to bring the number one cylinder to the exhaust stroke and then you can adjust these valves:
Cylinder 2 Intake
Cylinder 3 Exhaust
Cylinder 4 Intake and Exhaust
Cylinder 5 Exhaust
Cylinder 6 Exhaust
Cylinder 7 Intake
Cylinder 8 intake.
And the valve clearance lock nut is torqued down to 15lb ft or 21nm.
the intake valve has the smaller rocker and the exhaust has the longer rocker
The rest is remembering how to put everything back together its not too hard it will come back to you. valve train then the injectors, fuel rails, injector lines, fuel supply and return lines, and any line associated with fuel must go on first, then the coolant lines and cooling system and the accessories can be put back on along with the manifolds and down pipe.
Last edited by 2500HeavyDuty; Dec 20, 2009 at 11:06 PM.

Thread Starter
|
Super Moderator
Joined: Oct 2007
Posts: 14,872
Likes: 764
From: Houston, Tx
yeah it would take a day if you were on pluto (153 hours)

it took a very long time. about 16 hours to tear it down and about 4 hours total to clean and prep parts, a day or two of waiting for the heads and injectors to get cleaned and finished.
and working on it in the driveway not the best idea cause i rained every other day. but it will take a while.
i will updae the specs and parts numbers when i can find them and sort them out
Diesel Enthusiast
Joined: Jan 2010
Posts: 287
Likes: 8
From: oregon
you are placing the head into the block because the fire wall will not let you install the stud or even remove the head bolt without firewall modifications
Read more: https://www.dieselbombers.com/chevy-...#ixzz0pl9QPpNI
so i was planning on putting some studs in tomorrow but then i read this. what kind and how much modification are you talking about? if you can will you upload some pictures please?
Read more: https://www.dieselbombers.com/chevy-...#ixzz0pl9QPpNI
so i was planning on putting some studs in tomorrow but then i read this. what kind and how much modification are you talking about? if you can will you upload some pictures please?
Thread Starter
|
Super Moderator
Joined: Oct 2007
Posts: 14,872
Likes: 764
From: Houston, Tx
yeah i dropped the hed into the block, the thing about the firewall is you have to remove the last headbolt and head at the same time to be able to get the head off.
and if your doing studs your going to have to drop the head with the stud at the same time on the driver side
Diesel Enthusiast
Joined: Jan 2010
Posts: 287
Likes: 8
From: oregon
well im doing the studs one at a time and am almost done with the driver side but i did the firewall modification and i was able to get the bolt out but it sure is being a pain to get the stud in there for some reason  . but oh well i am just excited to get studs in it and not have to worry about it anymore. did you go back through and re torque all your studs down again after a few months of driving?
. but oh well i am just excited to get studs in it and not have to worry about it anymore. did you go back through and re torque all your studs down again after a few months of driving?


