
Duramax Diesel Fuel System - Fuel Injector Service *

Thread Starter
|
Super Moderator
Joined: Oct 2007
Posts: 14,872
Likes: 764
From: Houston, Tx

Bulletin No.: 03-06-04-036A
Date: October 17, 2006
INFORMATION
Subject:
Information on Servicing Fuel Injectors to Avoid Contamination Models:
2001-2007 Chevrolet Silverado
2003-2007 Chevrolet Kodiak C4500/C5500 Series
2006-2007 Chevrolet Express Vans
2001-2007 GMC Sierra
2003-2007 GMC TopKick C4500/C5500 Series
2006-2007 GMC Savana Vans with 6.6L Duramax(TM) Diesel Engine (VINs 1, 2, 6, D - RPOs LB7, LLY, LMM, LBZ)
Supercede:
This bulletin is being revised to provide a new service procedure for cleaning fuel injector high pressure lines. Please discard Corporate Bulletin Number 03-06-04-036 (Section 06 - Engine/Propulsion System).
Fuel injectors may become contaminated during engine servicing. Debris between the injector line and the injector line nut may fall into the injector fuel inlet upon removal. Refer to the following SI procedures when following the procedures below on servicing fuel injectors/lines. This should resolve the concern.
Fuel Injection Fuel Rail Assembly Replacement - Bank 1
Fuel Injection Fuel Rail Assembly Replacement - Bank 2
Fuel Injector Replacement (Right)
Fuel Injector Replacement (Left)
Removal of Fuel Injector Lines
Before removing the fuel injector line, use compressed air to blow any debris from between the fuel injector line and the fittings (1, 2). Wipe the fittings (1) clean of debris.
Spray lithium grease, P/N 89021668 (in Canada, P/N 89021674), or equivalent, between the fuel injector line and fittings (1, 2) to assist in containing any debris during removal.
Remove the fuel injector line.
Remove the upper valve cover.
Remove the lower valve cover.
After the fuel line is removed and the fuel injector inlet is exposed, DO NOT use compressed air to clean debris. Using compressed air can allow debris to enter the fuel injector inlet and damage the fuel injector.
Immediately after removal of the lower valve cover, use a vacuum source to remove any contamination in the fuel injector inlet (1).
Fuel Injector Cleaning and Inspection
The fuel injector must be cleaned with the proper cleaning equipment. DO NOT use abrasive cleaning methods such as a metallic brush to remove deposits. Cleaning an injector with improper tools may damage the fuel injector.
Use a soft bristle non-metallic brush and fuel injector/top engine cleaner, P/N 88861802 (in Canada, P/N 992872), or equivalent, to remove any deposits from the nozzle tip (1) and the copper washer sealing area (2) before reinstallation.
Inspect the fuel injector nozzle tip (1) for cracks, dents, or other damage.
Inspect the nozzle tip (1) for any signs of discoloration (dark yellow, tan, or blue) due to excessive heat.
Replace the injector if any damage is found.
Refer to Service Bulletin Number 05-06-04-067 for information on injector bore cleaning.
Clean the fuel injector high-pressure lines by following the service information procedure outlined in this bulletin.
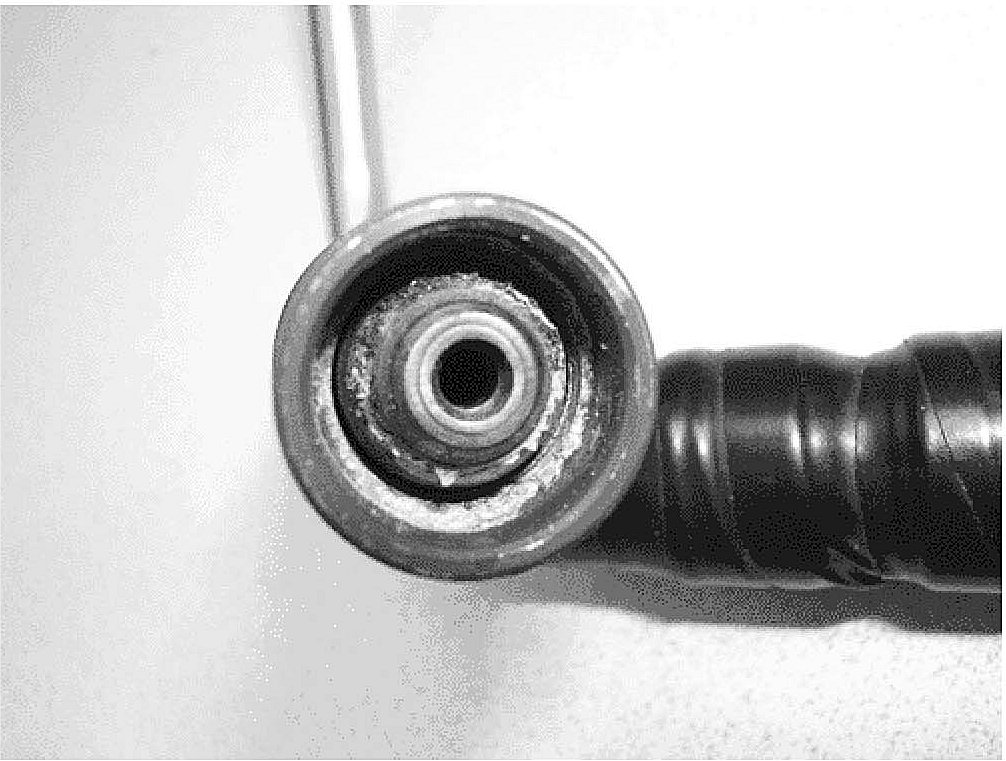
Inspect the fuel injector high-pressure line for excessive corrosion, scale or rust to the sealing surface.

Refer to the above illustration.
Medium size media glass beads have a cleaning and peening action and do not remove metal. They do not have the quick abrasive action of sharp edged media. Glass beads clean rust, scale and corrosion from metal parts without any damage.
Use an Abrasive Blasting Cabinet, P/N 624-AST-SBC1, (to order, call GM Dealer Equipment at 1-800-GMTOOLS), or equivalent, with a medium size media glass beads to clean the high pressure lines and fittings.
Black plastic electrical tape or equivalent will protect the fittings outside coating from being removed with the media. This must be done to all sixteen high pressure fittings.
Install black plastic electrical tape or equivalent on both of the fittings.
Refer to the above illustration (1).
When using an Abrasive Blasting Cabinet or equivalent, make sure you only clean the inside of the fittings and as much of the fitting threads as possible.
Refer to the above illustration (2).
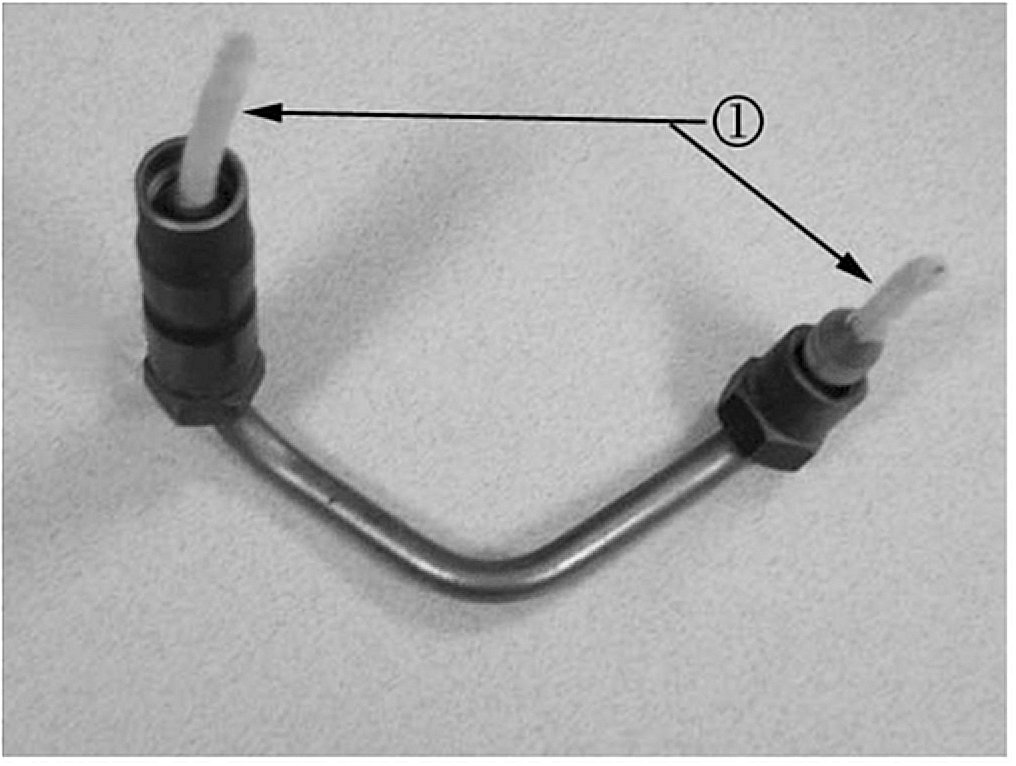
Use pipe cleaners to block the ends of the high pressure lines so the abrasive blasting glass beads will not contaminate the inside of the pipes. Refer to the above illustration (1). Before removing the pipe cleaners, clean by using compressed air to blow any debris and/or media glass beads from the pipe cleaners.
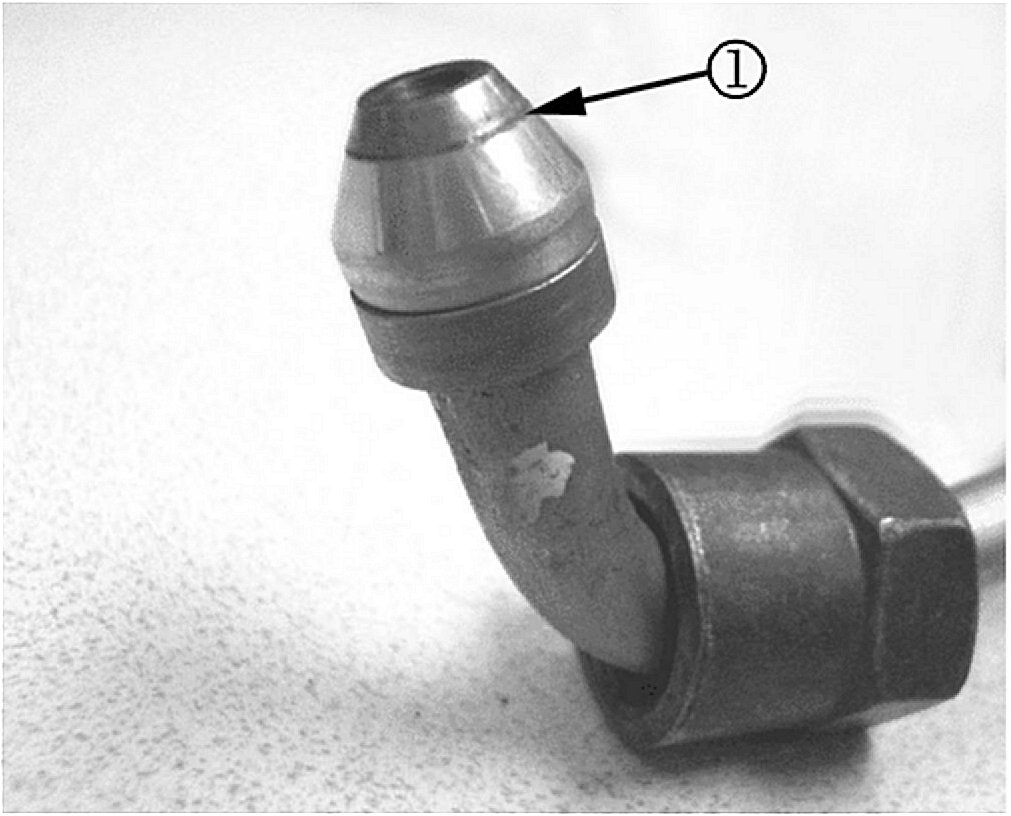
There may be some area of the fitting or line that the glass beads did not clean very well. Disregard any surface that did not clean up as long as the area of the fitting is clean at the bite edge or sealing surface. Refer to the above illustration (1). Replace any suspect high pressure line if the glass beads cannot remove corrosion, scale or rust from the sealing surfaces and/or pitting or any other damage that is found.
After cleaning all of the fuel injector high-pressure line fittings with the glass beads, clean by using compressed air to blow any debris and/or media glass beads from inside and outside of all the fittings and lines. Afterwards, wash thoroughly with All Purpose Parts Cleaner, P/N 12378553 (in Canada, P/N 88901247, Brake Parts Cleaner) or equivalent. Repeat this process until all of the debris and/or media glass beads have been removed from the fittings and lines.
Fuel Injector Installation
Install the fuel injectors and lines using published service procedures.
Ensure proper torquing of the fuel injector line. An under-torqued fuel injector line will not seal properly and an over-torqued fuel injector line may damage the fuel injector fitting. An improperly sealed or damaged fuel injector line or fuel injector fitting may cause a fuel leak.
Inspection For Fuel Leaks Into the Engine After Repair
Run the engine at idle for 10 minutes. Inspect for external fuel leaks while the engine is running.
Stop the engine and wait 10 minutes, then check the engine oil level. This will be the initial oil level.
Run the engine at idle for 5 minutes while commanding the fuel pressure to 160 MPa using a scan tool.
Stop the engine and wait 10 minutes, then check the oil level.
If the engine oil level is more than 4.7 mm (3/16 in) above the initial oil level, refer to the Fuel Leaks Inside of Engine procedure in the Engine Controls - 6.6L section of the Service Manual.
If the engine oil level is less than 4.7 mm (3/16 in) above the initial oil level, the repair is completed.
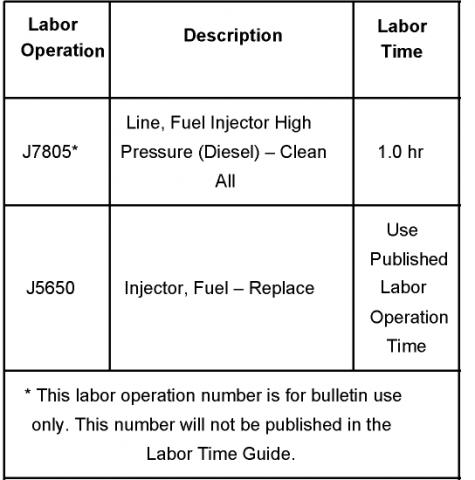
Parts Information
Warranty Information
Date: October 17, 2006
INFORMATION
Subject:
Information on Servicing Fuel Injectors to Avoid Contamination Models:
2001-2007 Chevrolet Silverado
2003-2007 Chevrolet Kodiak C4500/C5500 Series
2006-2007 Chevrolet Express Vans
2001-2007 GMC Sierra
2003-2007 GMC TopKick C4500/C5500 Series
2006-2007 GMC Savana Vans with 6.6L Duramax(TM) Diesel Engine (VINs 1, 2, 6, D - RPOs LB7, LLY, LMM, LBZ)
Supercede:
This bulletin is being revised to provide a new service procedure for cleaning fuel injector high pressure lines. Please discard Corporate Bulletin Number 03-06-04-036 (Section 06 - Engine/Propulsion System).
Fuel injectors may become contaminated during engine servicing. Debris between the injector line and the injector line nut may fall into the injector fuel inlet upon removal. Refer to the following SI procedures when following the procedures below on servicing fuel injectors/lines. This should resolve the concern.
Fuel Injection Fuel Rail Assembly Replacement - Bank 1
Fuel Injection Fuel Rail Assembly Replacement - Bank 2
Fuel Injector Replacement (Right)
Fuel Injector Replacement (Left)
Removal of Fuel Injector Lines
Before removing the fuel injector line, use compressed air to blow any debris from between the fuel injector line and the fittings (1, 2). Wipe the fittings (1) clean of debris.
Spray lithium grease, P/N 89021668 (in Canada, P/N 89021674), or equivalent, between the fuel injector line and fittings (1, 2) to assist in containing any debris during removal.
Remove the fuel injector line.
Remove the upper valve cover.
Remove the lower valve cover.
After the fuel line is removed and the fuel injector inlet is exposed, DO NOT use compressed air to clean debris. Using compressed air can allow debris to enter the fuel injector inlet and damage the fuel injector.
Immediately after removal of the lower valve cover, use a vacuum source to remove any contamination in the fuel injector inlet (1).
Fuel Injector Cleaning and Inspection
The fuel injector must be cleaned with the proper cleaning equipment. DO NOT use abrasive cleaning methods such as a metallic brush to remove deposits. Cleaning an injector with improper tools may damage the fuel injector.
Use a soft bristle non-metallic brush and fuel injector/top engine cleaner, P/N 88861802 (in Canada, P/N 992872), or equivalent, to remove any deposits from the nozzle tip (1) and the copper washer sealing area (2) before reinstallation.
Inspect the fuel injector nozzle tip (1) for cracks, dents, or other damage.
Inspect the nozzle tip (1) for any signs of discoloration (dark yellow, tan, or blue) due to excessive heat.
Replace the injector if any damage is found.
Refer to Service Bulletin Number 05-06-04-067 for information on injector bore cleaning.
Clean the fuel injector high-pressure lines by following the service information procedure outlined in this bulletin.
Inspect the fuel injector high-pressure line for excessive corrosion, scale or rust to the sealing surface.
Refer to the above illustration.
Medium size media glass beads have a cleaning and peening action and do not remove metal. They do not have the quick abrasive action of sharp edged media. Glass beads clean rust, scale and corrosion from metal parts without any damage.
Use an Abrasive Blasting Cabinet, P/N 624-AST-SBC1, (to order, call GM Dealer Equipment at 1-800-GMTOOLS), or equivalent, with a medium size media glass beads to clean the high pressure lines and fittings.
Black plastic electrical tape or equivalent will protect the fittings outside coating from being removed with the media. This must be done to all sixteen high pressure fittings.
Install black plastic electrical tape or equivalent on both of the fittings.
Refer to the above illustration (1).
When using an Abrasive Blasting Cabinet or equivalent, make sure you only clean the inside of the fittings and as much of the fitting threads as possible.
Refer to the above illustration (2).
Use pipe cleaners to block the ends of the high pressure lines so the abrasive blasting glass beads will not contaminate the inside of the pipes. Refer to the above illustration (1). Before removing the pipe cleaners, clean by using compressed air to blow any debris and/or media glass beads from the pipe cleaners.
There may be some area of the fitting or line that the glass beads did not clean very well. Disregard any surface that did not clean up as long as the area of the fitting is clean at the bite edge or sealing surface. Refer to the above illustration (1). Replace any suspect high pressure line if the glass beads cannot remove corrosion, scale or rust from the sealing surfaces and/or pitting or any other damage that is found.
After cleaning all of the fuel injector high-pressure line fittings with the glass beads, clean by using compressed air to blow any debris and/or media glass beads from inside and outside of all the fittings and lines. Afterwards, wash thoroughly with All Purpose Parts Cleaner, P/N 12378553 (in Canada, P/N 88901247, Brake Parts Cleaner) or equivalent. Repeat this process until all of the debris and/or media glass beads have been removed from the fittings and lines.
Fuel Injector Installation
Install the fuel injectors and lines using published service procedures.
Ensure proper torquing of the fuel injector line. An under-torqued fuel injector line will not seal properly and an over-torqued fuel injector line may damage the fuel injector fitting. An improperly sealed or damaged fuel injector line or fuel injector fitting may cause a fuel leak.
Inspection For Fuel Leaks Into the Engine After Repair
Run the engine at idle for 10 minutes. Inspect for external fuel leaks while the engine is running.
Stop the engine and wait 10 minutes, then check the engine oil level. This will be the initial oil level.
Run the engine at idle for 5 minutes while commanding the fuel pressure to 160 MPa using a scan tool.
Stop the engine and wait 10 minutes, then check the oil level.
If the engine oil level is more than 4.7 mm (3/16 in) above the initial oil level, refer to the Fuel Leaks Inside of Engine procedure in the Engine Controls - 6.6L section of the Service Manual.
If the engine oil level is less than 4.7 mm (3/16 in) above the initial oil level, the repair is completed.
Parts Information
Warranty Information
Last edited by 2500HeavyDuty; Dec 22, 2009 at 04:33 PM.

Thread
Thread Starter
Forum
Replies
Last Post
Jet A Fuel
6.7 Liter Dodge Cummins 07.5-12
3
Aug 3, 2015 10:45 AM
RatsMC
Chevy/GMC 6.2L and 6.5L
19
May 4, 2015 05:25 PM


