
oil leak?


Thread Starter
|
Diesel Fan
Joined: Nov 2010
Posts: 22
Likes: 0
From: Boulder City, NV
I have an 02 dodge 2500 and it has a pretty bad oil leak. I know where it is coming from but dont know if i need any special tools or something to fix it. The leak is coming from the cover that bolts to the front of the engine block behind the belt. I know that there are gears in there and want to know how hard is it to pull those gears or what do i have to do to get that off? Any advise? Thanks


Diesel Bombers Sponsor

Joined: Mar 2007
Posts: 3,791
Likes: 367
From: Blowing Rock,NC
Pretty big job to fix, requiring some pretty advanced technical and wrenching knowledge. Not saying it cant be done by an at home type guy, It's just a scary job for some once they realize the depth of it, And some places just wont take on a job thats already torn down.
If it comes down to the case needing to be removed to repair the oil leak, The cam must come out, It get's a little hairy the first time you do it but it's not too bad.
Here's the repair instructions PER THE SERVICE MANUAL,
REMOVAL
1. Disconnect the battery negative cables.
2. Raise vehicle on hoist.
3. Remove the oil pan and suction tube.
4. Partially drain engine coolant into container suitable for re-use.
5. Lower vehicle.
6. Remove radiator upper hose.
7. Disconnect coolant recovery bottle hose from radiator filler neck and lift bottle off of fan shroud.
8. Disconnect windshield washer pump supply hose and electrical connections and lift washer bottle off of fan shroud.
9. Remove the fan shroud-to-radiator mounting bolts.
10. Remove viscous fan/drive assembly. The fan drive nut has left handed threads.
11. Remove cooling fan shroud and fan assembly from the vehicle.
12. Remove the accessory drive belt.
13. Remove the cooling fan support/hub from the front of the engine.
14. Raise the vehicle on hoist.
15. Remove the crankshaft damper.
16. Lower the vehicle
17. Remove the gear cover-to-housing bolts and gently pry the cover away from the housing, taking care not to mar the gasket surfaces.
18. Remove the fuel injection pump.
19. Disconnect the camshaft position sensor connector.
20. Raise the tappets and remove the camshaft.
21. Remove the gear housing and gasket.
22. Clean the gasket material from the cylinder block.
INSTALLATION
1. Install a new gasket and the gear housing. Tighten the bolts to 24 Nm (18 ft. lbs.) torque.
2. Connect the camshaft position sensor connector.
3. Install the injection pump.
4. Install the camshaft. Align the crankshaft, camshaft, and injection pump gear marks as shown.
5. If a new housing is installed, the camshaft position sensor must be transferred to the new housing.
6. Obtain a seal pilot/installation tool from a crankshaft front seal service kit and install the pilot into the crankshaft front oil seal.
7. Apply a bead of Mopar(R) Silicone Rubber Adhesive Sealant or equivalent to the gear housing cover. Be sure to surround all through holes.
8. Using the seal pilot to align the cover, install the cover to the housing and install the bolts. Tighten the bolts to 24 Nm (18 ft. lbs. ) torque.
9. Remove the seal pilot.
10. Raise the vehicle.
11. Trim any excess gear housing gasket to make it flush with the oil pan rail.
12. Using a new gasket, install the oil pan and suction tube.
13. Install the crankshaft damper and tighten bolts to 125 Nm (92 ft. lbs.) torque.
14. Lower vehicle.
15. Install the fan support/hub assembly and tighten bolts to 24 Nm (18 ft. lbs.) torque.
16. Install the accessory drive belt.
17. Install the cooling fan and shroud together. Start fan nut and fan shroud-to-radiator bolts by hand.
18. Tighten fan drive nut to 57 Nm (42 ft. lbs.) torque.
19. Tighten fan shroud-to-radiator bolts to 11 Nm (95 inch lbs.) torque.
20. Install the windshield washer reservoir to the fan shroud and connect the washer pump supply hose and electrical connection.
21. Install the coolant recovery bottle to the fan shroud and connect the hose to the radiator filler neck.
22. Install the radiator upper hose and clamps.
23. Add engine oil.
24. Add coolant.
25. Connect the battery cables.
26. Start engine and inspect for leaks.
Last edited by mysterync; Feb 24, 2011 at 09:37 PM.
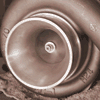
sorry i have a newbie question what does 66/71/16 does that mean u have two turbos one is a 66 and the other is a 71?? by the way thanks for the info cause I as well have same oil leak.
Diesel Bombers Sponsor
Joined: Mar 2007
Posts: 3,791
Likes: 367
From: Blowing Rock,NC
In turbo sizes we have a couple numbers but in this case it refers to a 66 compressor wheel, a 71 turbine wheel and a 16cm2 exhaust housing. These numbers tell us in a rough idea of the amounts of air it can move. Your welcome for the info on the repair.

Thread
Thread Starter
Forum
Replies
Last Post
pro graphic solutions
Diesel In Distress - Support Ticket
1
Feb 10, 2015 03:48 PM


