
Boost Pressure Tester Build Instructions

Thread Starter
|
BOMBARDIER

Joined: Mar 2007
Posts: 12,854
Likes: 1,112
From: Illinois?
This is a very simple guide to build a cheap version of a boost pressure tester. You can make the pipe in any configuration you want. The only requirements are that you can seal it in the intake line and apply air pressure to it. Past that it's free for all. These are just parts I had layin around.
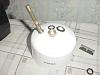
This is a list and photo of all the parts I used:
1. Threadable Replacement Valve Stem. I used a tractor stem but you can also use a high pressure truck tire stem the same way. You can also use a regular rubber one if you use JB Weld to hold it in place.
2. 3" 90 Degree Street Elbow.
3. 3" cap.
4. PVC Cement.
5. 9/16" O Ring Seals
Optional. I added this step so that I could hook the compressor up to the tester and set the regulator on the desired pressure and it maintains the pressure without me having to watch it and keep it pressurized. Makes it easier to do by yourself.
6. Brass Pipe Coupler 1/4"
7. 1/4" Male Air Chuck
8. 1/4" Female Air Chuck
9. JB Weld

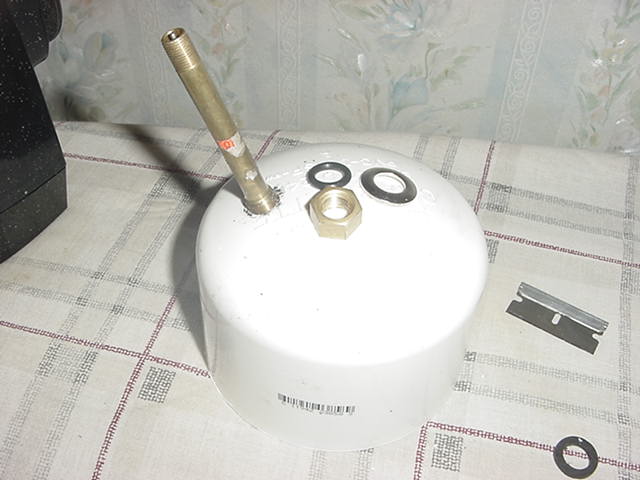
Step 1, Drill holes in your cap to fit the valve stem and air chuck threaded portions. These need to fit tight so they seal good.
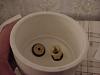
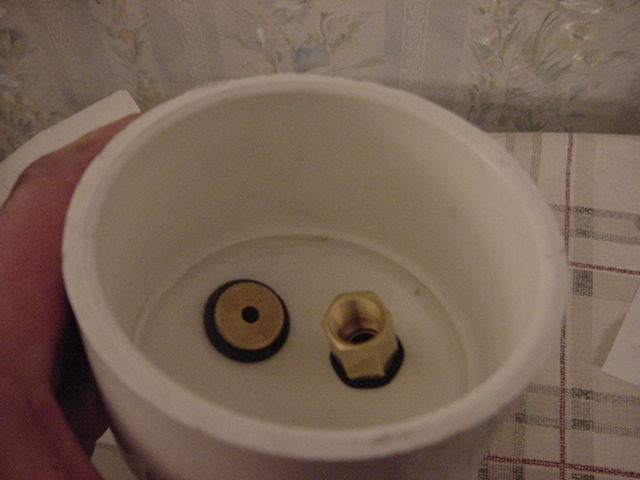
Step 2, The valve stem will have a rubber seal on the bottom side you just need to add an a 9/16" O ring washer to the top side of it. It's over kill but just to be sure it's sealed. OPTIONAL: Use the Male Air Chuck with a 5/8" O ring washer on top and bottom in the other hole. Place the female air chuck through the cap and hold it in place with the 1/4" brass coupler, O rings top and bottom.
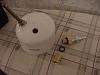
Step 3, Sand the inside of the cap and the outside of the noarrow portion of the 90 degree elbow. Just enough to rough it it up some and clean it good. Spread some glue around both the same places and twist the cap on the elbow. Be sure you have it the direction you want it to face as soon as it's on cause the glue is gonna grab it quick.
Step 4, If your using the optional air chuck fittings. Use some JB Weld to fill in the hose end of the female chuck. This will be used as a plug when your using the valve stem to pressurize the system.
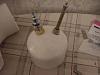
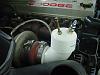
Step 5, Your Done Building. Now the last photo shows where to hook it up on your truck to test your system.
Now pressurize your system, with the truck turned off. Personally I try it at 20psi first and if everything comes out good there then I move up to 35psi and check it again.
Use a spray bottle with water and a little bit of dish soap in it and spray everything in the sytem. All hoses, all fittings and even the intercooler itself. With pressure in it anyplace it is leaking the spray will make bubbles.
Feel free to ask questions or make comments.


This is a list and photo of all the parts I used:
1. Threadable Replacement Valve Stem. I used a tractor stem but you can also use a high pressure truck tire stem the same way. You can also use a regular rubber one if you use JB Weld to hold it in place.
2. 3" 90 Degree Street Elbow.
3. 3" cap.
4. PVC Cement.
5. 9/16" O Ring Seals
Optional. I added this step so that I could hook the compressor up to the tester and set the regulator on the desired pressure and it maintains the pressure without me having to watch it and keep it pressurized. Makes it easier to do by yourself.
6. Brass Pipe Coupler 1/4"
7. 1/4" Male Air Chuck
8. 1/4" Female Air Chuck
9. JB Weld

Step 1, Drill holes in your cap to fit the valve stem and air chuck threaded portions. These need to fit tight so they seal good.
Step 2, The valve stem will have a rubber seal on the bottom side you just need to add an a 9/16" O ring washer to the top side of it. It's over kill but just to be sure it's sealed. OPTIONAL: Use the Male Air Chuck with a 5/8" O ring washer on top and bottom in the other hole. Place the female air chuck through the cap and hold it in place with the 1/4" brass coupler, O rings top and bottom.


Step 3, Sand the inside of the cap and the outside of the noarrow portion of the 90 degree elbow. Just enough to rough it it up some and clean it good. Spread some glue around both the same places and twist the cap on the elbow. Be sure you have it the direction you want it to face as soon as it's on cause the glue is gonna grab it quick.
Step 4, If your using the optional air chuck fittings. Use some JB Weld to fill in the hose end of the female chuck. This will be used as a plug when your using the valve stem to pressurize the system.
Step 5, Your Done Building. Now the last photo shows where to hook it up on your truck to test your system.

Now pressurize your system, with the truck turned off. Personally I try it at 20psi first and if everything comes out good there then I move up to 35psi and check it again.
Use a spray bottle with water and a little bit of dish soap in it and spray everything in the sytem. All hoses, all fittings and even the intercooler itself. With pressure in it anyplace it is leaking the spray will make bubbles.
Feel free to ask questions or make comments.
Thread Starter
|
BOMBARDIER
Joined: Mar 2007
Posts: 12,854
Likes: 1,112
From: Illinois?
Forgot to add the most important part of the project. Be sure to clean all the plastic shavings off the wifes ironing board you were usin as a workbench before she comes home from work.
Site Mascot
Joined: Mar 2007
Posts: 16,010
Likes: 940
From: Why-homing
Most Excellent Dennis.
I built mine almost identical to this
on the last bomb party we leak tested 9 trucks and found leaks on every one of em .........encluding mine
Build yerself one of these they work great
I built mine almost identical to this
on the last bomb party we leak tested 9 trucks and found leaks on every one of em .........encluding mine
Build yerself one of these they work great
BOMBARDIER
Joined: Mar 2007
Posts: 23,293
Likes: 1,322
From: North of You
BOMBARDIER
Joined: Jul 2007
Posts: 12,809
Likes: 668
From: Billlings, MT

Leaked in particular spot, or all over the place?
Last edited by Dr. Evil; May 15, 2008 at 09:19 PM.
Site Mascot
Joined: Mar 2007
Posts: 16,010
Likes: 940
From: Why-homing
boots boots boots .......they all leak every where.......OEM boots are crap
also found a bad gasket at grid heaters on one ride
No I didnt use MAMA's iorn board...............I am a man and have a work bench .....Dennis is a girlie man
also found a bad gasket at grid heaters on one ride
No I didnt use MAMA's iorn board...............I am a man and have a work bench .....Dennis is a girlie man
Thread Starter
|
BOMBARDIER
Joined: Mar 2007
Posts: 12,854
Likes: 1,112
From: Illinois?
Mama Nature took my workshop and my bench off to the land of Oz. Damn Toto's probably usin it as a **** post by now. This was one a those evening projects while I was watchin TV. I got 3 of these testers now. Didn't like the first, so I made another. Just put this one together cause so many guys on here need to test their system and nobody seemed to know what we are talkin about when we tell them to test their system. Put it together so I could take the pictures.
Wasn't even thinkin when I didn't get the scraps cleaned up in time. Took me 20 minutes to put this thing together and hours of catchin hell from Mama for doin it.
Wasn't even thinkin when I didn't get the scraps cleaned up in time. Took me 20 minutes to put this thing together and hours of catchin hell from Mama for doin it.


