ATS or BD.....you decide.
#1
 06-13-2009, 03:19 PM

The following write-up is based on my personal feelings and experiences installing two competing products and dealing with the companies representatives regarding those products. Any decision you make is your own, what I am going to give you is my experience with each.
All products were PURCHASED by the end users and NO sponsorship or endorsements were presented for this.
The products that I�ll be discussing are two competing sets of compound turbos, both installed on 2006 Dodge Ram�s with Cummins Turbo Diesel engines. One set was from ATS, which included the Aurora 3000 and Aurora 5000 turbos and the other was from BD Power, which included the SuperB and R700 turbos. Both are advertised as towing / race setups.
The two vehicles that the products were installed on:
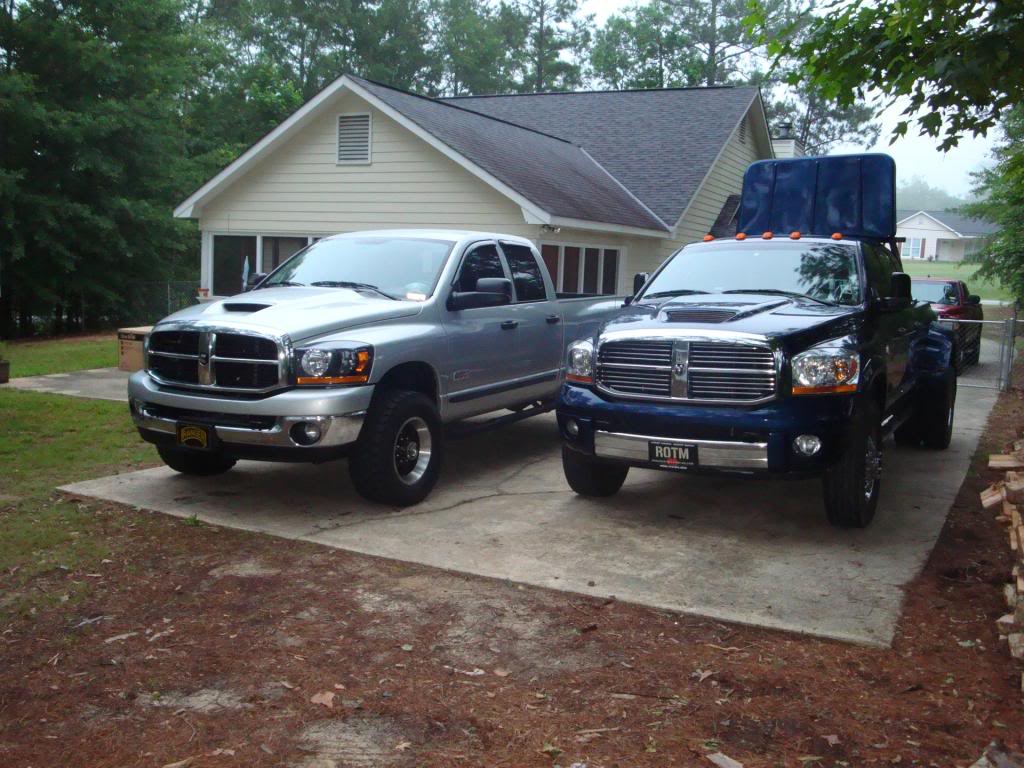
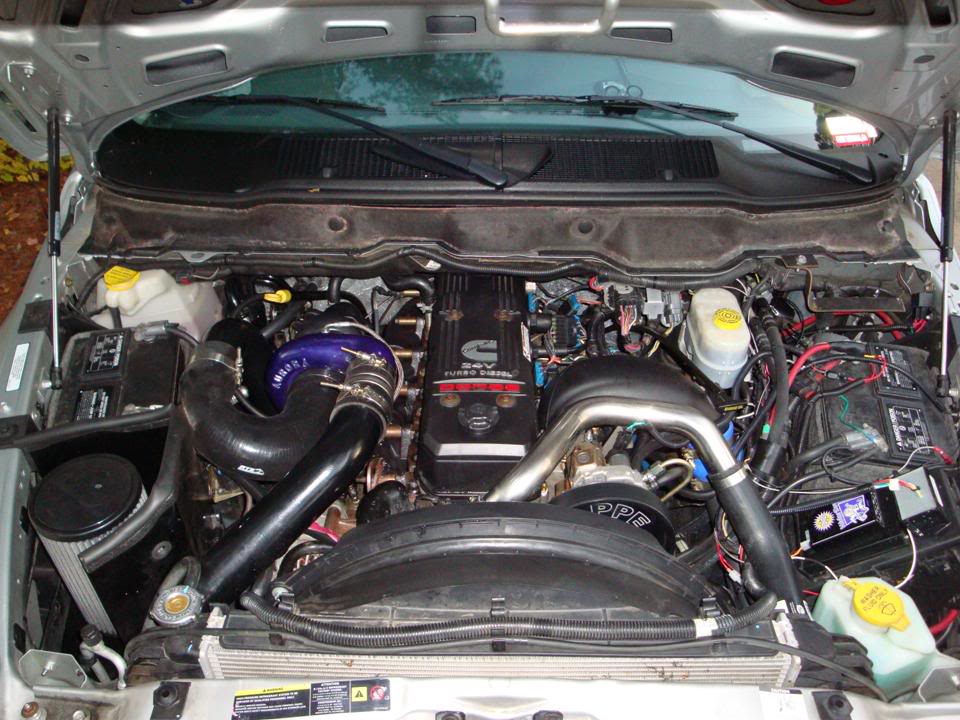
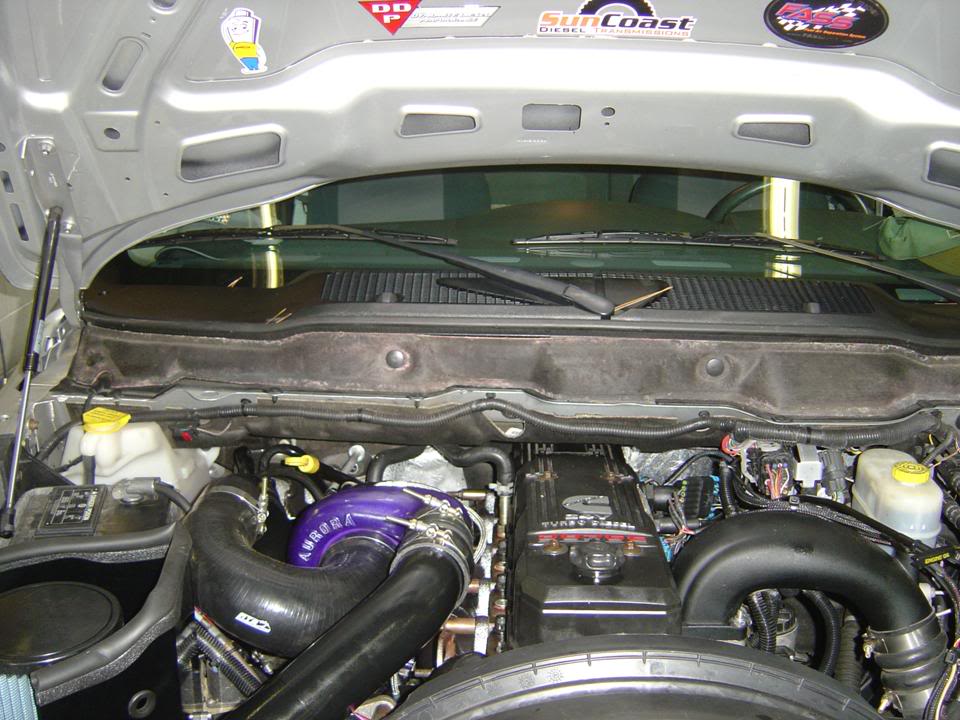
ATS Aurora Compounds on the silver 2500:
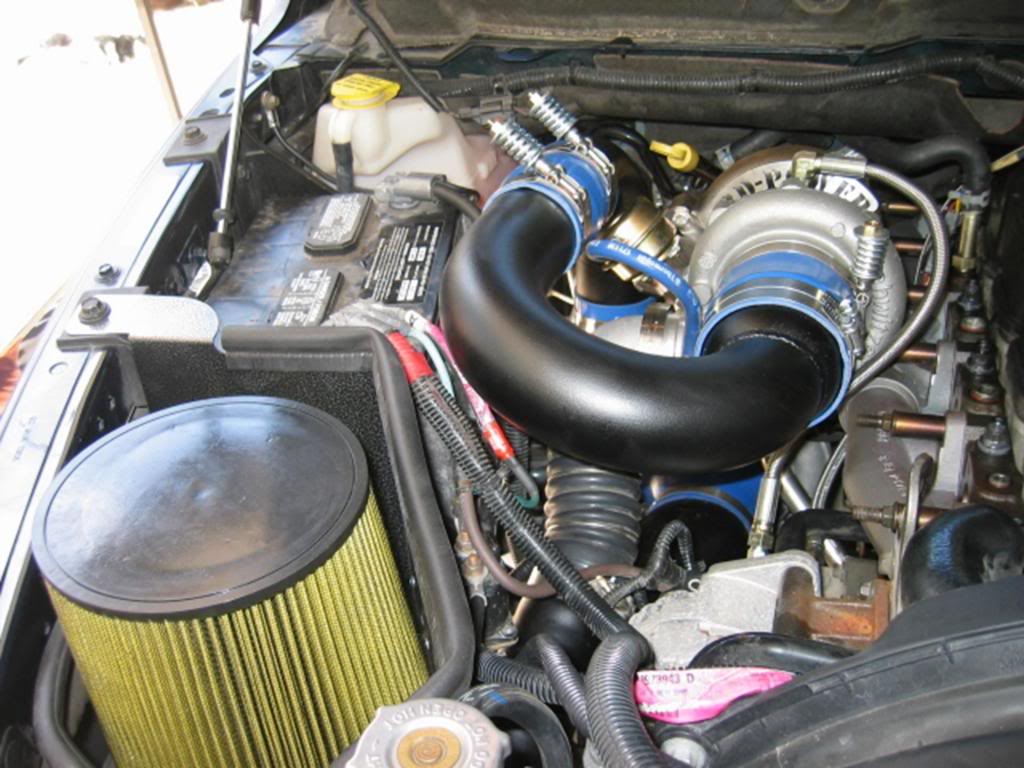
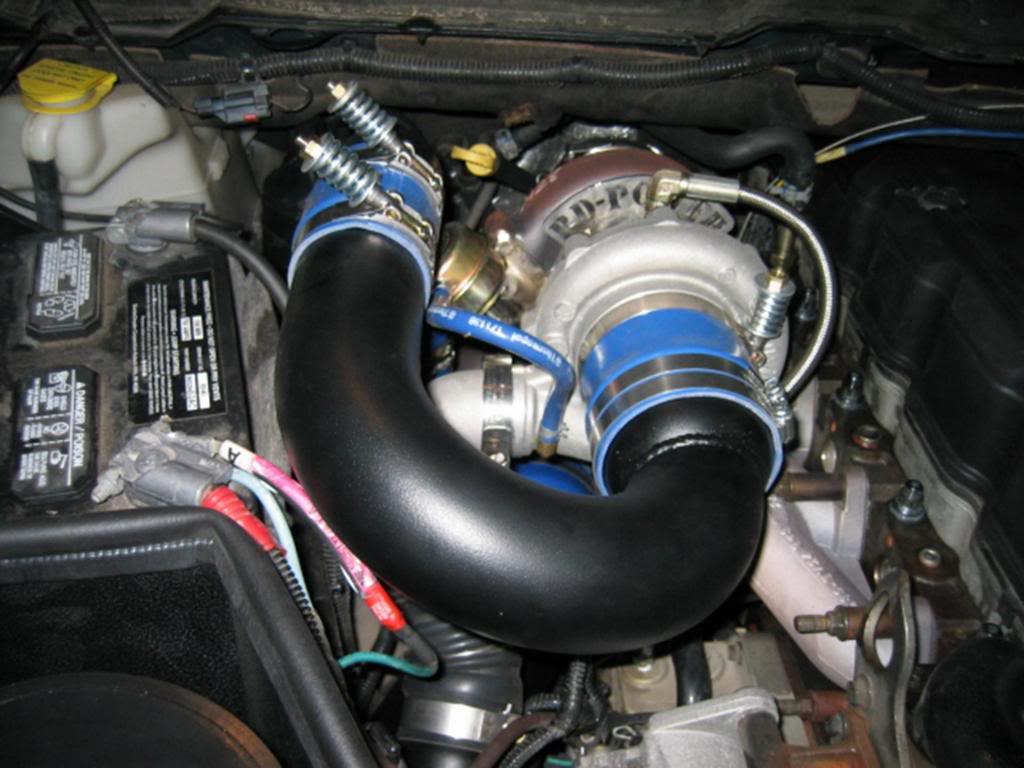
BD Power R700 Compounds on the blue 3500:
Now to begin, neither setup was completely problem free during the installation, but the BD setup posed many, many problems than the ATS setup did.
The problem with the ATS kit were:
1 � necessity to relocate an AC line, which required getting one made at a local shop. Cost was reimbursed by ATS with receipt and picture of modification.
2 � the turbo to intercooler boost boot was sized for an OEM intercooler, which required calling ATS who sent the correct one free of charge and overnight.
Now, the BD kit had these issues:
1 - missing band clamps
2 - incorrect studs for primary turbo to adapter bracket (wrong thread pitch and depth)
3 - missing exhaust manifold cap head bolts
4 - primary turbo adapter bracket would not clear coolant line even when cut as described
5 - primary turbo location causes contact with the passenger side spring mount
6 - 1/8 NPT EGT holes were incorrectly tapped and were on the wrong side of the manifold for this application
7 - down pipe flange was at the incorrect angle to mate with the primary and clear the firewall
8 - instructions for compressor housing, turbine housing and shaft housing alignment were incorrect
9 - no torque specs on fasteners (instructions simply said to tighten)
10 - air box bracket to radiator was poorly fit
11 - v-band clamp for secondary to elbow did not fit correctly and had to be tweeked
12 - no rust preventative applied to parts (there was rust on many of the cast parts, including the turbine housing, including the insides.
13 - piping needs to be fixed (the intake tube and secondary boost tube make contact with each other)
14 - secondary oil drain adapter had to be modified to fit the frost plug hole (it required beveling the edges with a die grinder to get it to seat)
15 - several nuts had to be filed in order to clear adjacent parts, specifically the secondary to manifold nuts so they clear the oil drain
Now, all of the issues above, for both setups, were able to be resolved locally with either parts that were available in the shop or by running to the local hardware store.
I will go into these problems and fixes later in the write-up.
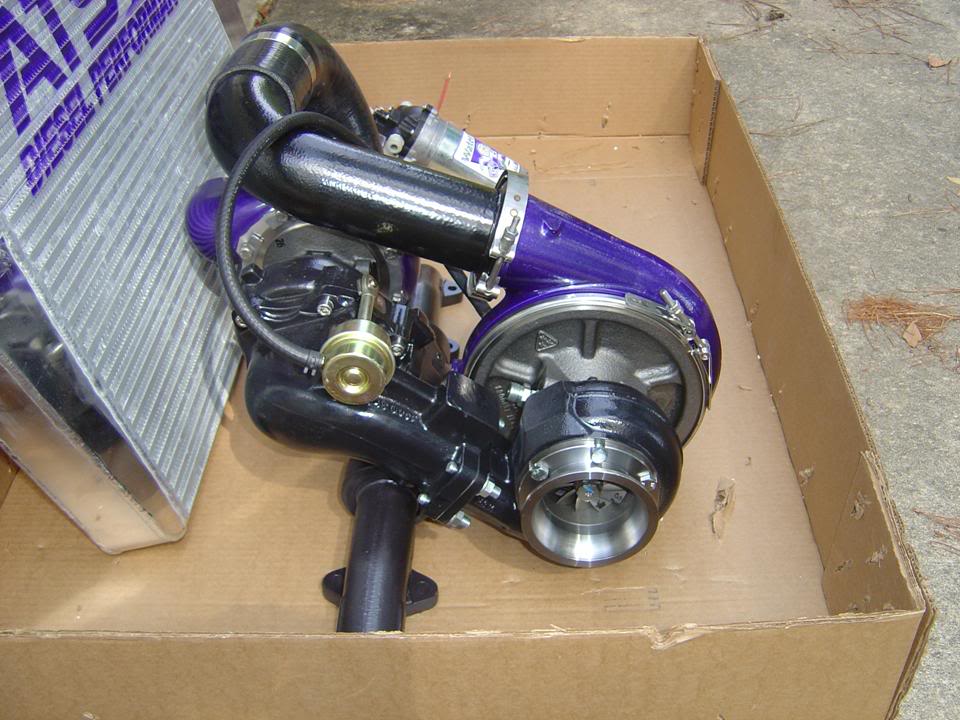
When the parts arrived, they were in very different conditions from each other. The ATS kit came completely assembled and made for a very easy install. You had the finished product to look at prior to installation.
The parts arrived complete, free of rust and corrosion and clocked correctly for the application.
The BD kit arrived in multiple boxes and unassembled. Upon initial inspection, there were numerous parts missing (as noted previously) and there was considerable rust and corrosion on and in the turbine housing.
Now from this point, the installations were vastly different. For the ATS setup, I was done in a single day (minus the fix for the AC line and getting the new boost boot for the ATS intercooler). I began this install at 11 am and was finished and running by 6 pm, including putting the stock intercooler back on. I did this install by myself with no help other than having my neighbor help lower the primary turbo into position.
The BD kit, too 2 days to complete. This was done with 5 people assisting at various stages of the installation. We began Day 1 at 8 am and worked until 1030 PM. The next day we began at 8 am and finished at approx 3 pm. The experience of the crew that were present for this install included myself, a factory trained Dodge parts / service manager, a diesel bus fleet manager and several others with considerable time turning a wrench.
To begin, obviously all the original parts had to be removed. Both of the trucks had OEM manifolds and turbos, both had AFE Stage II intakes, both had 5� exhausts installed. The blue 3500 had a Pac-Brake that had already been disconnected and posed no additional labor to remove.
Silver 2500:
Blue 3500:
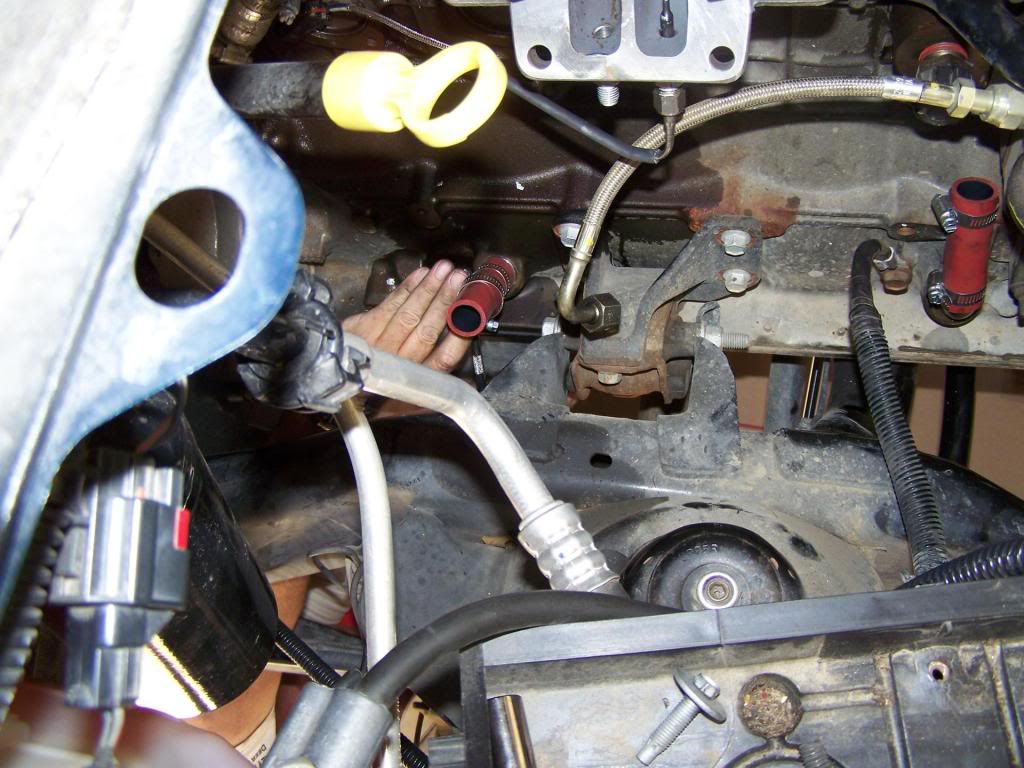
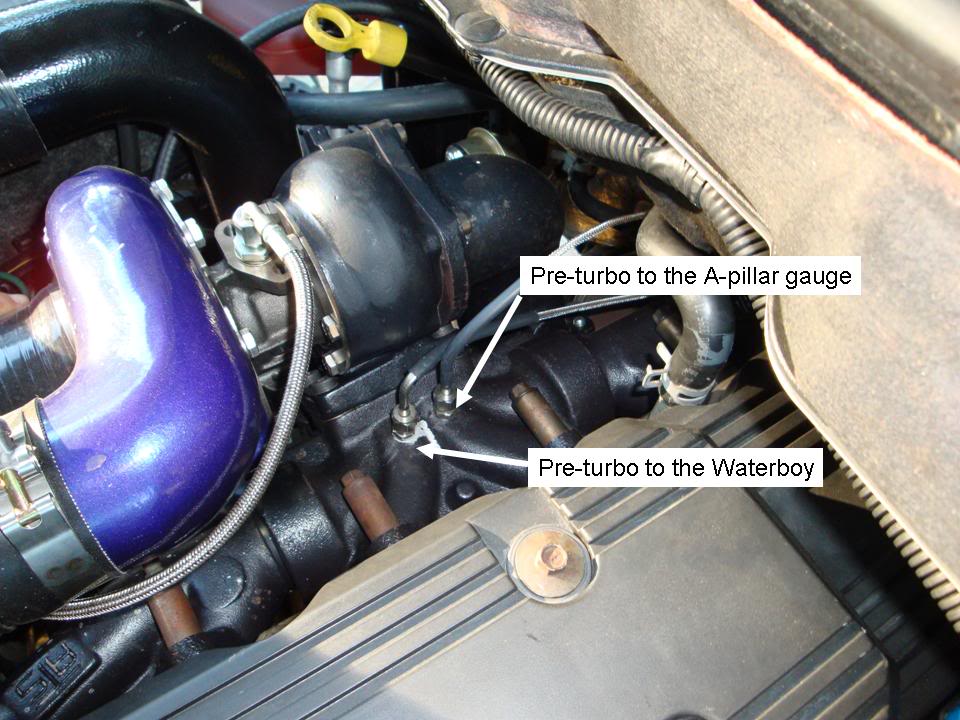
Once the old intakes, manifolds, turbo�s and passenger side batteries were removed, we can now start doing a few things were common to both kits, but became uncommon very quickly. Both kits require pulling out a frost plug leading to the oil pan for the drain on the secondary charger.
The picture below shows where the OEM return is (rear of engine) and the new secondary drain is located (front of engine)
All products were PURCHASED by the end users and NO sponsorship or endorsements were presented for this.
The products that I�ll be discussing are two competing sets of compound turbos, both installed on 2006 Dodge Ram�s with Cummins Turbo Diesel engines. One set was from ATS, which included the Aurora 3000 and Aurora 5000 turbos and the other was from BD Power, which included the SuperB and R700 turbos. Both are advertised as towing / race setups.
The two vehicles that the products were installed on:
ATS Aurora Compounds on the silver 2500:
BD Power R700 Compounds on the blue 3500:
Now to begin, neither setup was completely problem free during the installation, but the BD setup posed many, many problems than the ATS setup did.
The problem with the ATS kit were:
1 � necessity to relocate an AC line, which required getting one made at a local shop. Cost was reimbursed by ATS with receipt and picture of modification.
2 � the turbo to intercooler boost boot was sized for an OEM intercooler, which required calling ATS who sent the correct one free of charge and overnight.
Now, the BD kit had these issues:
1 - missing band clamps
2 - incorrect studs for primary turbo to adapter bracket (wrong thread pitch and depth)
3 - missing exhaust manifold cap head bolts
4 - primary turbo adapter bracket would not clear coolant line even when cut as described
5 - primary turbo location causes contact with the passenger side spring mount
6 - 1/8 NPT EGT holes were incorrectly tapped and were on the wrong side of the manifold for this application
7 - down pipe flange was at the incorrect angle to mate with the primary and clear the firewall
8 - instructions for compressor housing, turbine housing and shaft housing alignment were incorrect
9 - no torque specs on fasteners (instructions simply said to tighten)
10 - air box bracket to radiator was poorly fit
11 - v-band clamp for secondary to elbow did not fit correctly and had to be tweeked
12 - no rust preventative applied to parts (there was rust on many of the cast parts, including the turbine housing, including the insides.
13 - piping needs to be fixed (the intake tube and secondary boost tube make contact with each other)
14 - secondary oil drain adapter had to be modified to fit the frost plug hole (it required beveling the edges with a die grinder to get it to seat)
15 - several nuts had to be filed in order to clear adjacent parts, specifically the secondary to manifold nuts so they clear the oil drain
Now, all of the issues above, for both setups, were able to be resolved locally with either parts that were available in the shop or by running to the local hardware store.
I will go into these problems and fixes later in the write-up.
When the parts arrived, they were in very different conditions from each other. The ATS kit came completely assembled and made for a very easy install. You had the finished product to look at prior to installation.
The parts arrived complete, free of rust and corrosion and clocked correctly for the application.
The BD kit arrived in multiple boxes and unassembled. Upon initial inspection, there were numerous parts missing (as noted previously) and there was considerable rust and corrosion on and in the turbine housing.
Now from this point, the installations were vastly different. For the ATS setup, I was done in a single day (minus the fix for the AC line and getting the new boost boot for the ATS intercooler). I began this install at 11 am and was finished and running by 6 pm, including putting the stock intercooler back on. I did this install by myself with no help other than having my neighbor help lower the primary turbo into position.
The BD kit, too 2 days to complete. This was done with 5 people assisting at various stages of the installation. We began Day 1 at 8 am and worked until 1030 PM. The next day we began at 8 am and finished at approx 3 pm. The experience of the crew that were present for this install included myself, a factory trained Dodge parts / service manager, a diesel bus fleet manager and several others with considerable time turning a wrench.
To begin, obviously all the original parts had to be removed. Both of the trucks had OEM manifolds and turbos, both had AFE Stage II intakes, both had 5� exhausts installed. The blue 3500 had a Pac-Brake that had already been disconnected and posed no additional labor to remove.
Silver 2500:
Blue 3500:
Once the old intakes, manifolds, turbo�s and passenger side batteries were removed, we can now start doing a few things were common to both kits, but became uncommon very quickly. Both kits require pulling out a frost plug leading to the oil pan for the drain on the secondary charger.
The picture below shows where the OEM return is (rear of engine) and the new secondary drain is located (front of engine)
The following users liked this post:
biged681985 (06-14-2009)
#2
06-13-2009, 03:20 PM
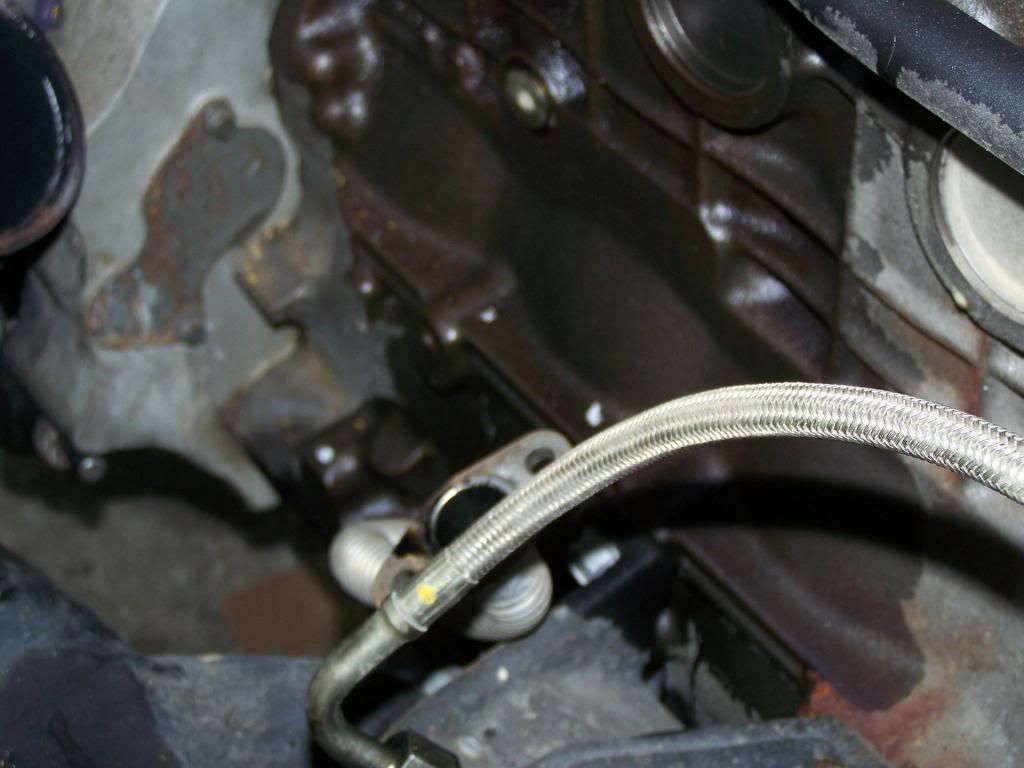
On the ATS kit, the primary charger is mounted in the exact same location as the OEM turbo was, it uses the existing oil drain line, bolts up to the existing exhaust elbow with the OEM v-band clamp and can retain the existing exhaust and associated components. The secondary charger utilizes the a new flexible steel line with an o-ring connection for the front return. Both connection fit easily and presented no problems.
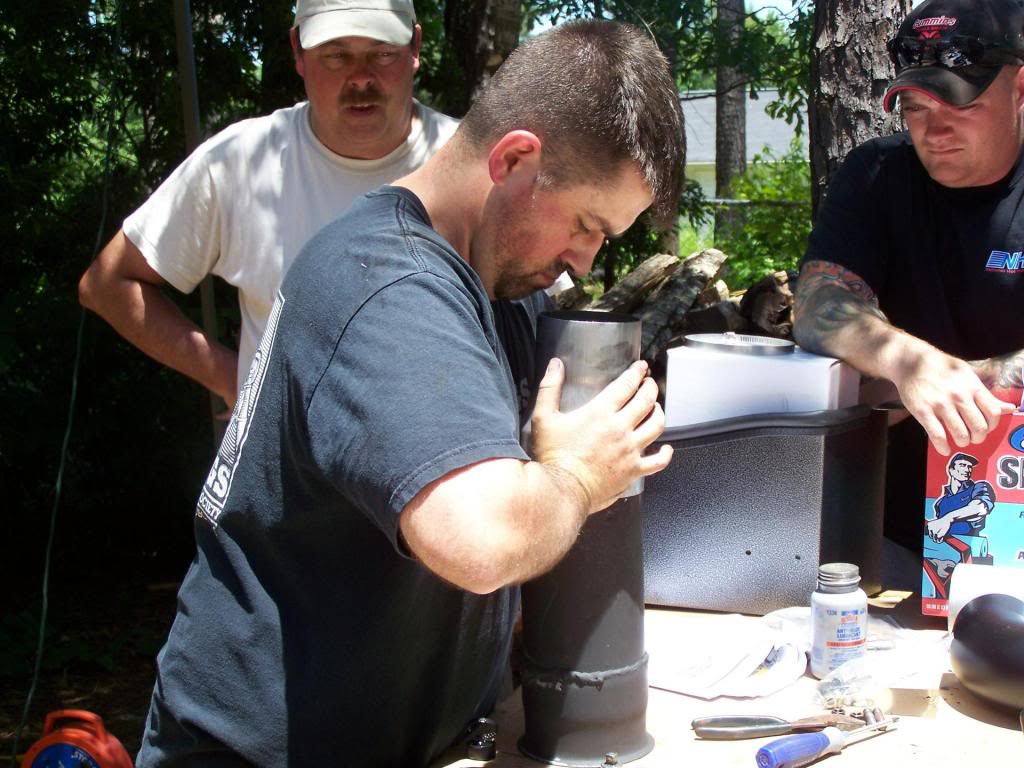
The BD kit required installing a steel adapter in the OEM return location and then a section of hose and 2 clamps to connect to the primary turbos, rigid steel drain pipe.
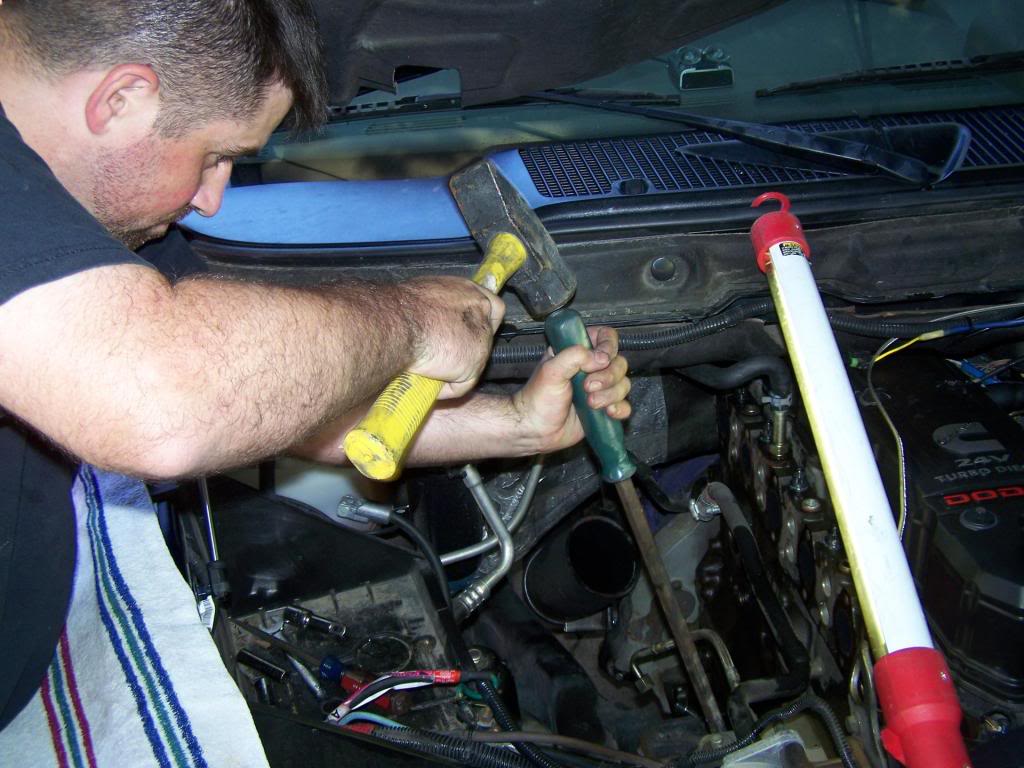
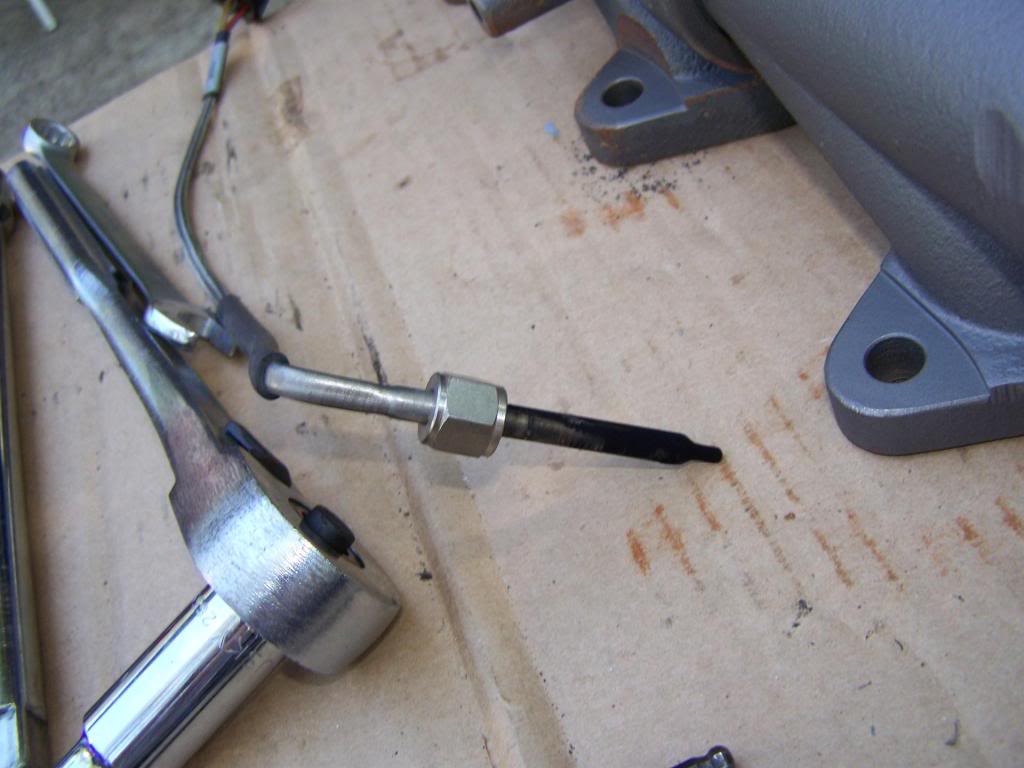
The secondary turbo also required a steel adapter to go in the frost plug hole. This adapter did not fit. The instructions said that you may have to use a punch to get it to fit….this was a mild understatement.
I tried brass and steel punches, using a reasonable amount of force and it would not even seat. I ended up need to use a pry bar and a mallet to mark the adapter where it was oversized so it could be re-sized wit h a die grinder.
Once it was chamfered and resized, the secondary adapter was installed. The picture below is of those two components and their associated hoses and clamps installed.

Now, from here, the ATS primary was attached the OEM exhaust elbow by removing the locator roll pins in the elbow and loosely attaching it to the existing down pipe for alignment and attachment to the secondary.
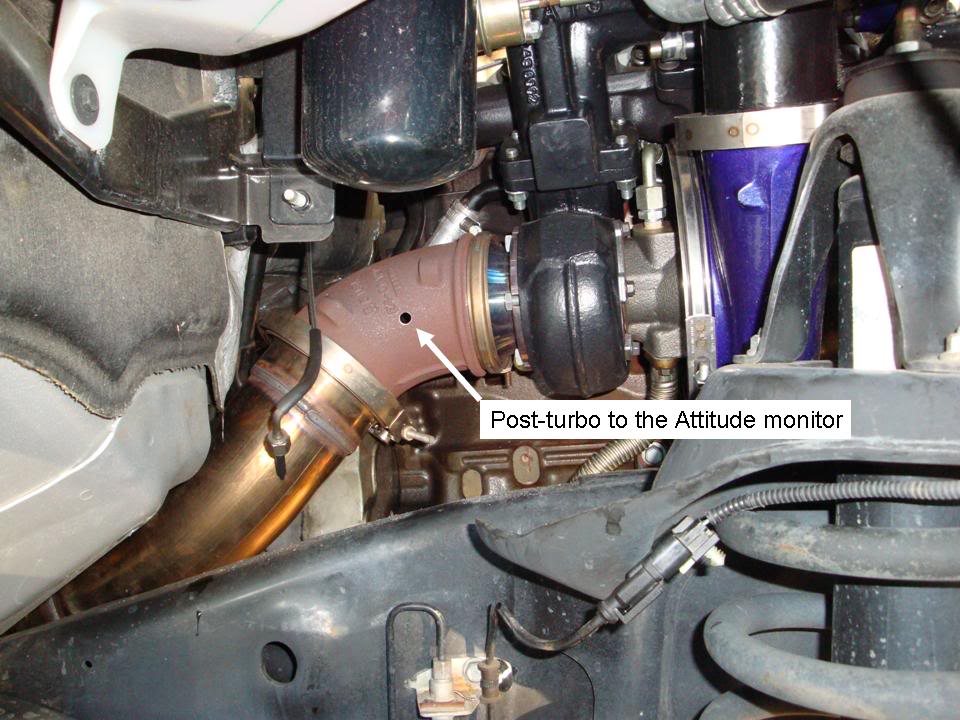
The BD kit does not sit in the OEM location and cannot reuse the existing elbow or down pipe. This presented a problem as both trucks had 5” exhausts and the BD downpipe that comes with the kit is 4”, which required getting an adapter to mate the two. This also eliminated the possibility of using the existing exhaust elbow and the post-turbo pyrometer used to monitor the exhaust brake.
Once this modification was made, the BD kit required draining approx 3 gals of coolant from the system. This was necessary because you had to cut the tube on the steel coolant line that runs near the bottom of the engine block. This was to install an adapter that bolted to existing bungs in the block. The kit came with a 90* adapter for this cut, but it was larger than the existing pipe and would not clear the bracket. We ended up fabricating a soft coolant line from the bottom of the engine to the heater core supply fitting. This still presented a problem as the edges of the supplied bracket are very sharp and would have cut the hose quickly. We omitted using the bracket at this point.
The BD kit required installing a steel adapter in the OEM return location and then a section of hose and 2 clamps to connect to the primary turbos, rigid steel drain pipe.
The secondary turbo also required a steel adapter to go in the frost plug hole. This adapter did not fit. The instructions said that you may have to use a punch to get it to fit….this was a mild understatement.
I tried brass and steel punches, using a reasonable amount of force and it would not even seat. I ended up need to use a pry bar and a mallet to mark the adapter where it was oversized so it could be re-sized wit h a die grinder.
Once it was chamfered and resized, the secondary adapter was installed. The picture below is of those two components and their associated hoses and clamps installed.
Now, from here, the ATS primary was attached the OEM exhaust elbow by removing the locator roll pins in the elbow and loosely attaching it to the existing down pipe for alignment and attachment to the secondary.
The BD kit does not sit in the OEM location and cannot reuse the existing elbow or down pipe. This presented a problem as both trucks had 5” exhausts and the BD downpipe that comes with the kit is 4”, which required getting an adapter to mate the two. This also eliminated the possibility of using the existing exhaust elbow and the post-turbo pyrometer used to monitor the exhaust brake.
Once this modification was made, the BD kit required draining approx 3 gals of coolant from the system. This was necessary because you had to cut the tube on the steel coolant line that runs near the bottom of the engine block. This was to install an adapter that bolted to existing bungs in the block. The kit came with a 90* adapter for this cut, but it was larger than the existing pipe and would not clear the bracket. We ended up fabricating a soft coolant line from the bottom of the engine to the heater core supply fitting. This still presented a problem as the edges of the supplied bracket are very sharp and would have cut the hose quickly. We omitted using the bracket at this point.
The following 2 users liked this post by cumminalong:
biged681985 (06-14-2009),
Diesel Dawgs Performance (06-13-2009)
#3
06-13-2009, 03:21 PM
From here, you must fit the exhaust adapter from the secondary to the primary on the BD compound. This again presented a problem. The studs supplied with the kit were incorrect in thread pitch, count and coarseness. We had to run to the hardware store to get fasteners of the correct type to bolt the adapter to the primary.
Once the primaries were positioned, we found the clocking that was called for in the BD directions was incorrect, so this was adjusted.
From here, both kits attached the secondary’s to the manifold prior to attaching the manifold to the engine block.
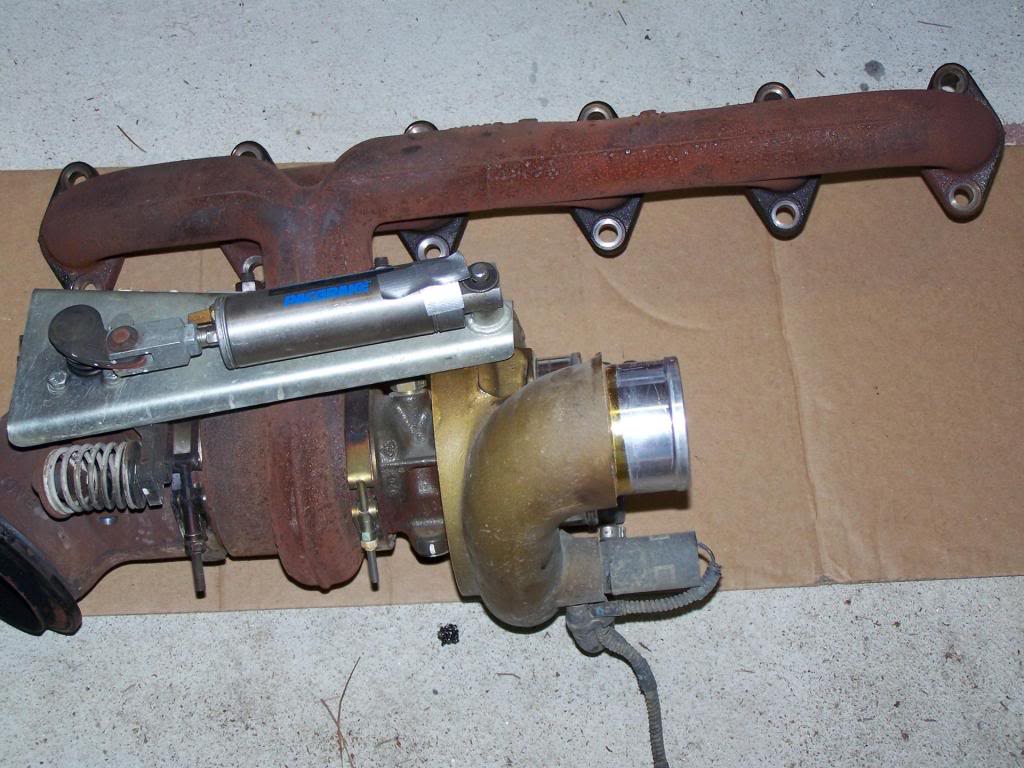
The ATS manifold came pre-drilled and tapped with four 1/8 NPT ports. Two on top and two on the bottom. These ports were in the correct locations for the application and were correctly tapped.
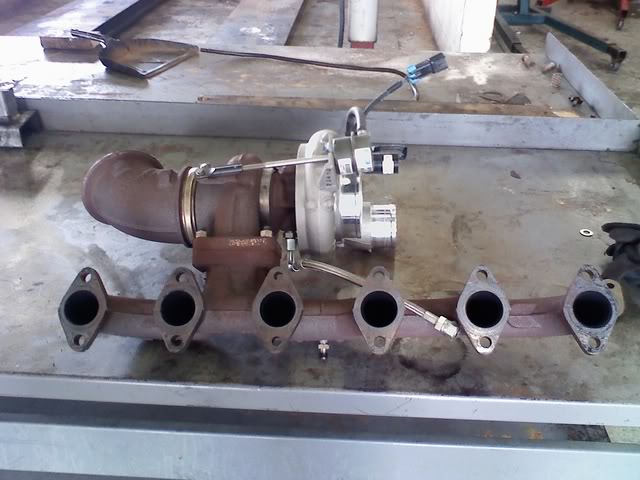
The BD kit came with two pre-drilled and tapped ports. The ports, as the manifold was to be installed, were located on the bottom of the manifold. They were also not tapped deep enough to properly seat a 1/8 NPT fitting. We could only get 2 threads of the probe fitting in before it stopped. This required tapping the manifold further to allow proper EGT probe function.

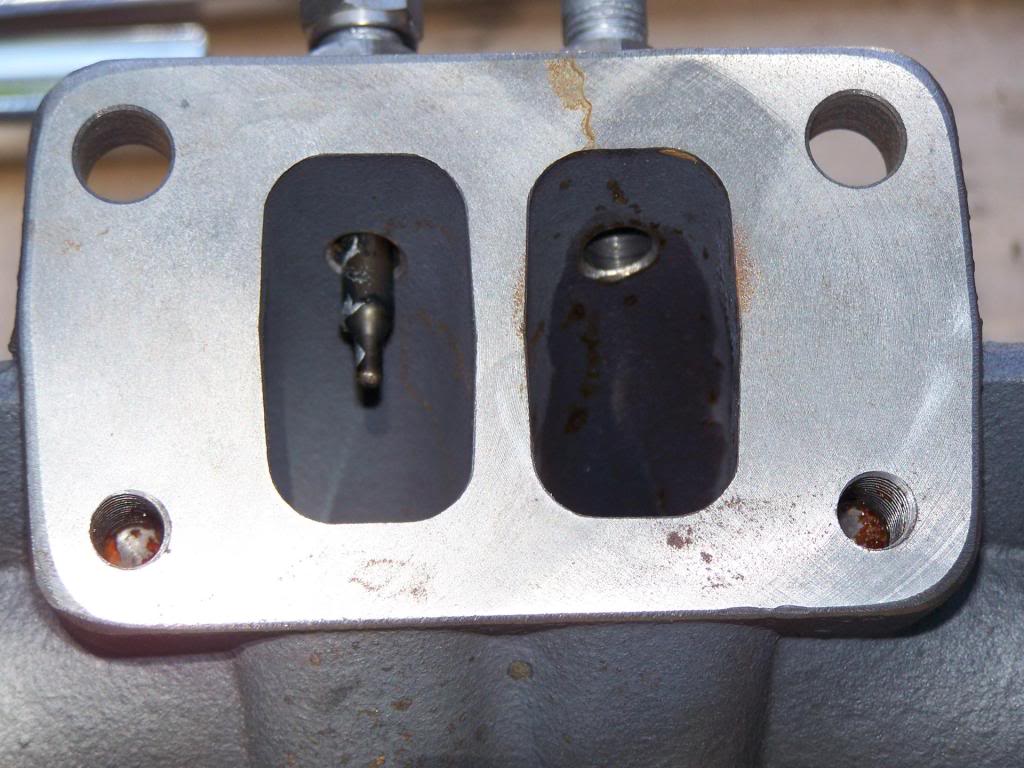
Once this was done, we installed the EGT probes and found another problem. The location of the ports on the bottom of the BD manifold did not allow enough clearance for straight type EGT probes. The probes ran directly into the side of the SuperB compressor housing. We ended up taking two 90* probes off of another truck to make them fit.
Once this was done, we were able to attach the secondary to the exhaust manifold. From here we saw another problem. The alignment of the compressor, cartridge and turbine housing’s on the BD kit were incorrect as called for in the directions. This was changed to get the proper alignment of the oil supply and return lines.
This led to another problem. The flages on the nuts for attaching the secondary to the exhaust manifold were too large and made contact with the secondary oil drain. These had to be removed, filed down and re-installed.
The ATS kit already had the secondary attached to the manifold, so all I had to do was check for proper torque specs on the fasteners.
---AutoMerged DoublePost---
Now that we had the secondary’s attached to the manifold, we were able to install them in the engine bay.
The ATS kit called for re-using the stock exhaust manifold studs, with the exception of two cap head colts that were used where the turbo/manifold flange was. These were used due too the clearance issue that would have been presented by the OEM studs.
The BD kit called for new cap head bolts all the way around. These were supposed to be included in the kit, but were not, so the OEM studs were re-used. This caused another trip to the hardware store for cap head bolts to fit behind the manifold.

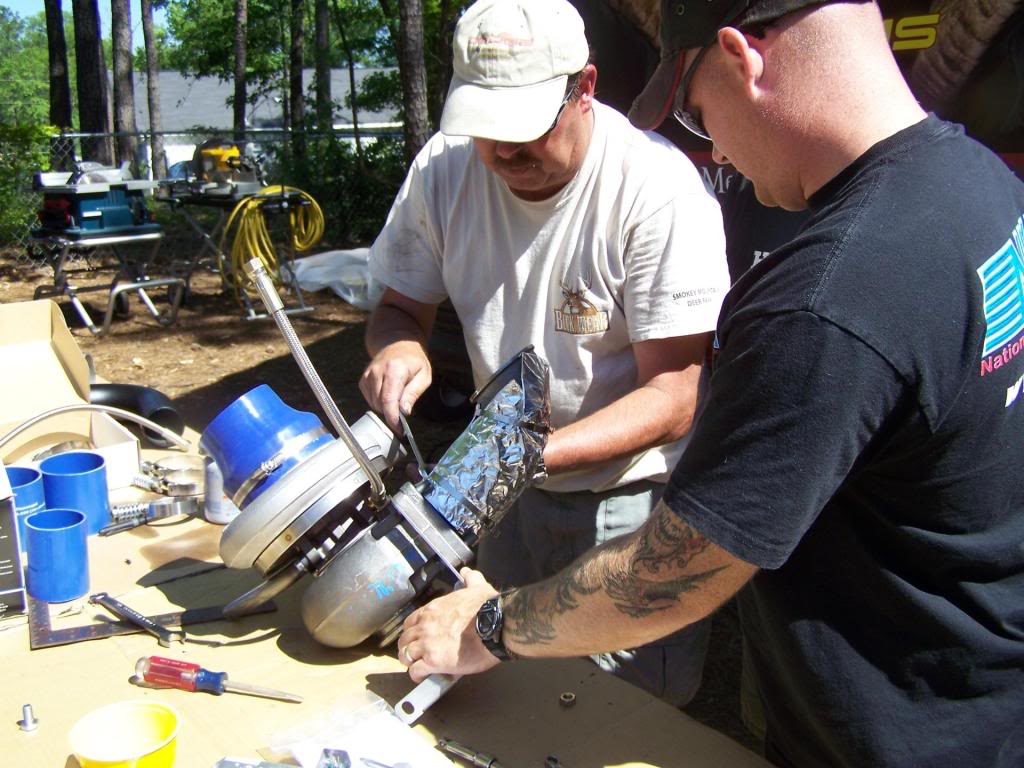
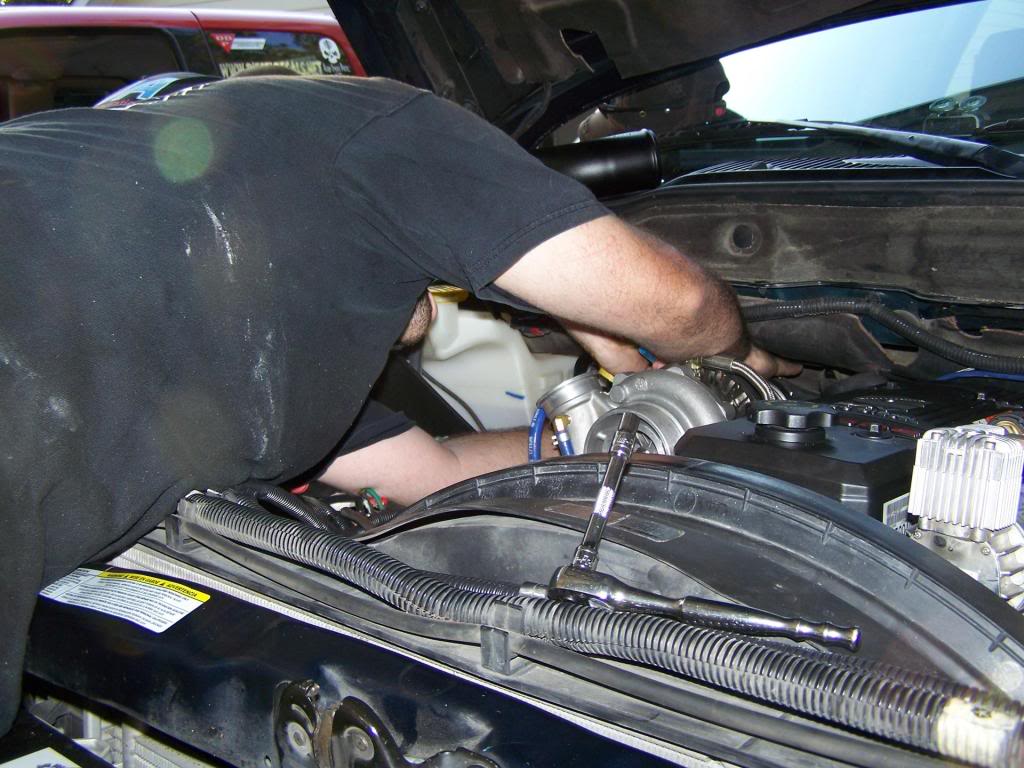
From here, the ATS kit requires attaching the exhaust adapter to the turbine housing of the secondary. This was simply a matter of lining up the holes and attaching the bolts. Using a ratchet wrench is essential here, otherwise you’ll be making minute turns on two of the hard to reach bolts. The picture below shows the ATS exhaust adapter and where it fits to the secondary.

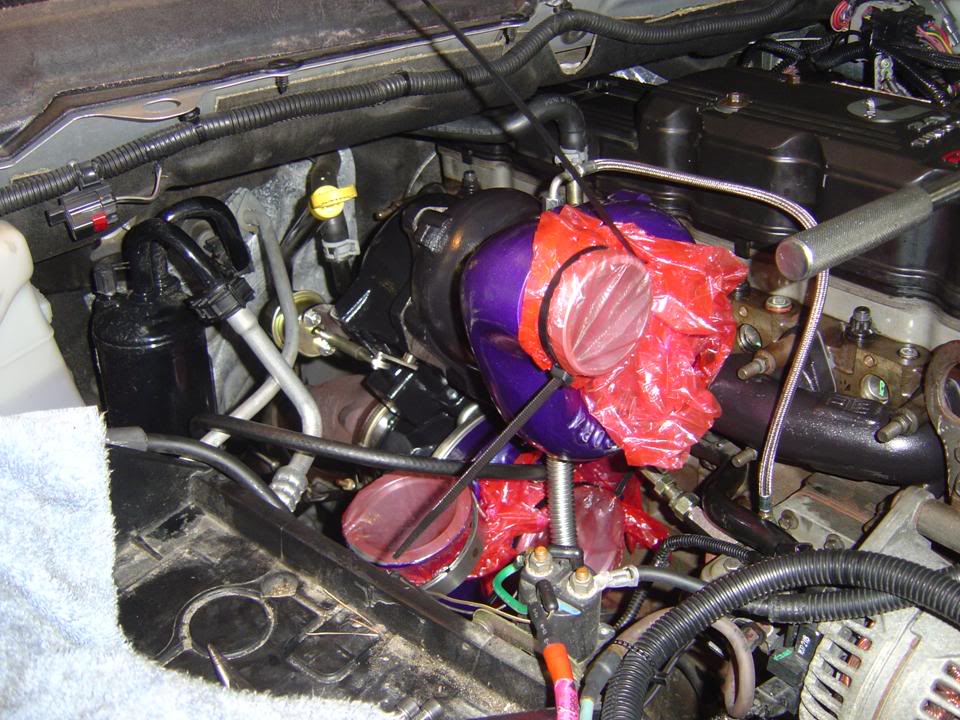
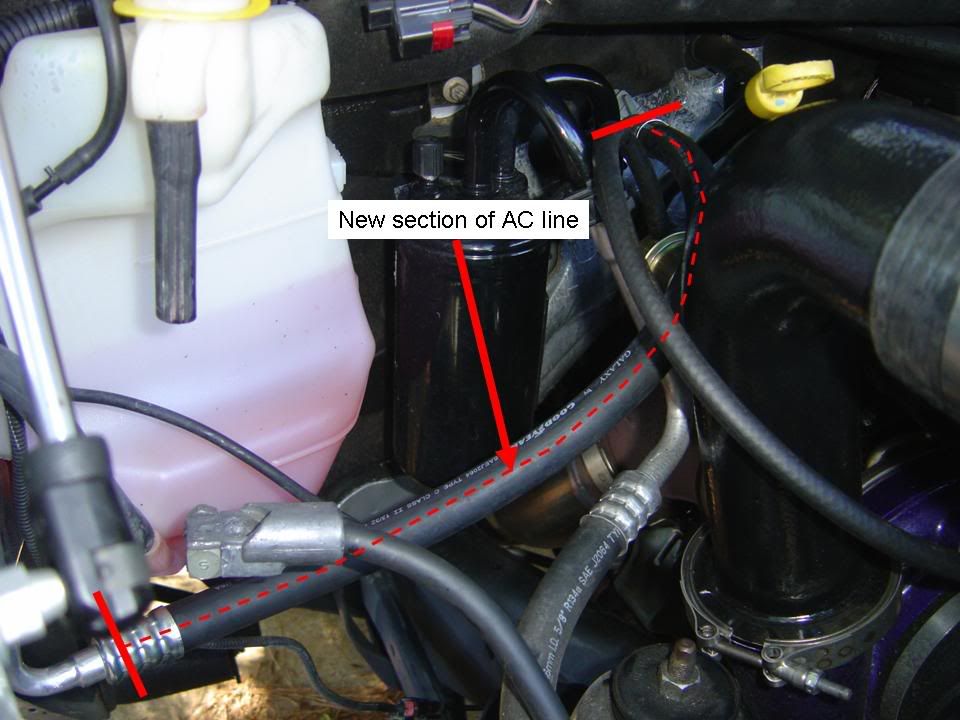
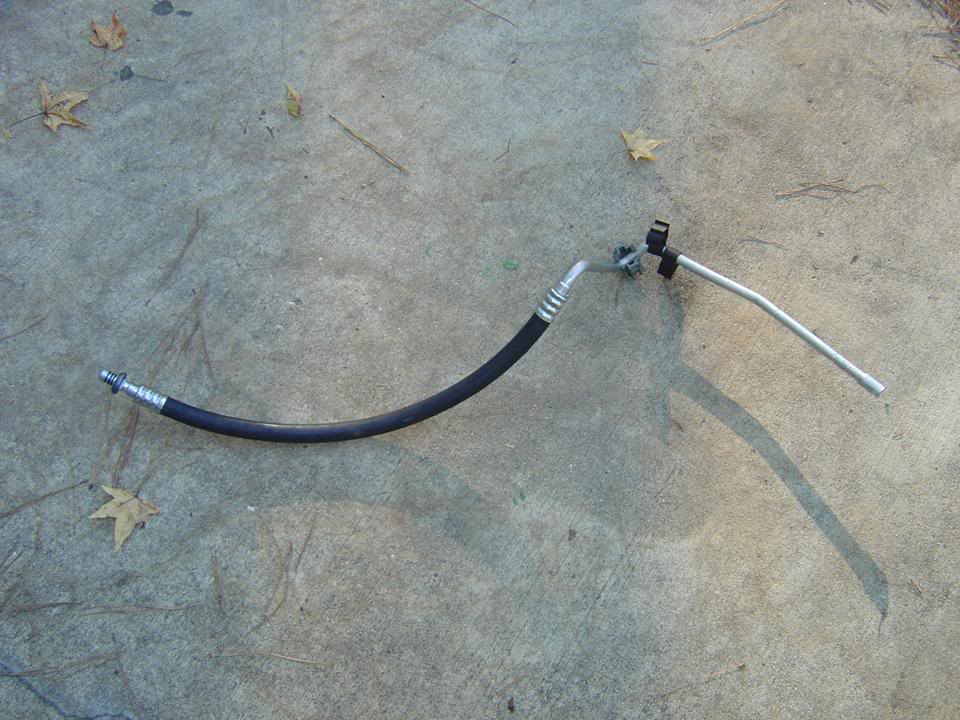
Now this is where we ran into a problem with the ATS setup. The location of the wastegate head was trying to occupy the same space as one of the AC lines. The required evacuating the AC system and removing the AC line until I could get a custom one made at a local shop. Here is the line I had to remove and the one I had had made to clear the wastegate head.
I contacted ATS regarding this, sent them the pictures and was reimbursed the $45 that it cost me to have a new AC line made.
The BD exhaust adapter also presented a problem at this point. The kit called for moving the AC drier approx 1.5” toward the passenger fender. The kit came with two spacer and two new bolts to do this. The problem here was that you have to move something that is attached to the hard lines. This required bending the AC lines as much as possible without breaking them off the drier.
I don’t have a good picture of this, as I was getting pretty pissed off with all the modifications on the BD kit. We ended up needing to use zip ties to hold it in place until we could get it to the shop to get bent properly.
From here, it was just a matter of connecting the oil drain lines, running the piping, installing the air filter, and tightening the band clamps…….or so we thought.
Once the primaries were positioned, we found the clocking that was called for in the BD directions was incorrect, so this was adjusted.
From here, both kits attached the secondary’s to the manifold prior to attaching the manifold to the engine block.
The ATS manifold came pre-drilled and tapped with four 1/8 NPT ports. Two on top and two on the bottom. These ports were in the correct locations for the application and were correctly tapped.
The BD kit came with two pre-drilled and tapped ports. The ports, as the manifold was to be installed, were located on the bottom of the manifold. They were also not tapped deep enough to properly seat a 1/8 NPT fitting. We could only get 2 threads of the probe fitting in before it stopped. This required tapping the manifold further to allow proper EGT probe function.
Once this was done, we installed the EGT probes and found another problem. The location of the ports on the bottom of the BD manifold did not allow enough clearance for straight type EGT probes. The probes ran directly into the side of the SuperB compressor housing. We ended up taking two 90* probes off of another truck to make them fit.
Once this was done, we were able to attach the secondary to the exhaust manifold. From here we saw another problem. The alignment of the compressor, cartridge and turbine housing’s on the BD kit were incorrect as called for in the directions. This was changed to get the proper alignment of the oil supply and return lines.
This led to another problem. The flages on the nuts for attaching the secondary to the exhaust manifold were too large and made contact with the secondary oil drain. These had to be removed, filed down and re-installed.
The ATS kit already had the secondary attached to the manifold, so all I had to do was check for proper torque specs on the fasteners.
---AutoMerged DoublePost---
Now that we had the secondary’s attached to the manifold, we were able to install them in the engine bay.
The ATS kit called for re-using the stock exhaust manifold studs, with the exception of two cap head colts that were used where the turbo/manifold flange was. These were used due too the clearance issue that would have been presented by the OEM studs.
The BD kit called for new cap head bolts all the way around. These were supposed to be included in the kit, but were not, so the OEM studs were re-used. This caused another trip to the hardware store for cap head bolts to fit behind the manifold.
From here, the ATS kit requires attaching the exhaust adapter to the turbine housing of the secondary. This was simply a matter of lining up the holes and attaching the bolts. Using a ratchet wrench is essential here, otherwise you’ll be making minute turns on two of the hard to reach bolts. The picture below shows the ATS exhaust adapter and where it fits to the secondary.
Now this is where we ran into a problem with the ATS setup. The location of the wastegate head was trying to occupy the same space as one of the AC lines. The required evacuating the AC system and removing the AC line until I could get a custom one made at a local shop. Here is the line I had to remove and the one I had had made to clear the wastegate head.
I contacted ATS regarding this, sent them the pictures and was reimbursed the $45 that it cost me to have a new AC line made.
The BD exhaust adapter also presented a problem at this point. The kit called for moving the AC drier approx 1.5” toward the passenger fender. The kit came with two spacer and two new bolts to do this. The problem here was that you have to move something that is attached to the hard lines. This required bending the AC lines as much as possible without breaking them off the drier.
I don’t have a good picture of this, as I was getting pretty pissed off with all the modifications on the BD kit. We ended up needing to use zip ties to hold it in place until we could get it to the shop to get bent properly.
From here, it was just a matter of connecting the oil drain lines, running the piping, installing the air filter, and tightening the band clamps…….or so we thought.
Last edited by cumminalong; 06-13-2009 at 03:21 PM. Reason: Automerged Doublepost
The following users liked this post:
biged681985 (06-14-2009)
#4
06-13-2009, 03:22 PM
The ATS kit presented me with one final problem here. The kit comes with a 90* boost boot to go from the secondary boost tube to the intercooler opening. This boot is sized for a stock intercooler and I had the ATS intercooler that had a larger opening.

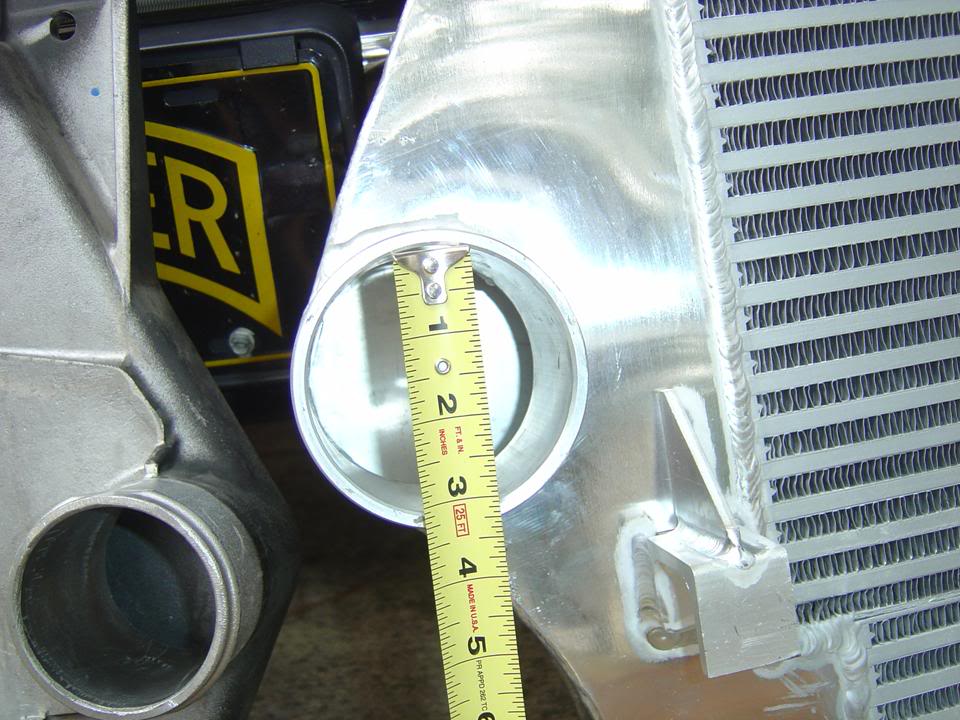
This required removing the ATS intercooler and re-installing the stock intercooler until the new one from ATS showed up, which was sent overnight.
Now the BD kit threw a few more challenges at us….
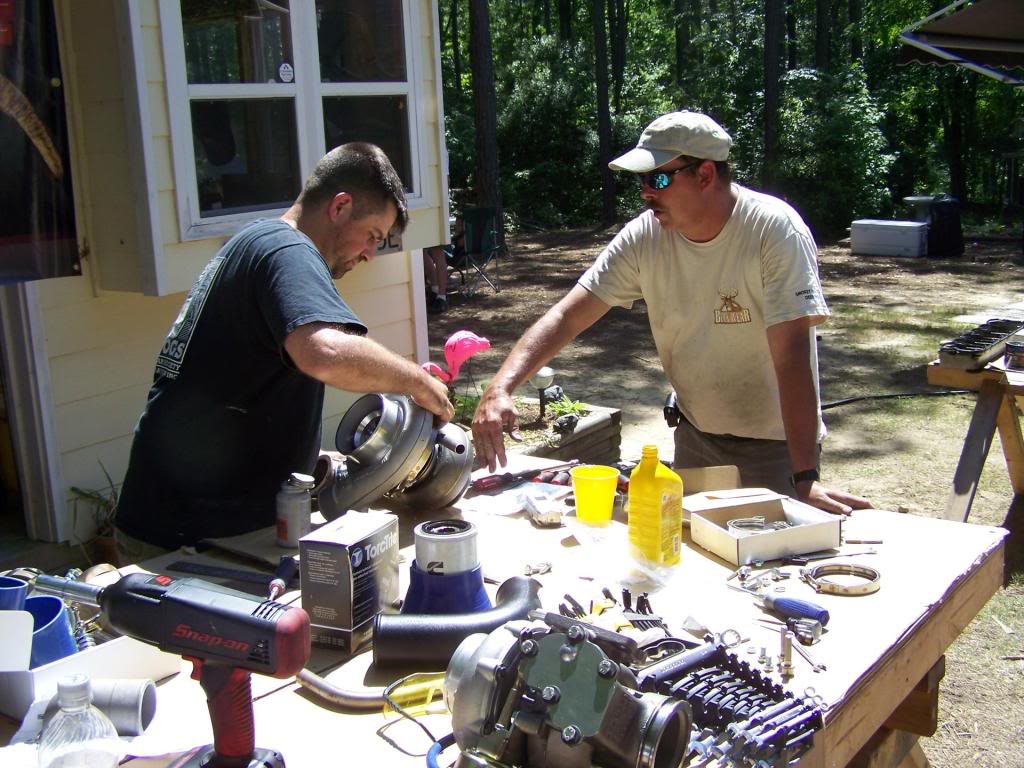
As we began routing the piping, we found that the compressor outlets still needed some tweeking to line up. Other than it being a pain to reach all the hold down bolts at this point, we found that the location of the wastegate head made it impossible to turn the compressor outlet to the correct position. You could go toward the engine, as it would hit the manifold and you couldn’t go toward the battery as you hit the wastegate head. So, we had to remove the wastegate head, clock the compressor housing and then re-install the head. Now, the location to the wastegate head and it’s 3 bolts make this a task for a contortionist. This took us a little while an increased our vulgarities count significantly.
Once the wastegate was reattached, we could not get to all the piping…..
The routing of the ATS piping was very straight forward, as you saw the kit already assembled and correctly clocked. The pieces fit together easily and the kit contained 1 extra of each size band clamp.
The BD kit seemed much less efficient. The pipes crossed each other, the intake and boost tubes were close enough to make contact, you had to re-use the STOCK accordion boot to attach the boost tube to the secondary and the air filter and housing were attached rather cheaply. The pipe simply comes through the rubber gasket in the filter box and attaches to the pipe. There is significant play and movement in this setup.
Now, came another level of frustration…..
The ATS kit attaches to your exhaust utilizing the existing elbow and no modifications are required on your exhaust setup. Simply align the elbow, exhaust and turbine housing and tighten the v-band clamps.
The BD kit made this require several more steps at this point. To attach the turbine housing to the exhaust, you MUST use the proprietary down pipe that comes with the kit. This pipe is 4”…now remember that both of us had 5” exhausts. What we found initially was that the angle of the downpipe flange did not line up with the turbine housing and made the downpipe hit the floor of the cab. Also, the flange was slightly bent and had to be flattened and modified a bit to line up with the exhaust. This also required using a 4” to 5” adapter to connect the two and cut the exhaust that he had installed.
Once all the connections were made, and everything was checked, doubled checked and rechecked, we primed the oil lines and attached them to the oil filter housing.
Both kits reacted the same here….no issues upon initial start up.
On the first drives, the ATS kits was near perfect from the get go. I drove it the next day voer 500 miles of easy driving to make sure everything was broken in. No issues whatsoever.
The BD kit had issues as soon as we went down the street. The location of the turbine housing made it contact the passenger side spring mount as the engine flexed in the mounts. Upon initial application of throttle and upon braking, the housing was making contact and vibrating the whole chassis. The only way we could remedy this was the place a small piece of dynamat between the turbine housing and the spring mount.
Once this was fixed, we found another issue…..the downpipe. Again, due to the angle at the flange being wrong, it was trying to twist and was turning up toward the floorboard. This had to be fixed once the truck was taken to the muffler shop and had it all welded in place.
At this point the installation of both kits was done. I’ll reserve my comments regarding dealing with representative of both companies, as I’m the end user of one product and was just the installer of the second.
I will say this, I had NO PROBLEMS with ATS’s customer service, phone calls were returned and I talked to the person that was able to solve to 2 smalls issues I had very quickly.
Looking at the warranty side of the two systems….
On one hand you have a 3 year / 150K mile warranty from ATS. On the other, you have a 1 year warranty from BD. This may be extended by BD, as it was with this kit, but it did not cover the chargers beyond one year, as there are not manufactured by them, they are outsourced from BorgWarner/Switzer.
My overall impression of both kits, varies WIDELY. Initial quality, fit and finish, component completeness, ease of installation and the associated literature was of much higher quality on the ATS kit.
If I was to recommend either for the guy that turns his own wrenches and wants a relatively painless install, I would recommend the ATS over the BD in the heartbeat.
This required removing the ATS intercooler and re-installing the stock intercooler until the new one from ATS showed up, which was sent overnight.
Now the BD kit threw a few more challenges at us….
As we began routing the piping, we found that the compressor outlets still needed some tweeking to line up. Other than it being a pain to reach all the hold down bolts at this point, we found that the location of the wastegate head made it impossible to turn the compressor outlet to the correct position. You could go toward the engine, as it would hit the manifold and you couldn’t go toward the battery as you hit the wastegate head. So, we had to remove the wastegate head, clock the compressor housing and then re-install the head. Now, the location to the wastegate head and it’s 3 bolts make this a task for a contortionist. This took us a little while an increased our vulgarities count significantly.
Once the wastegate was reattached, we could not get to all the piping…..
The routing of the ATS piping was very straight forward, as you saw the kit already assembled and correctly clocked. The pieces fit together easily and the kit contained 1 extra of each size band clamp.
The BD kit seemed much less efficient. The pipes crossed each other, the intake and boost tubes were close enough to make contact, you had to re-use the STOCK accordion boot to attach the boost tube to the secondary and the air filter and housing were attached rather cheaply. The pipe simply comes through the rubber gasket in the filter box and attaches to the pipe. There is significant play and movement in this setup.
Now, came another level of frustration…..
The ATS kit attaches to your exhaust utilizing the existing elbow and no modifications are required on your exhaust setup. Simply align the elbow, exhaust and turbine housing and tighten the v-band clamps.
The BD kit made this require several more steps at this point. To attach the turbine housing to the exhaust, you MUST use the proprietary down pipe that comes with the kit. This pipe is 4”…now remember that both of us had 5” exhausts. What we found initially was that the angle of the downpipe flange did not line up with the turbine housing and made the downpipe hit the floor of the cab. Also, the flange was slightly bent and had to be flattened and modified a bit to line up with the exhaust. This also required using a 4” to 5” adapter to connect the two and cut the exhaust that he had installed.
Once all the connections were made, and everything was checked, doubled checked and rechecked, we primed the oil lines and attached them to the oil filter housing.
Both kits reacted the same here….no issues upon initial start up.
On the first drives, the ATS kits was near perfect from the get go. I drove it the next day voer 500 miles of easy driving to make sure everything was broken in. No issues whatsoever.
The BD kit had issues as soon as we went down the street. The location of the turbine housing made it contact the passenger side spring mount as the engine flexed in the mounts. Upon initial application of throttle and upon braking, the housing was making contact and vibrating the whole chassis. The only way we could remedy this was the place a small piece of dynamat between the turbine housing and the spring mount.
Once this was fixed, we found another issue…..the downpipe. Again, due to the angle at the flange being wrong, it was trying to twist and was turning up toward the floorboard. This had to be fixed once the truck was taken to the muffler shop and had it all welded in place.
At this point the installation of both kits was done. I’ll reserve my comments regarding dealing with representative of both companies, as I’m the end user of one product and was just the installer of the second.
I will say this, I had NO PROBLEMS with ATS’s customer service, phone calls were returned and I talked to the person that was able to solve to 2 smalls issues I had very quickly.
Looking at the warranty side of the two systems….
On one hand you have a 3 year / 150K mile warranty from ATS. On the other, you have a 1 year warranty from BD. This may be extended by BD, as it was with this kit, but it did not cover the chargers beyond one year, as there are not manufactured by them, they are outsourced from BorgWarner/Switzer.
My overall impression of both kits, varies WIDELY. Initial quality, fit and finish, component completeness, ease of installation and the associated literature was of much higher quality on the ATS kit.
If I was to recommend either for the guy that turns his own wrenches and wants a relatively painless install, I would recommend the ATS over the BD in the heartbeat.
The following 4 users liked this post by cumminalong:
biged681985 (06-14-2009),
coyropin (06-13-2009),
Diesel Dawgs Performance (06-13-2009),
mattg (11-09-2009)
#5
06-13-2009, 05:33 PM

wow nice write up, quite a few problems that wouldn't really be easily solved by normal people, so i suppose it's kinda like apples to oranges but which one performs better, makes more boost, etc? 
Last edited by bobcat67; 06-13-2009 at 07:21 PM.


#8
06-13-2009, 08:20 PM
The first 500 miles, they are really tight and you need to be bit easy on them to makes sure everything is seated correctly.
Mine were well broken in and I turn 726HP and 1291TQ with my setup and have run it as high as 72 psi.
We had intended to put his on the dyno on the second day, but all the problems and fixes set us behind schedule and he had to drive back down the Louisianna the next day.
Also, his is built as a tow rig. He runs a single CP3 vs my duals, 90 hp sticks vs my 160's, Smarty Revo vs TNT/R and Edge, etc......... not really a fair comparison on that note.
Last edited by cumminalong; 06-13-2009 at 08:24 PM.
The following users liked this post:
biged681985 (06-14-2009)
#9
06-14-2009, 12:38 AM
agreed on the fact that they would not be a very good comparison, and you run 160hp sticks on a CR? that thing smoke like a train or what?
Last edited by bobcat67; 06-14-2009 at 12:40 AM.
#10
06-14-2009, 07:07 AM
Once the 5000 is lit, which is around 20 - 23 psi, it controls the smoke pretty good.
Here's what it looks like on the dyno and track.....


