Not another 6.0 write up
#11
 01-17-2017, 10:50 PM

Now the moment you've all been waiting for. Deep breath.
Chapter 12: Get the fuggin heads off
Front load your day with motrin/ibuprofen and LOTS of water. Up until now there hasn't been a whole lot of heavy lifting but now you're going to need it. Take it before you start so that it's already working before you start really working yourself.
Disconnect your up pipes from the manifolds and remove the heat shield and any sensors from the exhaust and get the up pipes out, I wish I would've, had to wiggle the head a little to get clear of the socket joint. The passenger side is easiest through the fenderwell, driver side will need to go from underneath. You can only get the top bolts by reaching over the engine. Keep the manifolds bolted to the heads, they make for makeshift handles to help guide the head around once you lift it.
The valve covers make great trays to put everything else in. Don't damage or throw out the valve cover gaskets, I am not aware of any kit that comes with new ones. Next things out are the stand pipes and dummy plugs. When you do the oil rails, make sure that you pull them straight out and be ready for them, they're heavier than they look. I propped mine up on the rocker box so that the oil could drain out. The stand pipes will likely separate and you will have to go chasing the other halves with a pair of needle nose pliers and they don't give up easily. Up next is the injectors, pull LIGHTLY from the back side of the plug and use a flat head screwdriver to depress the clips, one on the top and one on the bottom that both are split down the middle so technically 4 clips each. You will also need the long reach Torx to get to the injector hold down bolt, set them aside for later cleanup. After the injectors, I did the glow plugs, the knife tool worked wonders and got all but one of the plugs out without damage, one of them broke and I had to go to town with needle nose pliers, the glow plugs themselves came out easy. Budget for new harnesses, but don't buy them unless you need them, your heads will be at the shop for a few days and give time for shipping.
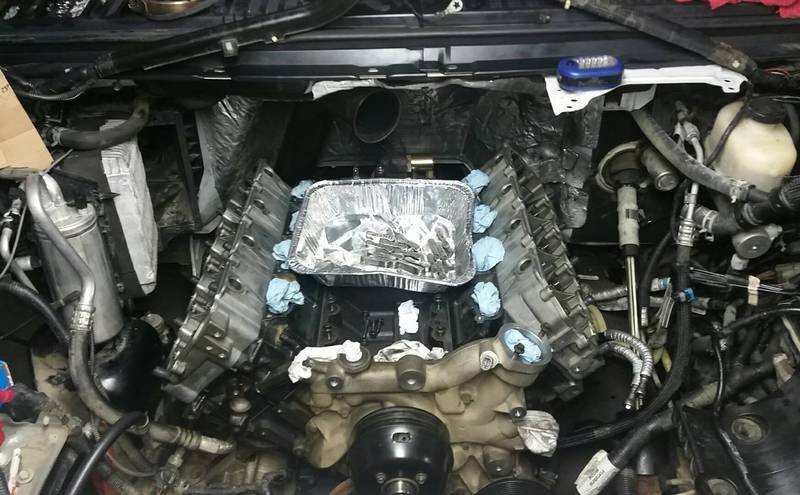
Break your TTYs or stud cap nuts loose with the breaker bar AND the cheater pipe. I removed the rocker bolts first before the cap nuts on the studs so that the pressure from the lifters/valves wouldn't potentially stretch those little guys. If you already have ARPs then you're looking at close to 400lb of static torque. Grab 2 more of your aluminum trays and start getting the rockers out. I stacked them in like this.
I know, I'm a 21st century Picasso, autographs are for sale.
Moving on. I marked the valve bridges for where they sat in the head, but did not mark the orientation, we'll see if that bites me in the *** later. Push rods came out in order from front to back and went into cardboard in the same order and same orientation, none of mine had the copper tip on either end. I know it �may� just be the screws I have rolling around in my head but I feel that the parts will create unique wear patterns so the push rods, lifters and rocker arms kinda become a match for each other. Just like a motorcycles chain and sprocket set. Who wants to drive me to the loonie bin?
You should know by now how you will be attaching your hoist to the heads, I used a lift bracket I got from eBay but it didn't have the risers on it which caused me to reverse it for the passenger side, made it lift out almost vertical which wasn't such a bad thing. Since doing the job cab-on, I had to zip tie the lower studs. I zipped #2 to #3 and #4 to #5 (counting from the front) so that they would pinch in. This near vertical hoisting allowed them to drop clear of the A/C box and slide right out. For the driver side I clipped the old intake gaskets (see pic in tools section) and stacked them on top of each other which gave the bracket enough of a stand off to not be against the rocker box, that one lifted out almost perfectly. On the driver head, studs #4 and #5 need to be zip tied together.

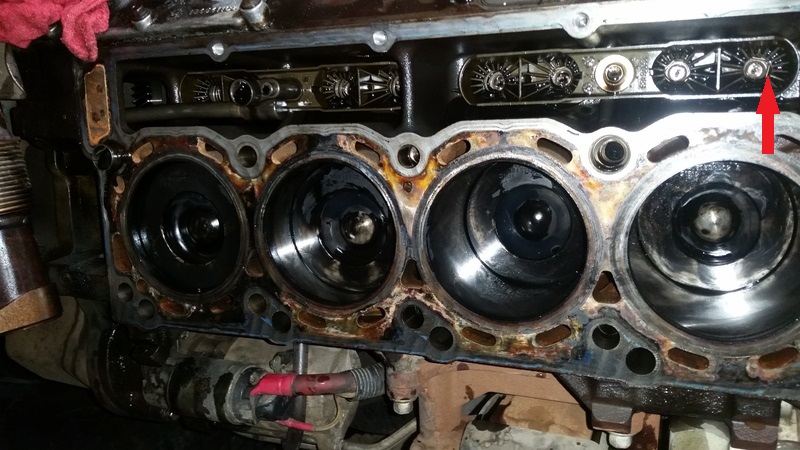
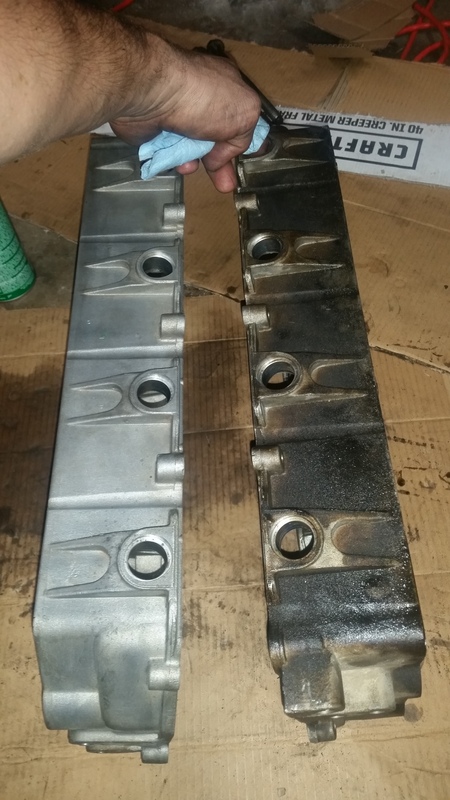
Set the heads down on a couple 2x4s and continue to strip them down, get the manifolds off, take the rocker boxes off but leave the fuel bolts in the back. This will help you differentiate the left head from the right when you go to reassemble. I don't know of any reason that the machine shop would need that to be removed. Now be good and lay down some tarps/moving blankets in the back of the Mrs. car so that you don't get oil all over the place and get those puppies to the shop. I dropped mine off for a check and deck, mag, pressure test and clean up. They ended up doing a .003� grind, valve seat grind and hardened seat installation. 6.0s are known for developing minor cracks in the valve seats, they can be taken care of by a deeper grind and installing new seats, cracks elsewhere are something to raise concerns. All in all I walked out for just shy of $600 plus new keepers.
Chapter 12: Get the fuggin heads off
Front load your day with motrin/ibuprofen and LOTS of water. Up until now there hasn't been a whole lot of heavy lifting but now you're going to need it. Take it before you start so that it's already working before you start really working yourself.
Disconnect your up pipes from the manifolds and remove the heat shield and any sensors from the exhaust and get the up pipes out, I wish I would've, had to wiggle the head a little to get clear of the socket joint. The passenger side is easiest through the fenderwell, driver side will need to go from underneath. You can only get the top bolts by reaching over the engine. Keep the manifolds bolted to the heads, they make for makeshift handles to help guide the head around once you lift it.
The valve covers make great trays to put everything else in. Don't damage or throw out the valve cover gaskets, I am not aware of any kit that comes with new ones. Next things out are the stand pipes and dummy plugs. When you do the oil rails, make sure that you pull them straight out and be ready for them, they're heavier than they look. I propped mine up on the rocker box so that the oil could drain out. The stand pipes will likely separate and you will have to go chasing the other halves with a pair of needle nose pliers and they don't give up easily. Up next is the injectors, pull LIGHTLY from the back side of the plug and use a flat head screwdriver to depress the clips, one on the top and one on the bottom that both are split down the middle so technically 4 clips each. You will also need the long reach Torx to get to the injector hold down bolt, set them aside for later cleanup. After the injectors, I did the glow plugs, the knife tool worked wonders and got all but one of the plugs out without damage, one of them broke and I had to go to town with needle nose pliers, the glow plugs themselves came out easy. Budget for new harnesses, but don't buy them unless you need them, your heads will be at the shop for a few days and give time for shipping.
Break your TTYs or stud cap nuts loose with the breaker bar AND the cheater pipe. I removed the rocker bolts first before the cap nuts on the studs so that the pressure from the lifters/valves wouldn't potentially stretch those little guys. If you already have ARPs then you're looking at close to 400lb of static torque. Grab 2 more of your aluminum trays and start getting the rockers out. I stacked them in like this.
I know, I'm a 21st century Picasso, autographs are for sale.
Moving on. I marked the valve bridges for where they sat in the head, but did not mark the orientation, we'll see if that bites me in the *** later.
Push rods came out in order from front to back and went into cardboard in the same order and same orientation, none of mine had the copper tip on either end. I know it �may� just be the screws I have rolling around in my head but I feel that the parts will create unique wear patterns so the push rods, lifters and rocker arms kinda become a match for each other. Just like a motorcycles chain and sprocket set. Who wants to drive me to the loonie bin? You should know by now how you will be attaching your hoist to the heads, I used a lift bracket I got from eBay but it didn't have the risers on it which caused me to reverse it for the passenger side, made it lift out almost vertical which wasn't such a bad thing. Since doing the job cab-on, I had to zip tie the lower studs. I zipped #2 to #3 and #4 to #5 (counting from the front) so that they would pinch in. This near vertical hoisting allowed them to drop clear of the A/C box and slide right out. For the driver side I clipped the old intake gaskets (see pic in tools section) and stacked them on top of each other which gave the bracket enough of a stand off to not be against the rocker box, that one lifted out almost perfectly. On the driver head, studs #4 and #5 need to be zip tied together.
Set the heads down on a couple 2x4s and continue to strip them down, get the manifolds off, take the rocker boxes off but leave the fuel bolts in the back. This will help you differentiate the left head from the right when you go to reassemble. I don't know of any reason that the machine shop would need that to be removed. Now be good and lay down some tarps/moving blankets in the back of the Mrs. car so that you don't get oil all over the place and get those puppies to the shop. I dropped mine off for a check and deck, mag, pressure test and clean up. They ended up doing a .003� grind, valve seat grind and hardened seat installation. 6.0s are known for developing minor cracks in the valve seats, they can be taken care of by a deeper grind and installing new seats, cracks elsewhere are something to raise concerns. All in all I walked out for just shy of $600 plus new keepers.
#12
01-22-2017, 02:02 PM
Chapter 13: Clean up, clean up, everybody everywhere.
While your heads are at the shop, it's time to clean house. First things first, do a quick inspection, make sure that all of your lifters have the the keeper pin still on top of them.
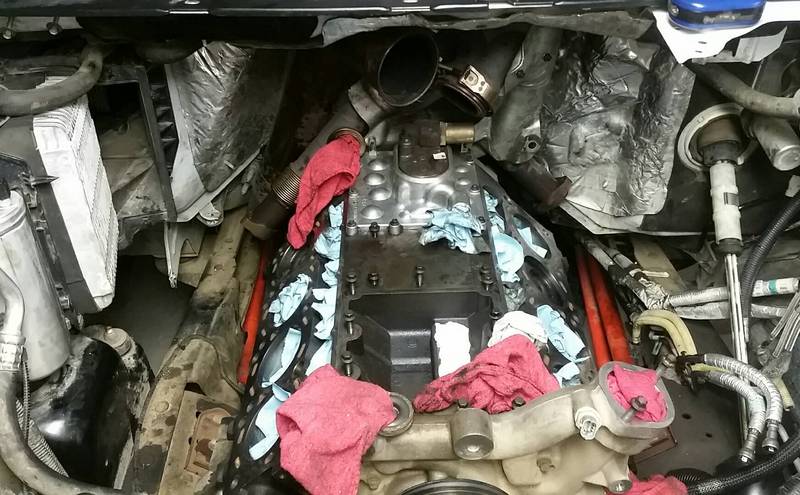
Next up is to stuff rags everywhere, you are going to be cleaning things up and don't want that junk ending up where it shouldn't. Get your air buffer and go to town on the block deck but don't use any serious abrasives and keep the tool moving, you don't want to gouge the surface. If you don't have an air buffer then you can expect to spend a good long time cleaning, it's better to spend $30 at Horror Fright, trust me. If you are doing any work on your HPOP, do that before you clean the cylinders and bolt holes, it's gonna drip oil when you pull it out.
When doing the HPOP, remove the ICR, then the cover. Grab your magnet NOW and have it sitting against the HPOP mounting bolts and STC rail bolts. There is almost nothing between those bolts and the black abyss where the camshaft lives, if you drop one, you're gonna need a lot of luck and faith on your side. I already had the updated STC so didn't need to remove the pump, but did remove the cover so that I could get it cleaned up and sparkling again.
Also while you have everything out of the way. If you haven't already done so, it's time to dimple your firewall with a ball peen hammer and a very awkward swing angle. Grab a stud, nut, 11/16� socket, ratchet, sharpie and scissors. Thread the stud in, put the nut on only a couple threads, then put the ratchet and socket on as far as you can, cut the heat shield enough to clear everything, then mark the firewall where you need to pound it. Remove the stud and wail on the sheet metal (don't worry, there isn't anything dangerously close on the backside). Repeat until you can get the ratchet in easily.
Then I grabbed the vacuum and sucked anything that had gotten down in the bolt holes, while holding the vacuum at the top of the hole, stuck the brake cleaner straw in the bolt hole and gave it a nice long shot, angling it every way I could. I did the same with WD-40 to give threads a light lube and rust protection. Spray a little WD-40 in each of the cylinders, wipe up the puddles and any gunk and then watch the pistons and rotate the crank, as each piston reaches BDC, wipe that one down with a clean lint free cloth, finish with the dowel pin (between the bolts) at the 6 o'clock position like this.
It's good insurance for when you reassemble the heads in case the lifters sprung up so that you don't run a valve into a piston when you torque everything down. I gave a wipe with acetone on everything and then a light oil wipe to prevent flash rust from moisture in the air (it was raining nonstop here when I did mine) then shoved rags in.
I gave the same treatment that I did on the HPOP cover to the oil cooler housing and rocker boxes. Lots and lots of brake cleaner, a small brass brush to get in the nooks and crannies, and a fan. You want to get those fumes out of your workspace fast, especially if you are working on the ground, they will gather down low and displace oxygen. No bueno. but the end result is sexy sexy.
I didn't take pictures when I cleaned up my injectors and glow plugs. I know, I'm a horrible person. Basically, use a razor blade to get under the crush washer and pry it up a little, then grab your glow plug harness knife to slip underneath and slide it off. I used some super fine steel wool with a little bit of oil to clean the tips. Replace all of your o-rings, yes, even the blue one on the plug, you already paid for it when you got your seal kit, no sense in not doing it.
If this is the first time your turbo has been off the truck, it's ideal timing to clean out the vanes. Cleaning out the turbine is super easy, and in reality, kinda hard to screw up. The hardest part in my eyes is getting all the vanes lined back up when reinstalling the unison ring and making sure that it is clocked correctly for the actuator. If you regularly open your truck up then you shouldn't have to deal with much coke build up, just soot. Soot cleans right up by running the vanes on a wire brush. Coke buildup may require the use of the air buffer.
While your heads are at the shop, it's time to clean house. First things first, do a quick inspection, make sure that all of your lifters have the the keeper pin still on top of them.
Next up is to stuff rags everywhere, you are going to be cleaning things up and don't want that junk ending up where it shouldn't. Get your air buffer and go to town on the block deck but don't use any serious abrasives and keep the tool moving, you don't want to gouge the surface. If you don't have an air buffer then you can expect to spend a good long time cleaning, it's better to spend $30 at Horror Fright, trust me. If you are doing any work on your HPOP, do that before you clean the cylinders and bolt holes, it's gonna drip oil when you pull it out.
When doing the HPOP, remove the ICR, then the cover. Grab your magnet NOW and have it sitting against the HPOP mounting bolts and STC rail bolts. There is almost nothing between those bolts and the black abyss where the camshaft lives, if you drop one, you're gonna need a lot of luck and faith on your side. I already had the updated STC so didn't need to remove the pump, but did remove the cover so that I could get it cleaned up and sparkling again.
Also while you have everything out of the way. If you haven't already done so, it's time to dimple your firewall with a ball peen hammer and a very awkward swing angle. Grab a stud, nut, 11/16� socket, ratchet, sharpie and scissors. Thread the stud in, put the nut on only a couple threads, then put the ratchet and socket on as far as you can, cut the heat shield enough to clear everything, then mark the firewall where you need to pound it. Remove the stud and wail on the sheet metal (don't worry, there isn't anything dangerously close on the backside). Repeat until you can get the ratchet in easily.
Then I grabbed the vacuum and sucked anything that had gotten down in the bolt holes, while holding the vacuum at the top of the hole, stuck the brake cleaner straw in the bolt hole and gave it a nice long shot, angling it every way I could. I did the same with WD-40 to give threads a light lube and rust protection. Spray a little WD-40 in each of the cylinders, wipe up the puddles and any gunk and then watch the pistons and rotate the crank, as each piston reaches BDC, wipe that one down with a clean lint free cloth, finish with the dowel pin (between the bolts) at the 6 o'clock position like this.
It's good insurance for when you reassemble the heads in case the lifters sprung up so that you don't run a valve into a piston when you torque everything down. I gave a wipe with acetone on everything and then a light oil wipe to prevent flash rust from moisture in the air (it was raining nonstop here when I did mine) then shoved rags in.
I gave the same treatment that I did on the HPOP cover to the oil cooler housing and rocker boxes. Lots and lots of brake cleaner, a small brass brush to get in the nooks and crannies, and a fan. You want to get those fumes out of your workspace fast, especially if you are working on the ground, they will gather down low and displace oxygen. No bueno. but the end result is sexy sexy.
I didn't take pictures when I cleaned up my injectors and glow plugs. I know, I'm a horrible person. Basically, use a razor blade to get under the crush washer and pry it up a little, then grab your glow plug harness knife to slip underneath and slide it off. I used some super fine steel wool with a little bit of oil to clean the tips. Replace all of your o-rings, yes, even the blue one on the plug, you already paid for it when you got your seal kit, no sense in not doing it.
If this is the first time your turbo has been off the truck, it's ideal timing to clean out the vanes. Cleaning out the turbine is super easy, and in reality, kinda hard to screw up. The hardest part in my eyes is getting all the vanes lined back up when reinstalling the unison ring and making sure that it is clocked correctly for the actuator. If you regularly open your truck up then you shouldn't have to deal with much coke build up, just soot. Soot cleans right up by running the vanes on a wire brush. Coke buildup may require the use of the air buffer.
#13
02-17-2017, 03:19 PM
Chapter 14: You've torn her down, now it's time to build her up
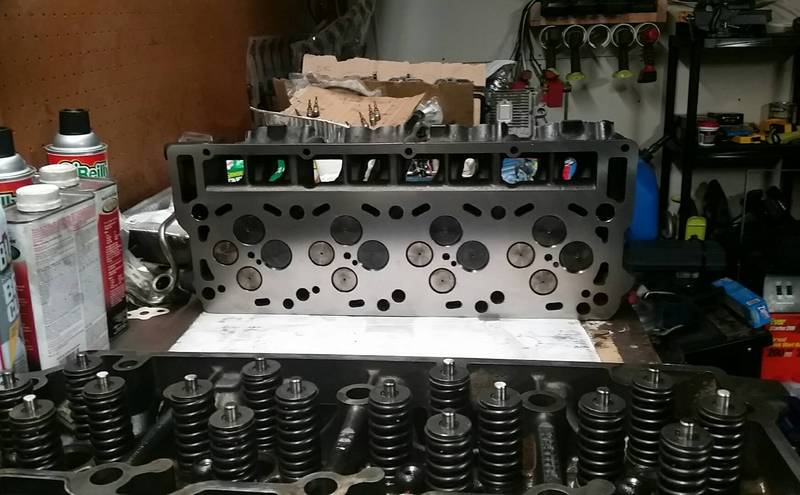
Once you get your heads back from the machine shop all nice and shmexy. No, I didn't fire-ring, hope I don't regret that decision.
Put your rocker boxes and the manifolds on the heads, then put on your lift bracket, chains, whatever floats your boat. Make sure to put new o-rings on the boxes. I didn't spring for manifold gaskets but you can if you want, the 6.0 didn't come with them from the factory and I haven't had any issues in 2 tear downs.
It's time for the lube job, if you didn't buy extra lube then you are way behind. The anemic little packet that ARP sends with their studs does not even remotely resemble enough to coat the threads and washers. Apparently their definition of �liberally apply� differs from everyone else's. Get it in there real nice and deep like, rub it around, put it on your lips, fuggit get weird...I mean what?
You will need to �capture� the lower head studs the same way that they came out, the passenger side zip tie #2 to #3 and #4 to #5, then #4 to #5 on the driver side. Give the decks a wipe with acetone to clean off the WD-40 coat as well as anything that accumulated during the teardown. Put your new gaskets and dowel pins on the block and get the head hooked up to the cherry picker. Do not think that you can do this yourself, go get a helper THAT KNOWS HOW TO RUN A HOIST. You want to be the one moving the head around and getting it lined up. Don't leave it in someone else's hands to make sure that YOUR brand new gaskets don't get bumped or tweaked. As soon as the full weight of the head is on the block, clip the zip ties and run those studs down so that the dowel pins aren't the only things holding the weight from sliding and get the lifting gear out of the way. Put the rest of the studs in and run them down until they seat, do NOT apply any torque. I used my 3/16� hex socket on a 1/4� ratchet to prevent carpal tunnel while making sure to not over tighten.
Now you need to get your valve bridges in, like I said before, I marked the location of each but not the orientation so I put them all with the elongated hole pointing toward the exhaust manifold, we'll see. Put your pushrods in and give them a little twist, push and wiggle to make sure that they are fully seated down on the lifter and not hung up on the ridge or anything, bent rods may ensue otherwise. When you put your rockers back on, inspect them to make sure that the little ball bearing and its keeper are in good shape. I only snugged up the bolts until they met the plate, I don't like the idea of using those little bolts to compress valve springs, to me it's just asking to pull the aluminum threads out. Getting the washers in can take about 10 minutes because you'll spend more than 5 minutes just mesmerized at how perfect they are. Your fingers are going to get dirty, deal with it. Make sure each washer has a nice layer of lube on both sides and slide them all on the studs, then put some lube on the undersides of the cap nuts.
I went through and completed the first torque sequence at 70lb-ft and then torqued the rocker fulcrums to their 23lb-ft. After that I went through the sequence of getting the studs to 140lb and finally 210lb-ft. I did not use an adapter for the torque wrench at all and was able to get most of them from where I was standing in between the water pump and intercooler. The key is consistency, do NOT jerk the torque wrench, use long smooth fluid pulls until it clicks/beeps/whatever. Don't fret if you run out of room before you reach your setting, many times it will click as soon as you reset, no biggie. Sometimes it's better to push instead of pull such as the driver side, if you are pulling then you will have to basically be standing on top of the engine, crouched down and in a prime position to curl your back and hurt yourself. Keep your shoulders back, back arched rearward and do as much of the work as you can with your legs, you have 2 exposed frame rails to leverage against, use them. When you are finished, wipe up and of the excess thread lube that squeezed out. Stick your fingers in some fresh oil and put on the injector o-rings so that they won't pinch and shred, also put some on the top rings for the rail.
For the oil rails, make sure that all of the nipples are pointing straight out, put the rail in evenly and then push on the front and back simultaneously to keep it from rocking one side in first. Put the bolts in and torque them down. Again, apply a light oil film to the o-rings (are you starting to see a pattern here?) of the stand pipes and dummy plugs and slip them in and torque to spec. Clean the valve cover gasket nicely and then button up the heads.
Fill the HPOP housing up through the top fill plug, she doesn't take much, but you don't want that baby turning dry during your first crank. Put your new HPOP screen in and put some oil in the cooler valley but not a lot, too much and it'll overflow when you put the cooler in. This is where having that extra gallon of oil is needed because the cooler doesn't drain during your usual 15qt oil change. Reinstall your oil cooler housing.
Now it's basically reassembly the way it came apart, not rocket surgery. This is the home stretch, just take your time and think about it. In the heat of the moment, you can think �I'll just put this on too and then torque everything at once so that I'm not running back and forth, STOP, this thinking opens up something getting missed. Torque each component as it is installed that way there is no way that you miss something. The intake manifold bolts should go back in where they came out, the difference between a bolt and a stud determines where your wirings harnesses fit. There isn't much slack in the harnesses to deviate from the factory location, so this is where those pictures and/or drawings you should've done before disassembly come in handy. Just breathe and don't rush it.
I used some hairspray that I stole from the Mrs. on the inside of the intercooler boots to prevent blow outs, doing great so far and have had her up to 36psi.
#14
02-23-2017, 12:23 AM
Chapter 15: Kick the tires and light the fire
Now that you have everything put back together, with brand new filters I hope, it's time to fill all the fluids and triple check your wiring. For the oil, add in your usual 15qts for now, you will have to judge the dipstick after you start it in order to get it right where it needs to be depending on how full the oil cooler valley is. As for the coolant, remember what I said about taking your time to make sure everything is right and not get ahead of yourself because you can see the light at the end of the tunnel?...yeeaaaa, about that.
If you're like me, then it's also time to close the block drains and clean up all the brand new coolant off the garage floor. Be careful when you are moving around cleaning it up, ELC concentrate is slicker than elephant snot. If you didn't dump 2 gallons of coolant on the ground then add ONLY 3 gallons of ELC and top off with distilled water in order to get your 50/50 mix. Again, just like the oil, you will have to finalize the level once the truck is running and coolant fills all of the water jackets and the heater core.
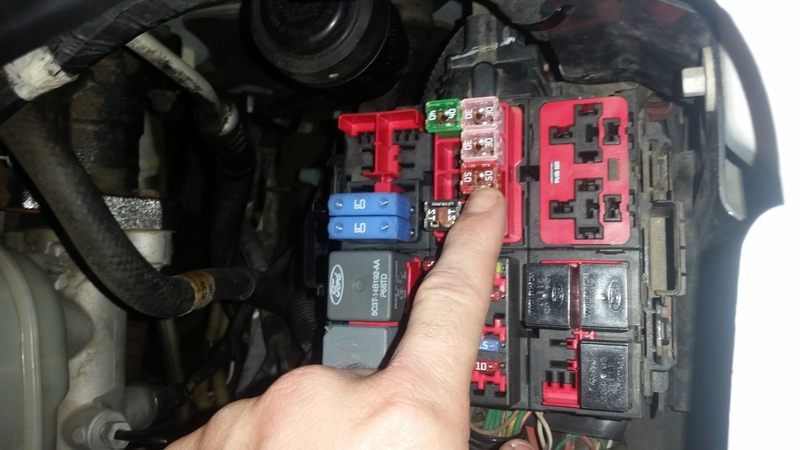
Ok. Now you're positive that everything is plumbed correctly and filled enough for the initial start up, hook up your batteries and prime the systems. Cycle the key on until the fuel pump stops clicking 5 times to get fuel pressure to the injectors. Next up is the oil system, there are a couple ways to do this, you can A) pull the fuse for the FICM in the fuse panel on the driver fender (pretty sure it is #5 or 6, a square 50A) and turn the engine over with the key
or B) touch the starter wire to the positive side of the passenger battery (it's a fairly heavy gauge wire with a push connection)
[IMG]http://i27.photobucket.com/albums/c189/highonspeed/Mobile%20Uploads/20170220_224810_zps7uesqilq.jpg[/IMG
Give 3-5 cranks for about 10 seconds each and then let it sit for 30-60 seconds so that you don't overheat the starter, this will get the oil pumped through the rails to reduce cranking time for the real deal. I cycled the fuel pump a couple more times just to be sure.
Listen to the engine when it's turning over, it should have a smooth sound. If it has a stutter step then you have a problem.
Now get everything back where it's supposed to go, and take a deep breath, time to see if you can call yourself a shade tree diesel mechanic. It all comes down to this. Will the beast roar to life. Turn the key and hold it for NO MORE than 15 seconds. It'll take a few tries and you don't want the starter getting hot. Make sure the area is well ventilated because when that time finally happens and she breathes fire, there is going to be all kinds of smoke from oil, coolant and grease that spilled or were on your hands when you handled the downpipe, exhaust manifolds, turbo, up-pipes, etc. so don't freak out too much if you start seeing smoke coming out.
Let it idle for a few minutes and look everywhere for leaks, underneath, down under the intake manifold, fuel lines, coolant lines, everywhere. It needs to get up to temp to open the thermostat and help the coolant fill all passages. After a few minutes at temp, shut her down and top off the fluids, it'll need to sit for a little bit to let the oil drain back to the pan so that you don't mistakenly bring the level up to full while you still have a couple quarts still draining down from the heads.
Do your victory dance!!!
If you have the daylight to spare, go for a test drive. We aren't talking freeway yet folks, just around the neighborhood or a light drive around town. You need to keep it in a lower gear to get the RPMs up. The oil pump flows 18.5 GPM and the water pump 74.7 GPM at 3300RPM, having this high flow will help burp out any air bubbles. I only took mine to about 28-2900 and only for about 10 seconds at a time because I hate the thought of singing a diesel that high on the tach. When you get back, check for leaks and retorque the band clamps on the up-pipes, EGR cooler, and downpipe now that they have settled a bit...may want to let them cool a bit so that you don't leave any skin stuck to the hot stuff
Now that you have everything put back together, with brand new filters I hope, it's time to fill all the fluids and triple check your wiring. For the oil, add in your usual 15qts for now, you will have to judge the dipstick after you start it in order to get it right where it needs to be depending on how full the oil cooler valley is. As for the coolant, remember what I said about taking your time to make sure everything is right and not get ahead of yourself because you can see the light at the end of the tunnel?...yeeaaaa, about that.
If you're like me, then it's also time to close the block drains and clean up all the brand new coolant off the garage floor. Be careful when you are moving around cleaning it up, ELC concentrate is slicker than elephant snot. If you didn't dump 2 gallons of coolant on the ground then add ONLY 3 gallons of ELC and top off with distilled water in order to get your 50/50 mix. Again, just like the oil, you will have to finalize the level once the truck is running and coolant fills all of the water jackets and the heater core.
Ok. Now you're positive that everything is plumbed correctly and filled enough for the initial start up, hook up your batteries and prime the systems. Cycle the key on until the fuel pump stops clicking 5 times to get fuel pressure to the injectors. Next up is the oil system, there are a couple ways to do this, you can A) pull the fuse for the FICM in the fuse panel on the driver fender (pretty sure it is #5 or 6, a square 50A) and turn the engine over with the key
or B) touch the starter wire to the positive side of the passenger battery (it's a fairly heavy gauge wire with a push connection)
[IMG]http://i27.photobucket.com/albums/c189/highonspeed/Mobile%20Uploads/20170220_224810_zps7uesqilq.jpg[/IMG
Give 3-5 cranks for about 10 seconds each and then let it sit for 30-60 seconds so that you don't overheat the starter, this will get the oil pumped through the rails to reduce cranking time for the real deal. I cycled the fuel pump a couple more times just to be sure.
Listen to the engine when it's turning over, it should have a smooth sound. If it has a stutter step then you have a problem.
Now get everything back where it's supposed to go, and take a deep breath, time to see if you can call yourself a shade tree diesel mechanic. It all comes down to this. Will the beast roar to life. Turn the key and hold it for NO MORE than 15 seconds. It'll take a few tries and you don't want the starter getting hot. Make sure the area is well ventilated because when that time finally happens and she breathes fire, there is going to be all kinds of smoke from oil, coolant and grease that spilled or were on your hands when you handled the downpipe, exhaust manifolds, turbo, up-pipes, etc. so don't freak out too much if you start seeing smoke coming out.
Let it idle for a few minutes and look everywhere for leaks, underneath, down under the intake manifold, fuel lines, coolant lines, everywhere. It needs to get up to temp to open the thermostat and help the coolant fill all passages. After a few minutes at temp, shut her down and top off the fluids, it'll need to sit for a little bit to let the oil drain back to the pan so that you don't mistakenly bring the level up to full while you still have a couple quarts still draining down from the heads.
Do your victory dance!!!
If you have the daylight to spare, go for a test drive. We aren't talking freeway yet folks, just around the neighborhood or a light drive around town. You need to keep it in a lower gear to get the RPMs up. The oil pump flows 18.5 GPM and the water pump 74.7 GPM at 3300RPM, having this high flow will help burp out any air bubbles. I only took mine to about 28-2900 and only for about 10 seconds at a time because I hate the thought of singing a diesel that high on the tach. When you get back, check for leaks and retorque the band clamps on the up-pipes, EGR cooler, and downpipe now that they have settled a bit...may want to let them cool a bit so that you don't leave any skin stuck to the hot stuff
#15
03-19-2017, 11:57 AM
Remember what I said about budgeting for all of your parts plus some extra? This is exactly why, things happen that are out of our control, parts that were working perfectly fine may go **** up during the job and you need to be ready. If I only had the exact dollar amount to cover the parts necessary for the head gasket job then my truck would likely still be sitting in the garage on jackstands.
Chapter 16: Chasing ghosts
During my first start up, it clearly had a gnarly misfire, but being late I didn't do my test drive. The next morning I went back into it to try to figure out what was going on and when I started the engine, there was a ton of haze coming out the exhaust and is was getting a soft code for “P0266- Cylinder 2 Contribution/Balance.” Initial consensus from the forums concluded possible bent push rods so I ripped the valve cover back off and started getting into the push rods even though I was skeptical because I didn't even have the slightest resistance when I barred the engine over. First one and was good so slid it back in and got that stud torqued back down before I broke the next nut loose, those two were also perfect. On to the injectors.
Needless to say I was dumbfounded, all 8 cylinders were running perfect before the teardown and the only thing that I had done other than the o-rings was wipe off the tips to make sure all the holes were clear and everything checked out fine.
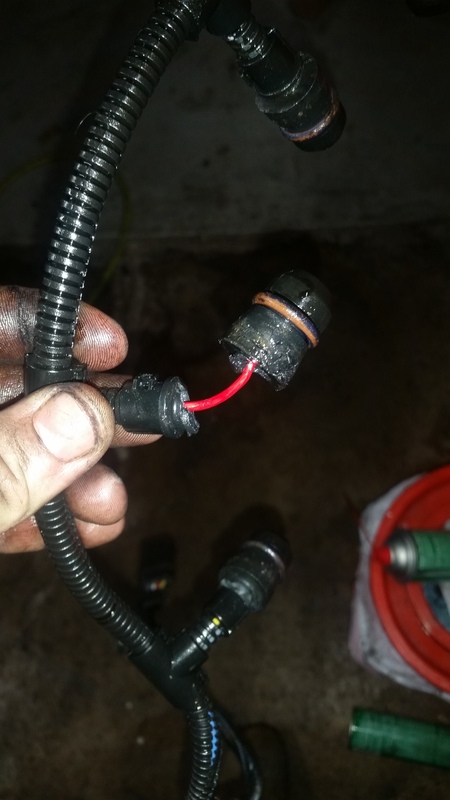
So I started doing some troubleshooting. I unplugged #2 first and the smoke went away so I knew I was fingering the right hole then took a trip down to the stealership for some short notice o-ring kits, picked up 4 total. My plan was to swap #2 and #4, put her back together and fire it off, if the problem followed then I'd know that it was a problem with the injector, if it stayed on #2 then it was something with the wiring or computer.
When I pulled them out, this is what I found.
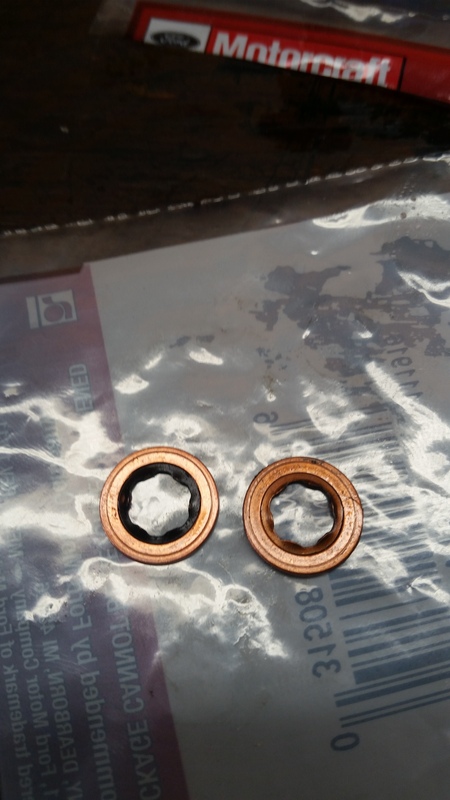
The washer on the left is from #2 and #4 on the right, both got a good crush on them so the injector was in there nice and secure but both of them had less than a full hour of run time on them. Now here is the weird part, when I got the new seals on and put #2 in #4 and #4 in #2, put the valve cover on, plugged everything in and hit the key, she purred like a kitten.
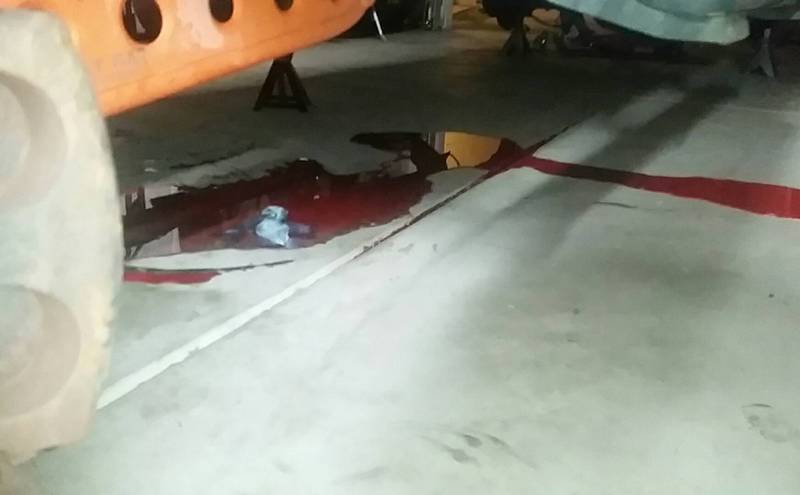
On to the next issue. I plugged in my bluetooth OBDII and started the Torque app for the first time and took her for her maiden voyage. Well chit, FICM is at 45.5V and I have a coolant leak, looks like my 3 year old soldering job on my stock FICM wasn't a permanent fix. Time to park her again, good thing I hadn't put the hood back on yet. Got a BPD power supply on order as soon as I got home, pulled the old unit, and started looking for the coolant drip. Turns out it was the connection where the transmission cooler lines go into radiator, just needed to snug them up a bit more. Turns out I thought that the plastique was more fragile than it is and didn't put enough rotation on it. Another issue solved.
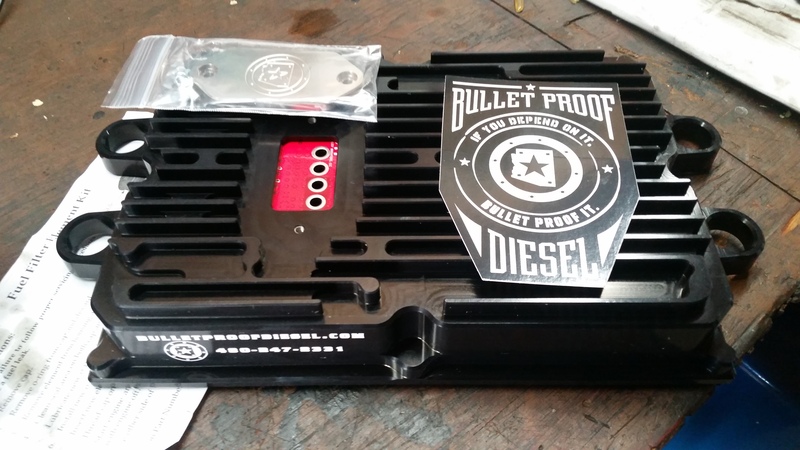
New sexiness showed up a couple days later, slapped it back together and got it back in the truck. Let's try this again...49.5V YEA BUDDY. Hood goes back on and I can actually drive it around confidently
But wait, there's more (Billy Mays moment). Up pops a nasty growling noise that I initially thought was just ZF-6 growl but ended up being the downpipe rubbing on the firewall. I've had my exhaust dump out the right side just behind the cab for the last 6 years without a single issue, and now it has broken 3 hangers in 2 months. Can't be something that got put back together wrong because nothing got taken apart. The exhaust stayed exactly where it was mounted during the teardown with jack stands under the downpipe to take the pressure off the flange. So for now I'm just running straight downpipe until I get this thing figured out. I took the u-bolt clamp and hanger off of my straight pipe and put it on the downpipe so that all of the pressure wasn't on the turbo.
Chapter 16: Chasing ghosts
During my first start up, it clearly had a gnarly misfire, but being late I didn't do my test drive. The next morning I went back into it to try to figure out what was going on and when I started the engine, there was a ton of haze coming out the exhaust and is was getting a soft code for “P0266- Cylinder 2 Contribution/Balance.” Initial consensus from the forums concluded possible bent push rods so I ripped the valve cover back off and started getting into the push rods even though I was skeptical because I didn't even have the slightest resistance when I barred the engine over. First one and was good so slid it back in and got that stud torqued back down before I broke the next nut loose, those two were also perfect. On to the injectors.
Needless to say I was dumbfounded, all 8 cylinders were running perfect before the teardown and the only thing that I had done other than the o-rings was wipe off the tips to make sure all the holes were clear and everything checked out fine.
So I started doing some troubleshooting. I unplugged #2 first and the smoke went away so I knew I was fingering the right hole then took a trip down to the stealership for some short notice o-ring kits, picked up 4 total. My plan was to swap #2 and #4, put her back together and fire it off, if the problem followed then I'd know that it was a problem with the injector, if it stayed on #2 then it was something with the wiring or computer.
When I pulled them out, this is what I found.
The washer on the left is from #2 and #4 on the right, both got a good crush on them so the injector was in there nice and secure but both of them had less than a full hour of run time on them. Now here is the weird part, when I got the new seals on and put #2 in #4 and #4 in #2, put the valve cover on, plugged everything in and hit the key, she purred like a kitten.
On to the next issue. I plugged in my bluetooth OBDII and started the Torque app for the first time and took her for her maiden voyage. Well chit, FICM is at 45.5V and I have a coolant leak, looks like my 3 year old soldering job on my stock FICM wasn't a permanent fix. Time to park her again, good thing I hadn't put the hood back on yet. Got a BPD power supply on order as soon as I got home, pulled the old unit, and started looking for the coolant drip. Turns out it was the connection where the transmission cooler lines go into radiator, just needed to snug them up a bit more. Turns out I thought that the plastique was more fragile than it is and didn't put enough rotation on it. Another issue solved.
New sexiness showed up a couple days later, slapped it back together and got it back in the truck. Let's try this again...49.5V YEA BUDDY. Hood goes back on and I can actually drive it around confidently
But wait, there's more (Billy Mays moment). Up pops a nasty growling noise that I initially thought was just ZF-6 growl but ended up being the downpipe rubbing on the firewall. I've had my exhaust dump out the right side just behind the cab for the last 6 years without a single issue, and now it has broken 3 hangers in 2 months. Can't be something that got put back together wrong because nothing got taken apart. The exhaust stayed exactly where it was mounted during the teardown with jack stands under the downpipe to take the pressure off the flange. So for now I'm just running straight downpipe until I get this thing figured out. I took the u-bolt clamp and hanger off of my straight pipe and put it on the downpipe so that all of the pressure wasn't on the turbo.
Last edited by Diesel_Daddy6.0; 03-19-2017 at 12:05 PM.


