Om617 96 Jeep Cherokee build thread
#11
 02-03-2014, 10:04 PM


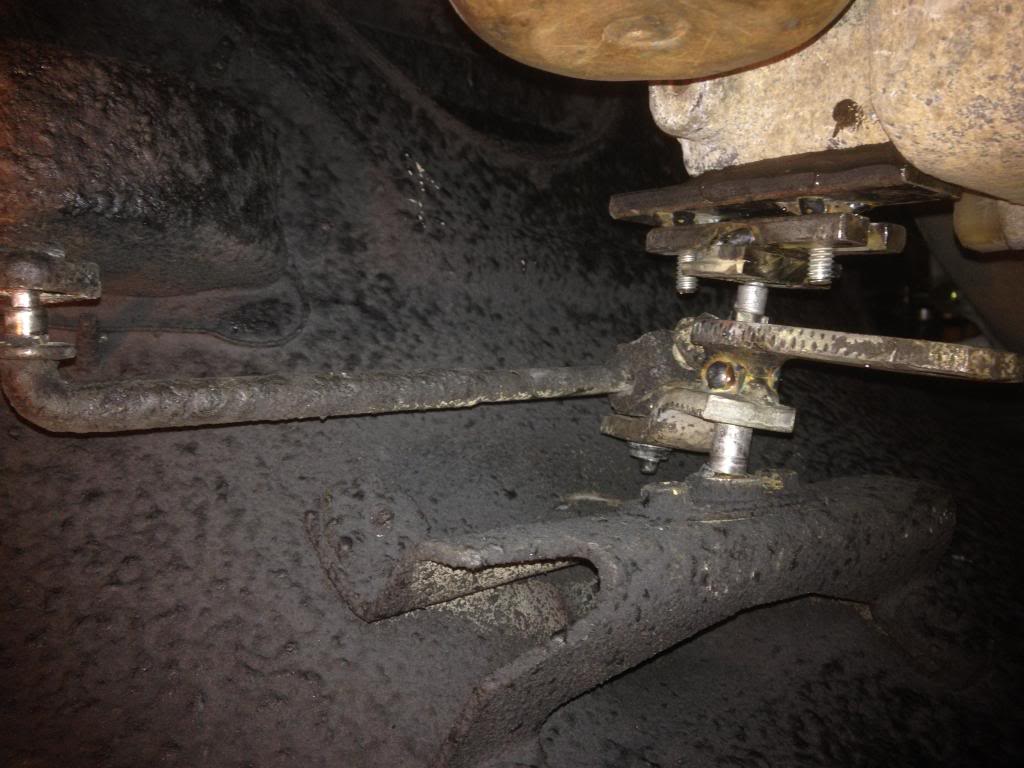
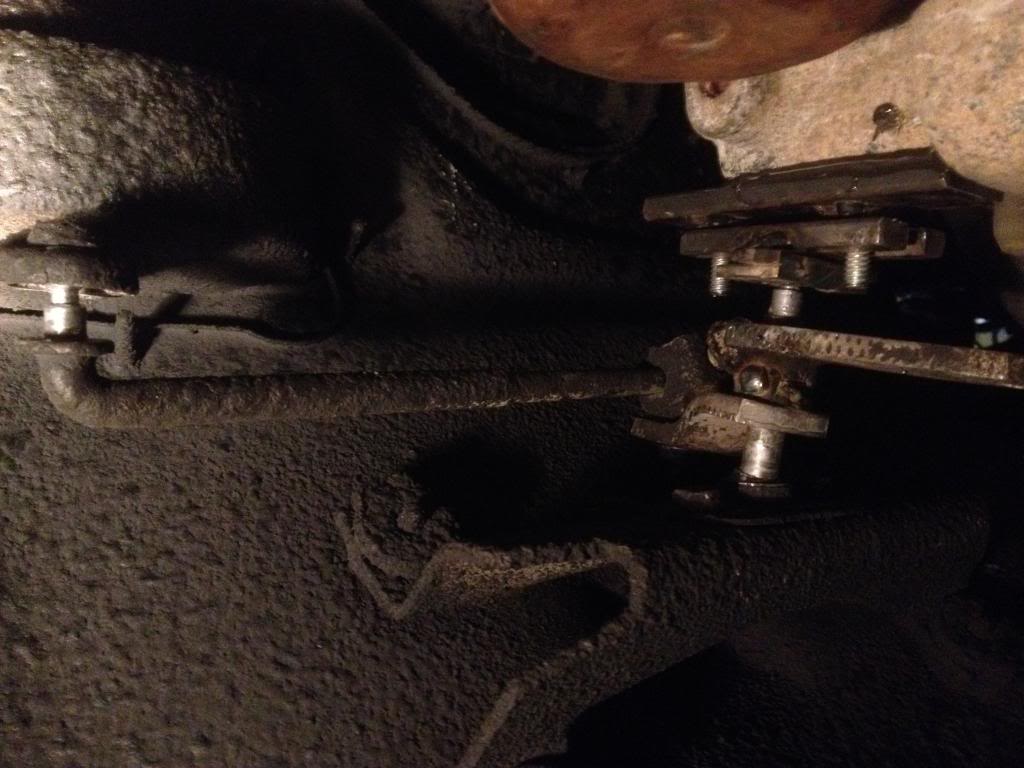
IRO double shear trackbar before I straightened it, i'll get better pics of it.

Drop pitman before notched oil pan.

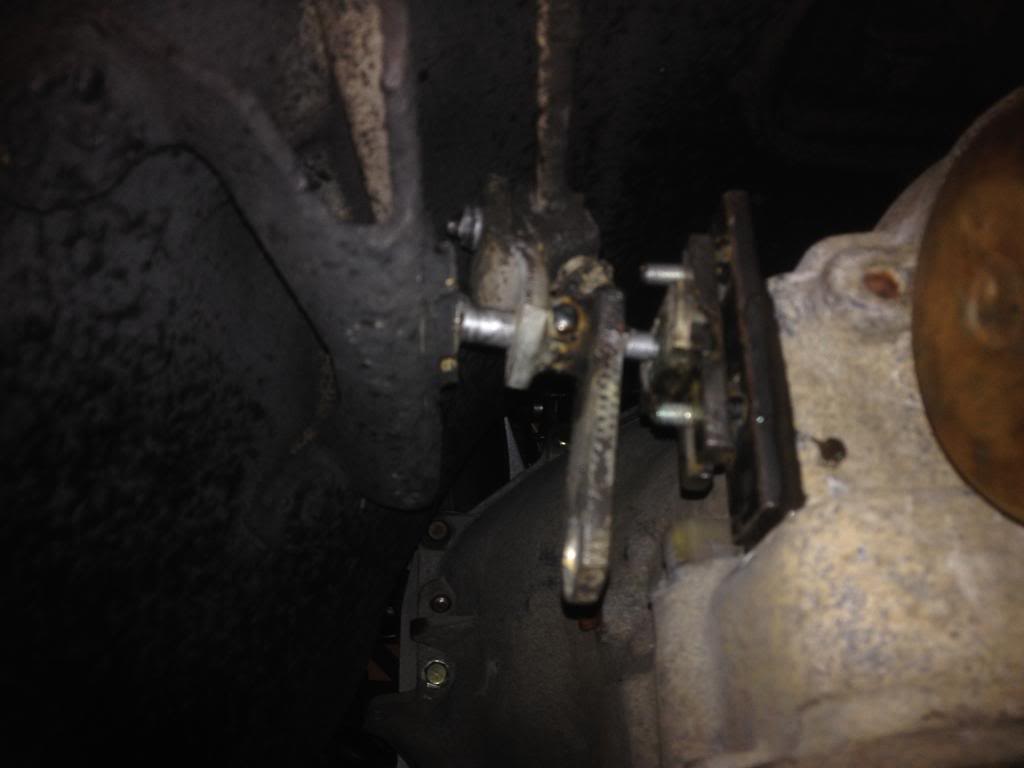
AC pulley clearance.

Steering stabilizer


Notched pan
---AutoMerged DoublePost---


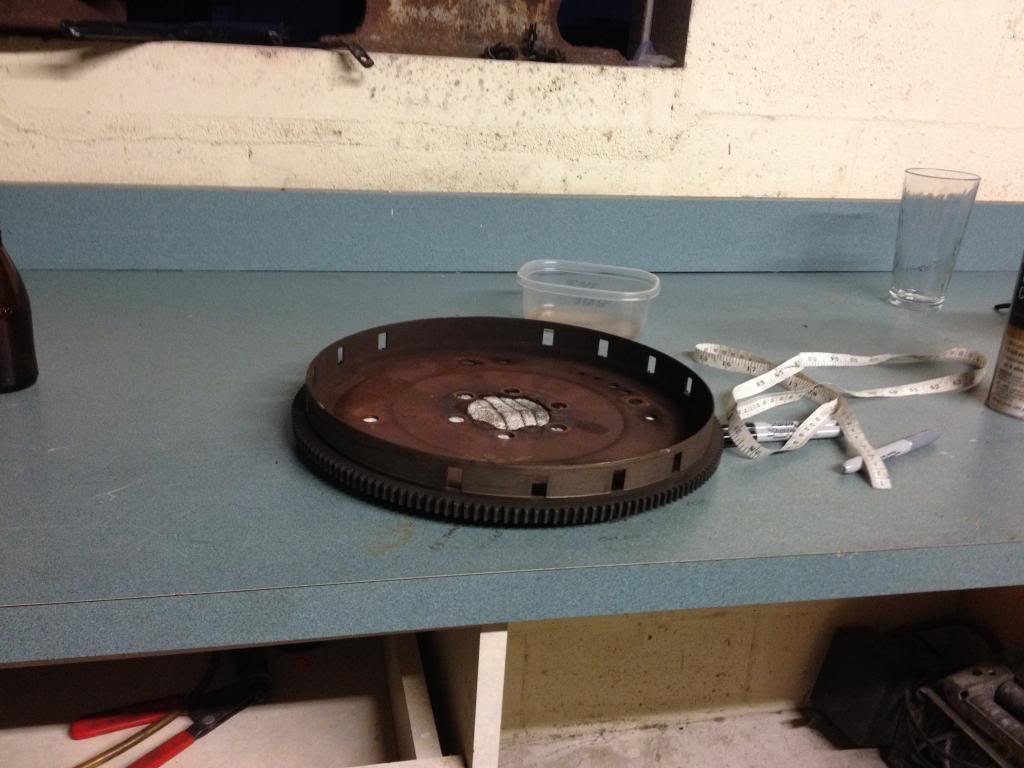
Speed Gems Trans Adapter and gear reduction starter, GM flex plate matched balanced to Mercedes morphindyke flexplate/flywheel by Luke at 4x4 Labs in Cali.
---AutoMerged DoublePost---
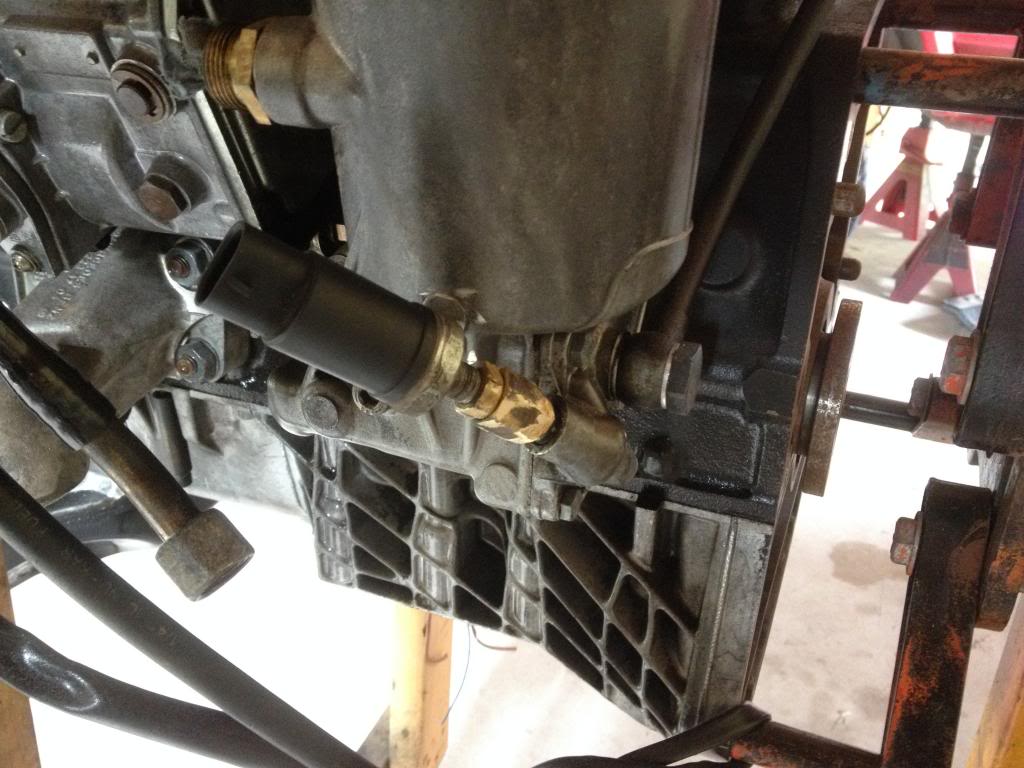
You can see the Jeep oil pressure sender on one of the above pics to the left of the filter just where the Mercedes one used to be.
Last edited by Evenglass; 02-03-2014 at 10:04 PM. Reason: Automerged Doublepost
#12
02-05-2014, 11:07 AM

#13
02-05-2014, 08:21 PM
FTE, first off massive respect to you sir. I've gleaned much information from you for awhile here and over on STD, In fact your build persuaded me away from the Cummins. I respect and consider your advice....Thank you for posting on my build.
Now the motor mounts;
I mulled this over for some time and this is how I decided it was right for me.
1. I don't wheel hard and vibration reduction and comfort was priority, not to mention these mounts work flawlessly on the Mercedes and they are supper smooth in the jeep. The whole idea for this build was "the best of both worlds" Capable off road but well mannered, like a dos equis commercial.
2. I considered what would happen if they did come apart, again they worked in stock Mercedes configuration, if you look at my mounts they retain the factory engine shocks which further reduce vibration and act as a limiting straps if the rubber mount fails.
3. The OM617 is not a torque monster at peak 220ft/lbs torque, torque in my application is multiplied in the transmission and differentials.
4. The transmission mount I utilized was used in the 70's? Chevy 400, it's pretty stiff and beefy I believe this helps with the rotational torque of the engine.
If I planned on wheeling harder I would not have used these mounts and sacrificed comfort for strength. I would recommend these mounts if using them at the level I have stated.
As it sits now the jeep only vibrates more than the 4.0 when at idle in drive with the brake depressed and then only slightly more. I was very surprised at the sound level in the jeep, it is no more then the 4.0, just a deeper tone. I used Moroso's Spiral Flow muffler to 2 1/4" pipe all the way back, it sounds great highly recommended.
---AutoMerged DoublePost---
Here's how you make the gauges work.
<a href="http://s508.photobucket.com/user/evenglass1/media/IMG_3118_zps76cc71c1.jpg.html" target="_blank"><img src="http://i508.photobucket.com/albums/s324/evenglass1/IMG_3118_zps76cc71c1.jpg" border="0" alt=" photo IMG_3118_zps76cc71c1.jpg"/></a>
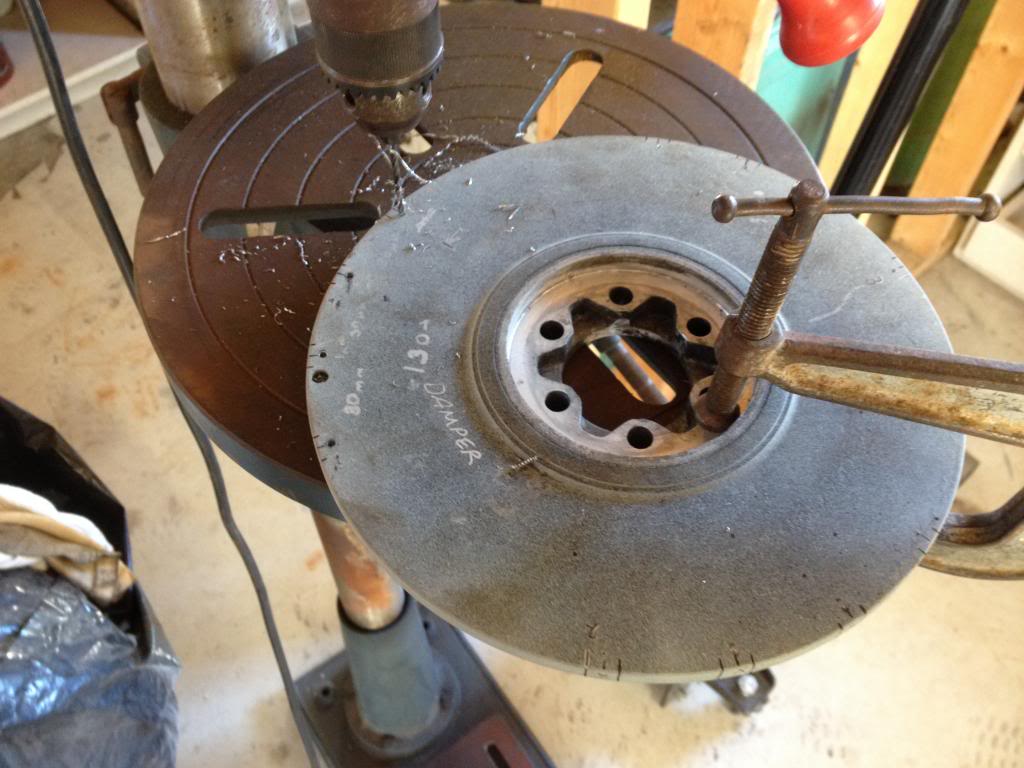
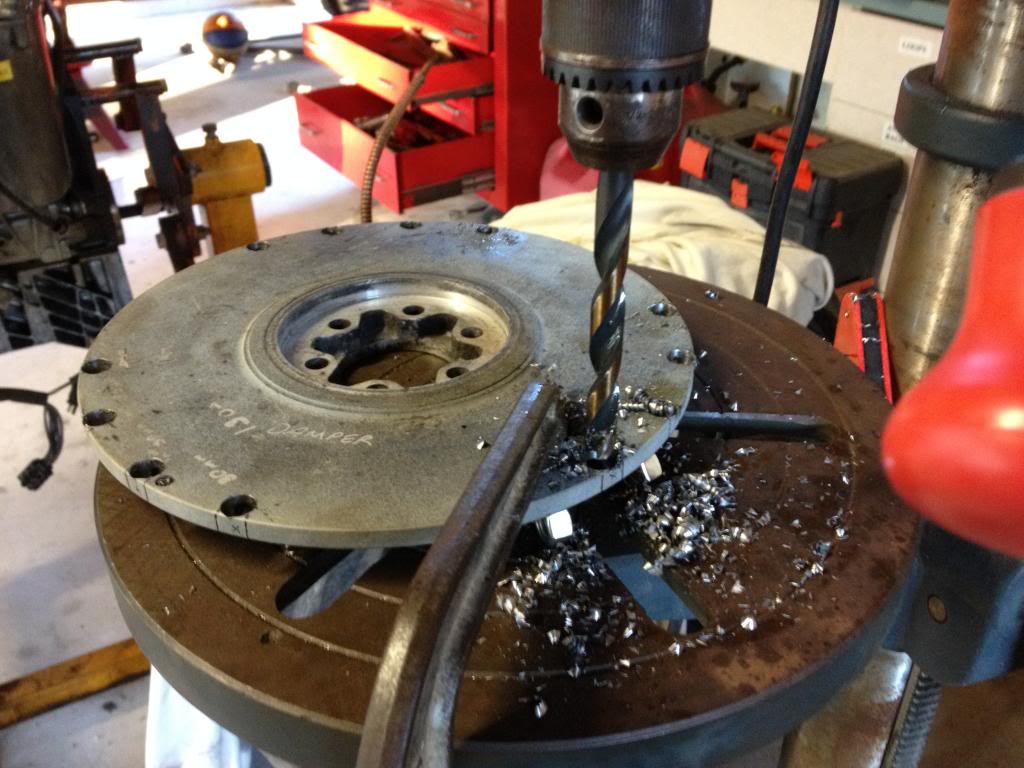
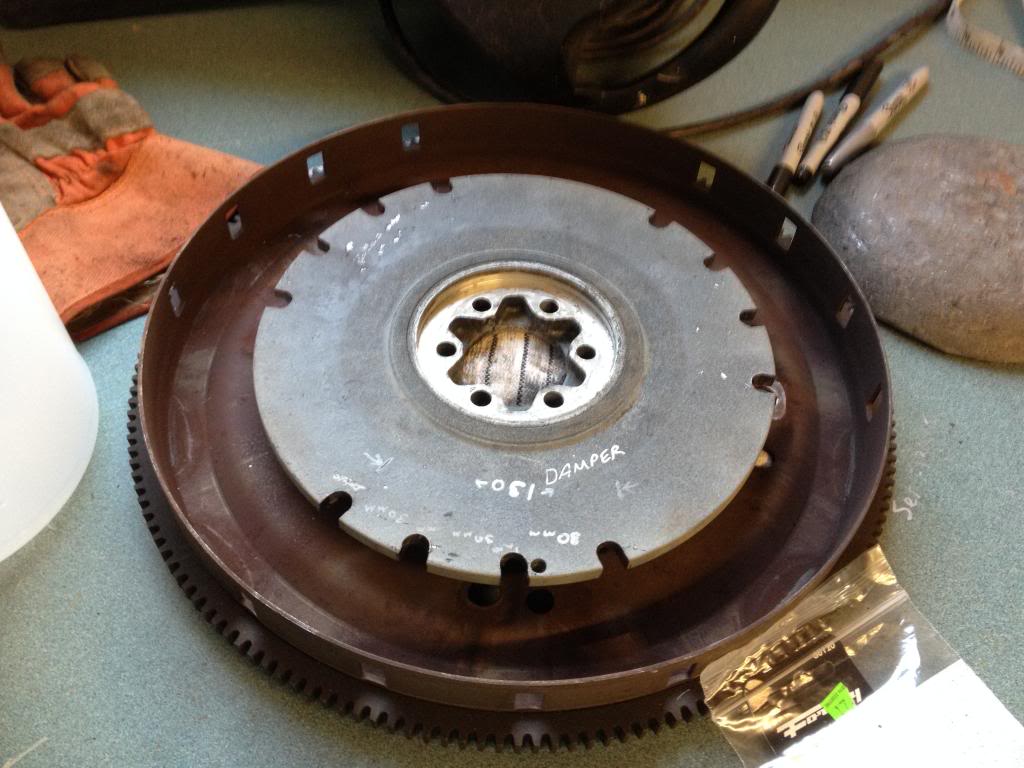
The Jeep reads the RPM from the flexplate via the CPS. Measure the Jeep flexplate do the math figure out the difference, I think the Mercedes was like 37% smaller then the Jeeps. Lay out your marks on the Mercedes damper but do not reduce the size of the reading notches(I think 1cm). Machine out the notches on the Mercedes damper with whatever means available, I used a drillpress and an angle grinder. The key here is time, take your time measure twice.
<a href="http://s508.photobucket.com/user/evenglass1/media/IMG_3272_zps691dc86c.jpg.html" target="_blank"><img src="http://i508.photobucket.com/albums/s324/evenglass1/IMG_3272_zps691dc86c.jpg" border="0" alt=" photo IMG_3272_zps691dc86c.jpg"/></a>
<a href="http://s508.photobucket.com/user/evenglass1/media/IMG_3274_zps4ec61402.jpg.html" target="_blank"><img src="http://i508.photobucket.com/albums/s324/evenglass1/IMG_3274_zps4ec61402.jpg" border="0" alt=" photo IMG_3274_zps4ec61402.jpg"/></a>
<a href="http://s508.photobucket.com/user/evenglass1/media/IMG_3275_zps808ff3e2.jpg.html" target="_blank"><img src="http://i508.photobucket.com/albums/s324/evenglass1/IMG_3275_zps808ff3e2.jpg" border="0" alt=" photo IMG_3275_zps808ff3e2.jpg"/></a>
<a href="http://s508.photobucket.com/user/evenglass1/media/IMG_3298_zps97c17cfb.jpg.html" target="_blank"><img src="http://i508.photobucket.com/albums/s324/evenglass1/IMG_3298_zps97c17cfb.jpg" border="0" alt=" photo IMG_3298_zps97c17cfb.jpg"/></a>
---AutoMerged DoublePost---
Here's how you make the gauges work.
The Jeep reads the RPM from the flexplate via the CPS. Measure the Jeep flexplate do the math figure out the difference, I think the Mercedes was like 37% smaller then the Jeeps. Lay out your marks on the Mercedes damper but do not reduce the size of the reading notches(I think 1cm). Machine out the notches on the Mercedes damper with whatever means available, I used a drillpress and an angle grinder. The key here is time, take your time measure twice.
---AutoMerged DoublePost---
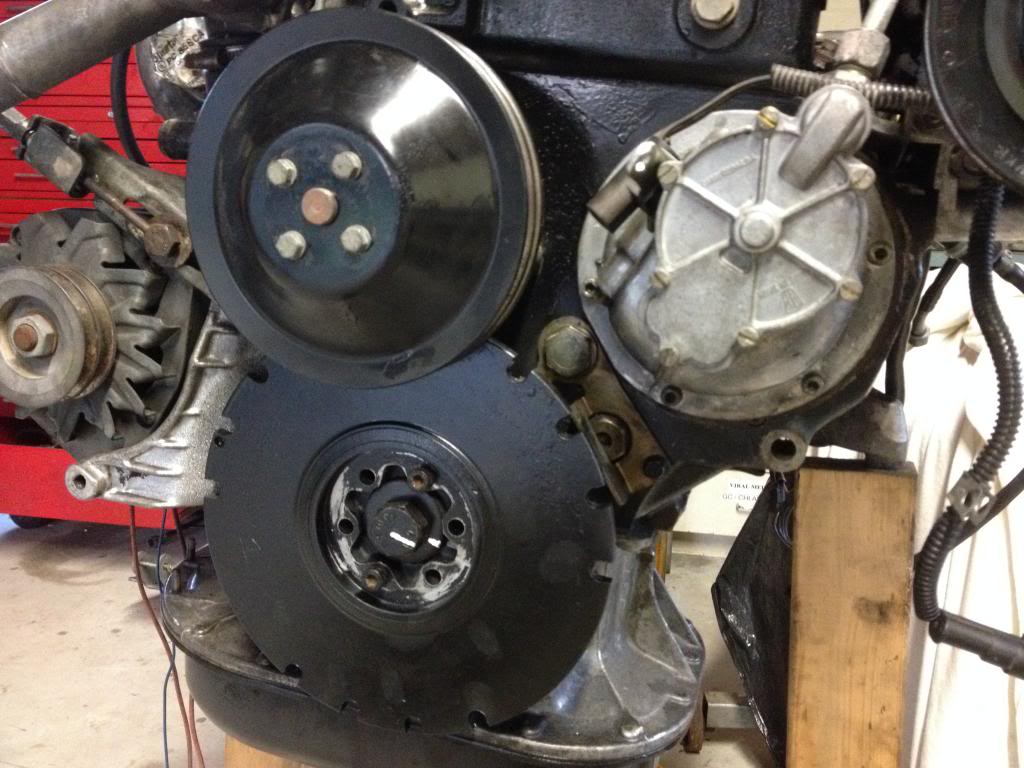
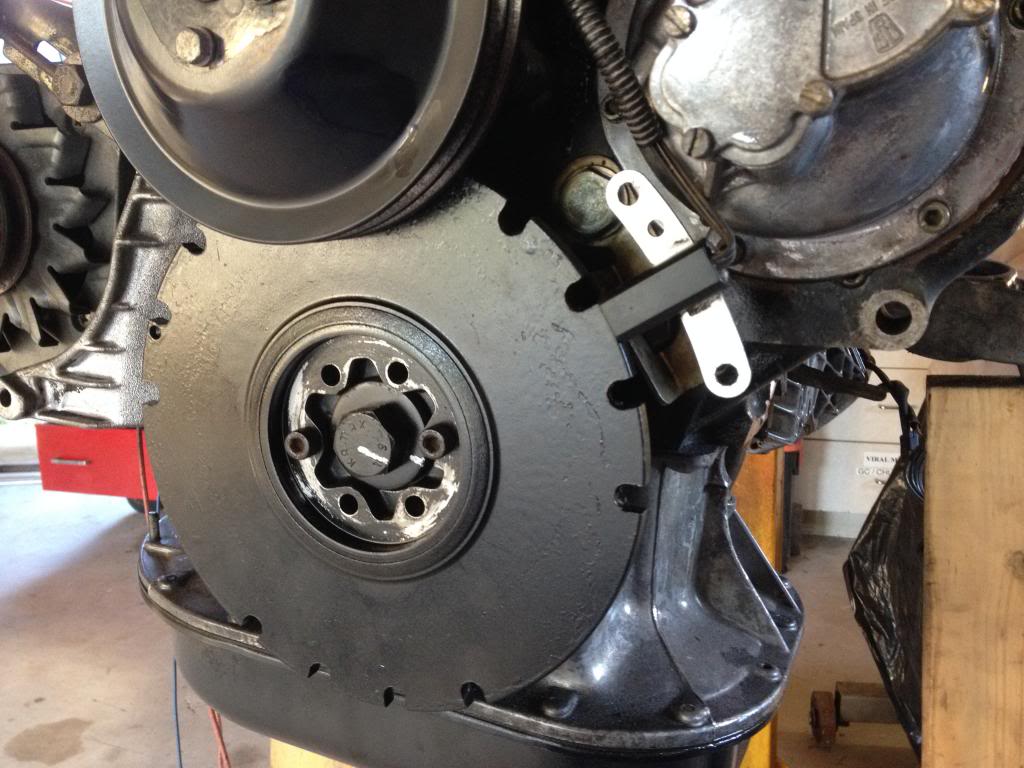
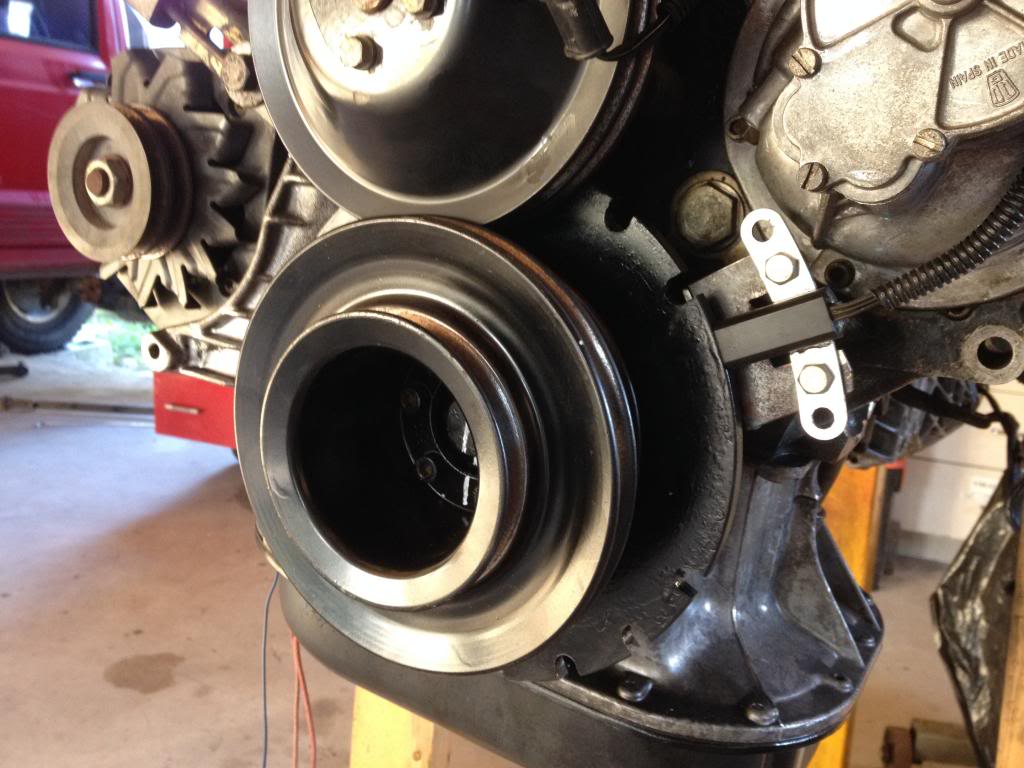
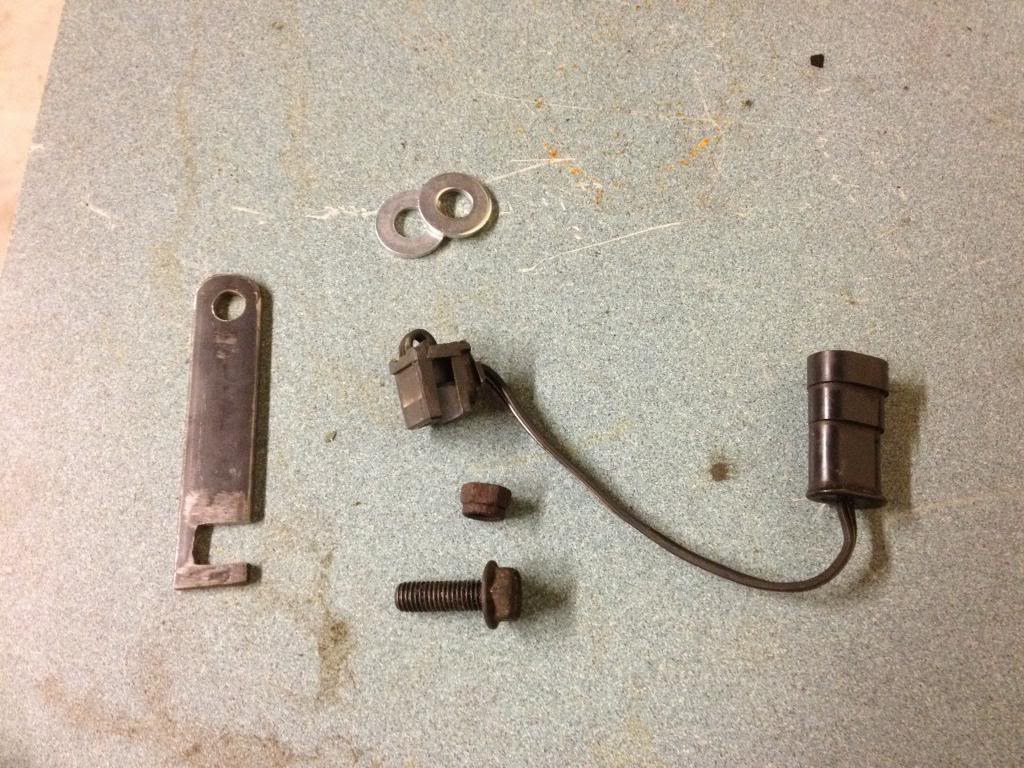
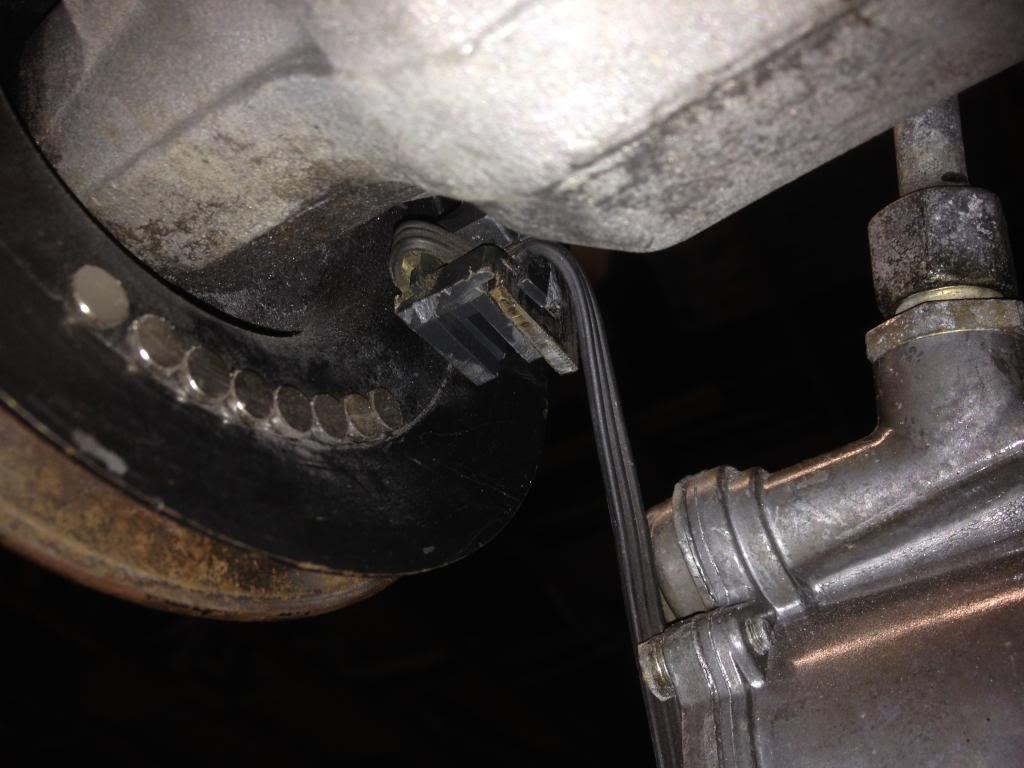
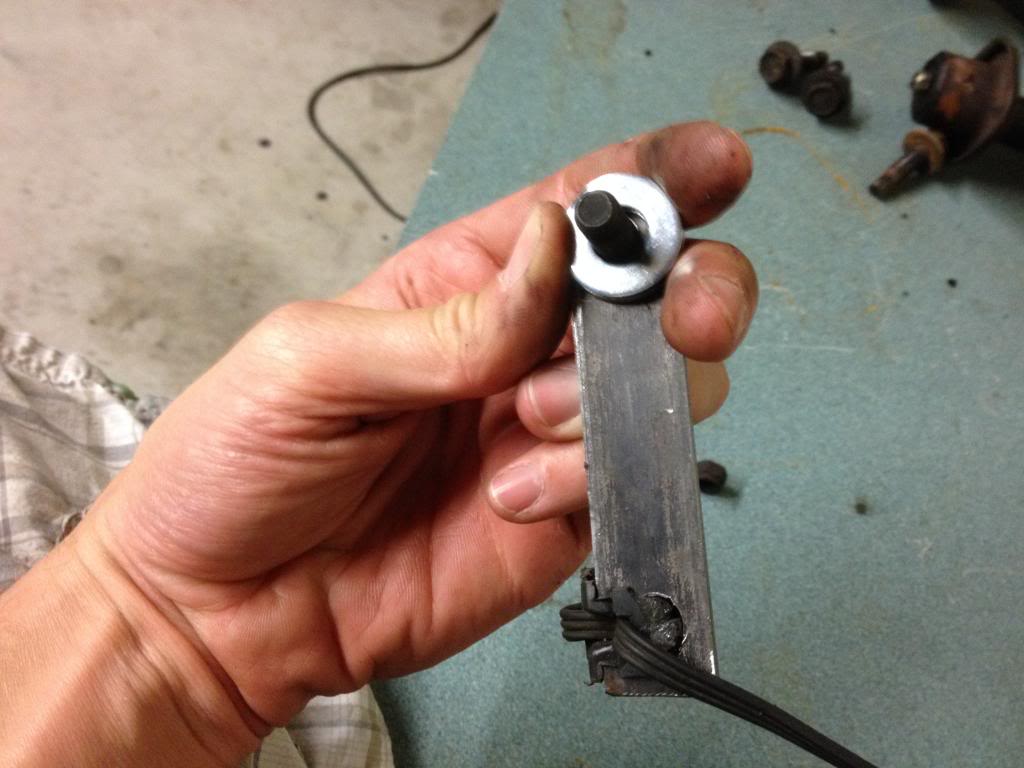
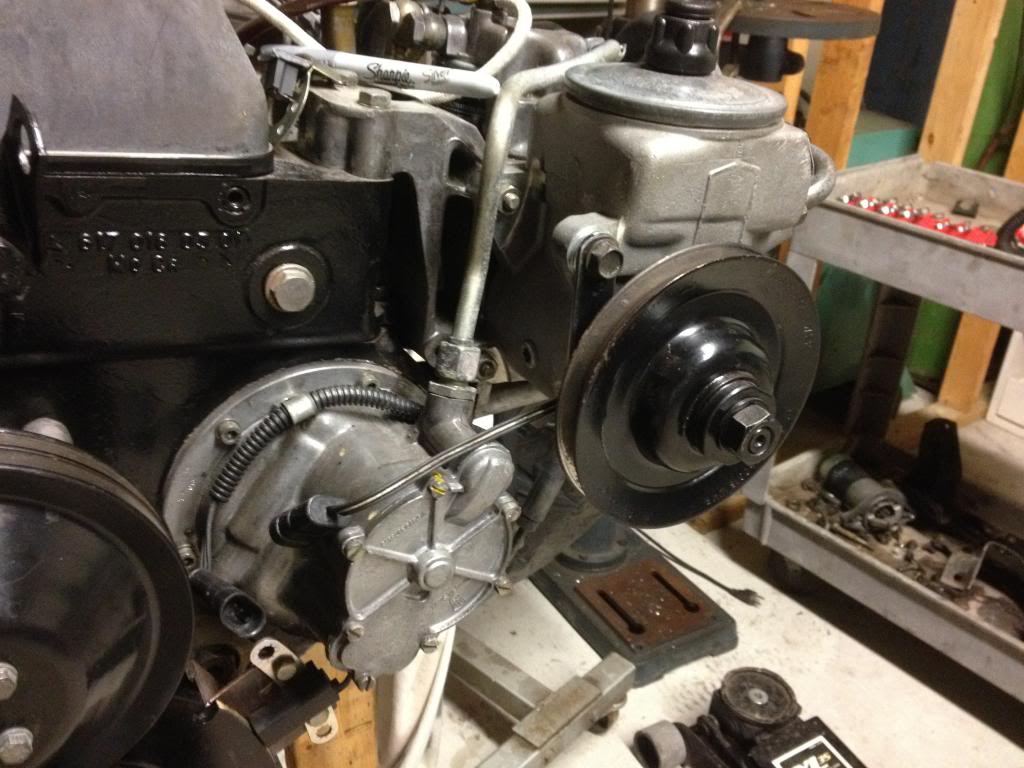
The Jeep ECM requires I signal from the cam shaft sensor to turn on and thus run the gauge cluster, this signal does not have to be correct just present for the first few seconds/revolutions of operation. Remove the CAM sensor from inside the Jeep distributor cut the excess plastic off and mount it so that it reads a rotating magnet. I mounted mine behind the power steering pump pulley and epoxied some neodymium magnets to the backside of the pulley.

---AutoMerged DoublePost---
---AutoMerged DoublePost---
---AutoMerged DoublePost---
Now the motor mounts;
I mulled this over for some time and this is how I decided it was right for me.
1. I don't wheel hard and vibration reduction and comfort was priority, not to mention these mounts work flawlessly on the Mercedes and they are supper smooth in the jeep. The whole idea for this build was "the best of both worlds" Capable off road but well mannered, like a dos equis commercial.
2. I considered what would happen if they did come apart, again they worked in stock Mercedes configuration, if you look at my mounts they retain the factory engine shocks which further reduce vibration and act as a limiting straps if the rubber mount fails.
3. The OM617 is not a torque monster at peak 220ft/lbs torque, torque in my application is multiplied in the transmission and differentials.
4. The transmission mount I utilized was used in the 70's? Chevy 400, it's pretty stiff and beefy I believe this helps with the rotational torque of the engine.
If I planned on wheeling harder I would not have used these mounts and sacrificed comfort for strength. I would recommend these mounts if using them at the level I have stated.
As it sits now the jeep only vibrates more than the 4.0 when at idle in drive with the brake depressed and then only slightly more. I was very surprised at the sound level in the jeep, it is no more then the 4.0, just a deeper tone. I used Moroso's Spiral Flow muffler to 2 1/4" pipe all the way back, it sounds great highly recommended.
---AutoMerged DoublePost---
Here's how you make the gauges work.
<a href="http://s508.photobucket.com/user/evenglass1/media/IMG_3118_zps76cc71c1.jpg.html" target="_blank"><img src="http://i508.photobucket.com/albums/s324/evenglass1/IMG_3118_zps76cc71c1.jpg" border="0" alt=" photo IMG_3118_zps76cc71c1.jpg"/></a>
The Jeep reads the RPM from the flexplate via the CPS. Measure the Jeep flexplate do the math figure out the difference, I think the Mercedes was like 37% smaller then the Jeeps. Lay out your marks on the Mercedes damper but do not reduce the size of the reading notches(I think 1cm). Machine out the notches on the Mercedes damper with whatever means available, I used a drillpress and an angle grinder. The key here is time, take your time measure twice.
<a href="http://s508.photobucket.com/user/evenglass1/media/IMG_3272_zps691dc86c.jpg.html" target="_blank"><img src="http://i508.photobucket.com/albums/s324/evenglass1/IMG_3272_zps691dc86c.jpg" border="0" alt=" photo IMG_3272_zps691dc86c.jpg"/></a>
<a href="http://s508.photobucket.com/user/evenglass1/media/IMG_3274_zps4ec61402.jpg.html" target="_blank"><img src="http://i508.photobucket.com/albums/s324/evenglass1/IMG_3274_zps4ec61402.jpg" border="0" alt=" photo IMG_3274_zps4ec61402.jpg"/></a>
<a href="http://s508.photobucket.com/user/evenglass1/media/IMG_3275_zps808ff3e2.jpg.html" target="_blank"><img src="http://i508.photobucket.com/albums/s324/evenglass1/IMG_3275_zps808ff3e2.jpg" border="0" alt=" photo IMG_3275_zps808ff3e2.jpg"/></a>
<a href="http://s508.photobucket.com/user/evenglass1/media/IMG_3298_zps97c17cfb.jpg.html" target="_blank"><img src="http://i508.photobucket.com/albums/s324/evenglass1/IMG_3298_zps97c17cfb.jpg" border="0" alt=" photo IMG_3298_zps97c17cfb.jpg"/></a>
---AutoMerged DoublePost---
Here's how you make the gauges work.
The Jeep reads the RPM from the flexplate via the CPS. Measure the Jeep flexplate do the math figure out the difference, I think the Mercedes was like 37% smaller then the Jeeps. Lay out your marks on the Mercedes damper but do not reduce the size of the reading notches(I think 1cm). Machine out the notches on the Mercedes damper with whatever means available, I used a drillpress and an angle grinder. The key here is time, take your time measure twice.


---AutoMerged DoublePost---
The Jeep ECM requires I signal from the cam shaft sensor to turn on and thus run the gauge cluster, this signal does not have to be correct just present for the first few seconds/revolutions of operation. Remove the CAM sensor from inside the Jeep distributor cut the excess plastic off and mount it so that it reads a rotating magnet. I mounted mine behind the power steering pump pulley and epoxied some neodymium magnets to the backside of the pulley.


---AutoMerged DoublePost---

---AutoMerged DoublePost---

---AutoMerged DoublePost---
Last edited by Evenglass; 02-05-2014 at 08:21 PM. Reason: Automerged Doublepost
#14
02-05-2014, 09:59 PM
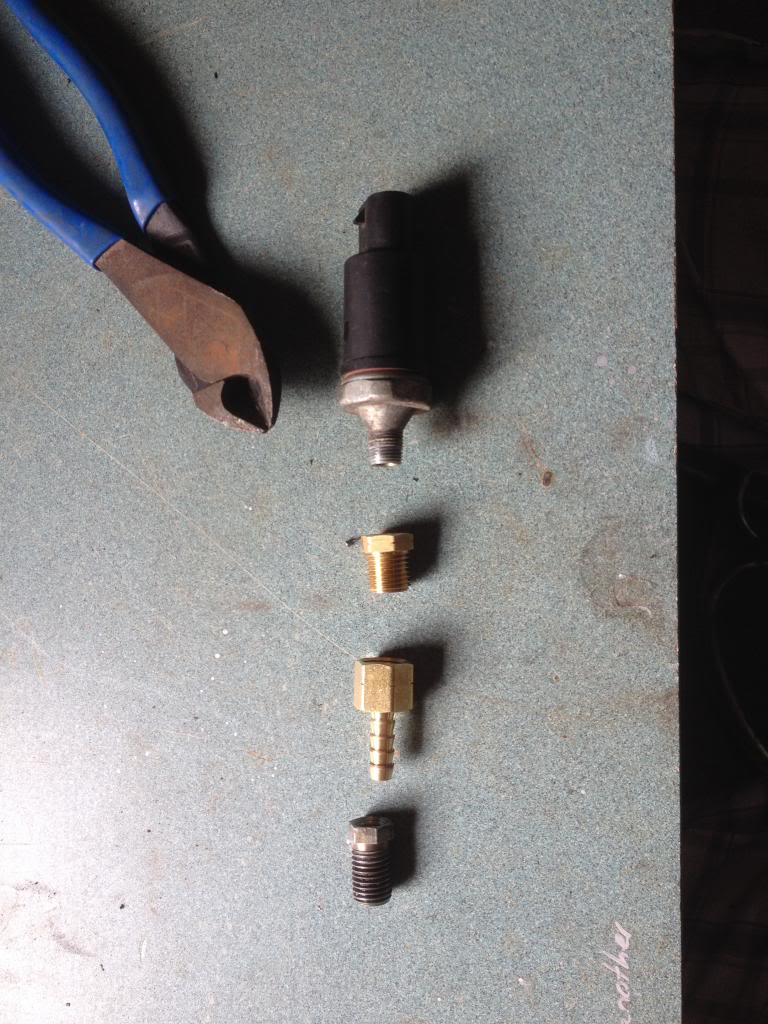
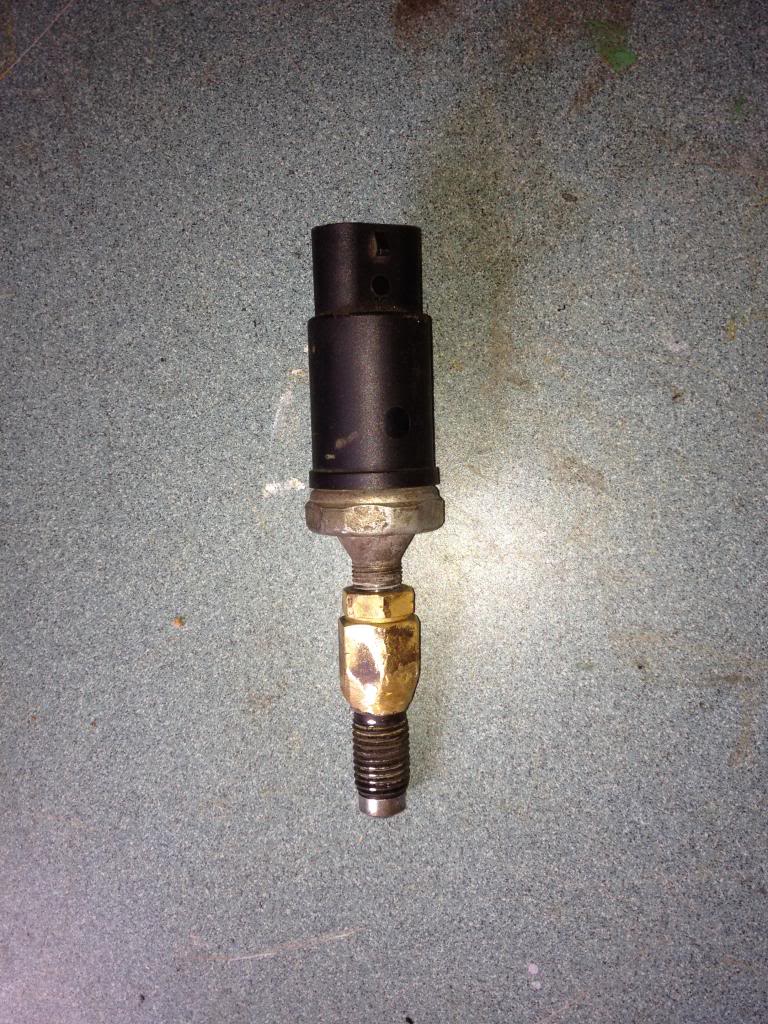
Here's how I got the Jeep oil pressure sensor to work. 1/8" to 3/8" NPT fitting to 1/8" female NPT hose barb adapter to Mercedes fitting. Put the standard fittings together as shown, cut the tubing off the Mercedes compression style fitting, shove the barb down the Mercedes fitting and braze together.
---AutoMerged DoublePost---
Picture of the upper engine mount from the below with shock mount ( I forgot to add these pics earlier).
---AutoMerged DoublePost---
I will admit those are the ugliest welds I have ever created.....


---AutoMerged DoublePost---
Picture of the upper engine mount from the below with shock mount ( I forgot to add these pics earlier).


---AutoMerged DoublePost---
I will admit those are the ugliest welds I have ever created.....
Last edited by Evenglass; 02-05-2014 at 09:59 PM. Reason: Automerged Doublepost

#16
02-06-2014, 07:22 PM
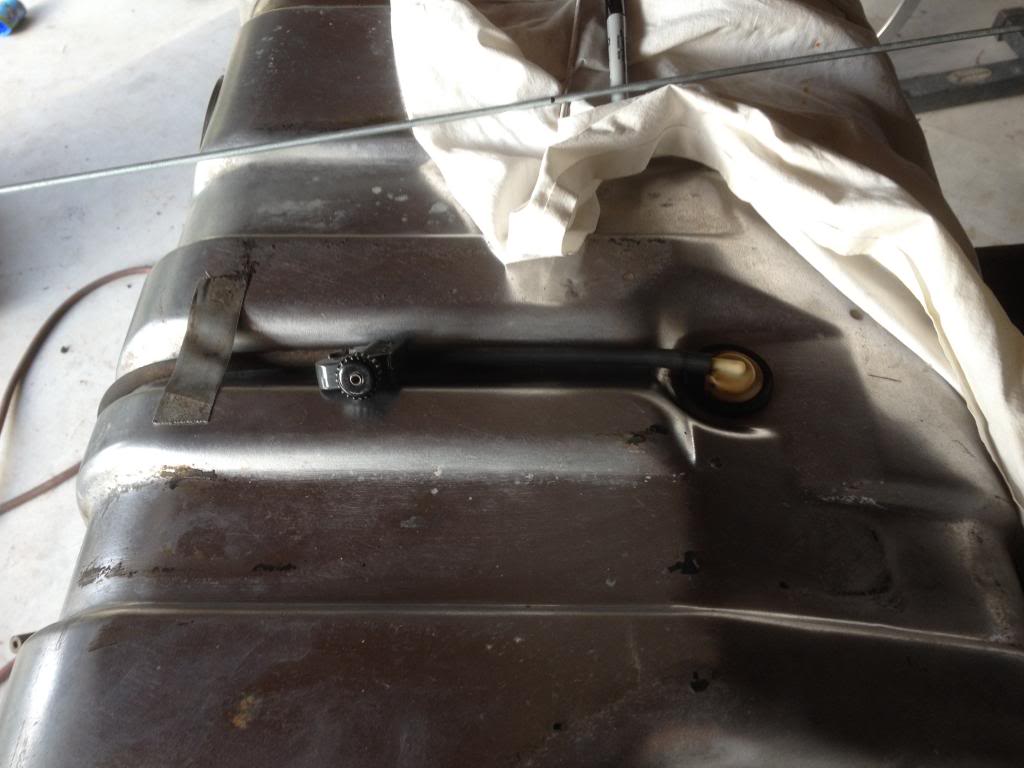
Here's what to do with the fuel pickup. But this filter.

Remove electric fuel pump from pickup assembly and replace it with said filter. In other words your filling the space where the pump went with the filter, it should just puch right on the the stock tank screen/pickup.

---AutoMerged DoublePost---
The return line is very important and must be large enough to return the fuel to the tank under minimal pressure. My first rendition of the return line employed the stock jeeps 3/16" hard vent/vacuum line, some have used this and reported no ill effects however that was not my experience. The back pressure with the 3/16" hard line was enough to create power surges and blow return lines off, I ended up replacing my return line with 5/16" hydraulic line all the way to the tank and pickup. The engine runs and idles much smoother now, just to see I pulled the return line and placed it into a half gallon can, at idle it filled it in under 3 minutes.
These pictures show my original 3/16" hard line I used as the tank return I have since dropped the tank and replaced with 5/16" hard lines, however the procedure is the same.
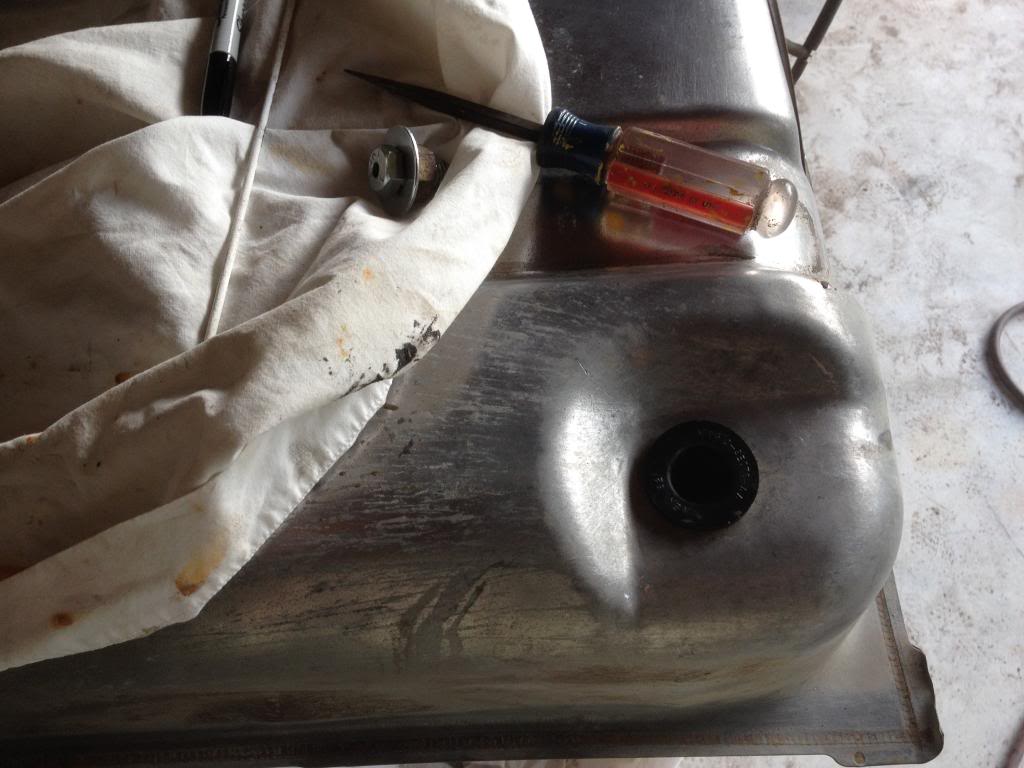
Pull out one of vapor return check valves leaving the sealing grommet in place. You will need the softest 3/4" nut bolt and 2 washers you can find. The idea is to place the bolt in place of the check valve and tighten to seal hole. Drill a hole through the center of the bolt large enough to feed 5/16" hard line through the hole stopping about an inch shy of the bottom of the tank. Cut the remaining hard line to about 4" and carefully bend at 90* toward the front of the tank, you will be attaching the soft return line to this. Braze one of the washers to the bottom of the bolt head and then braze the 5/16" hard line in the hole you created in the bolt sealing it in place. The Remaining washer and nut will then be fed onto the line inside the tank and tightened from inside the tank with the nut.
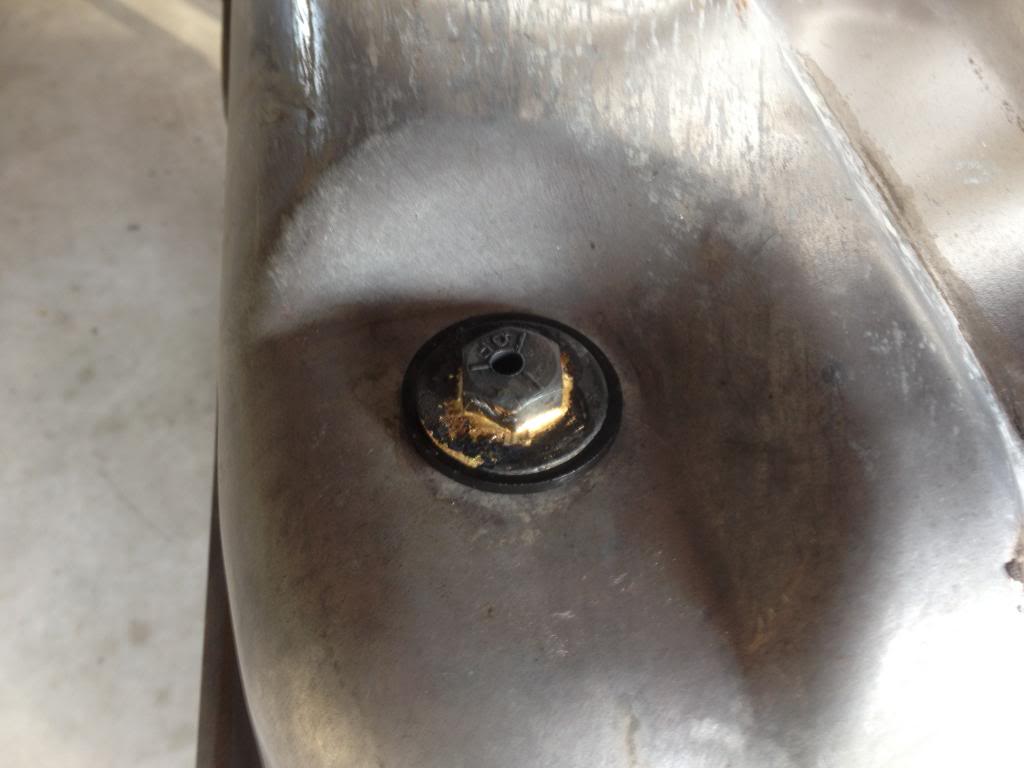
Vapor check valve
Check valve grommet
Finished bolt assembly with hole drilled, this is how it will be assembled in the tank.
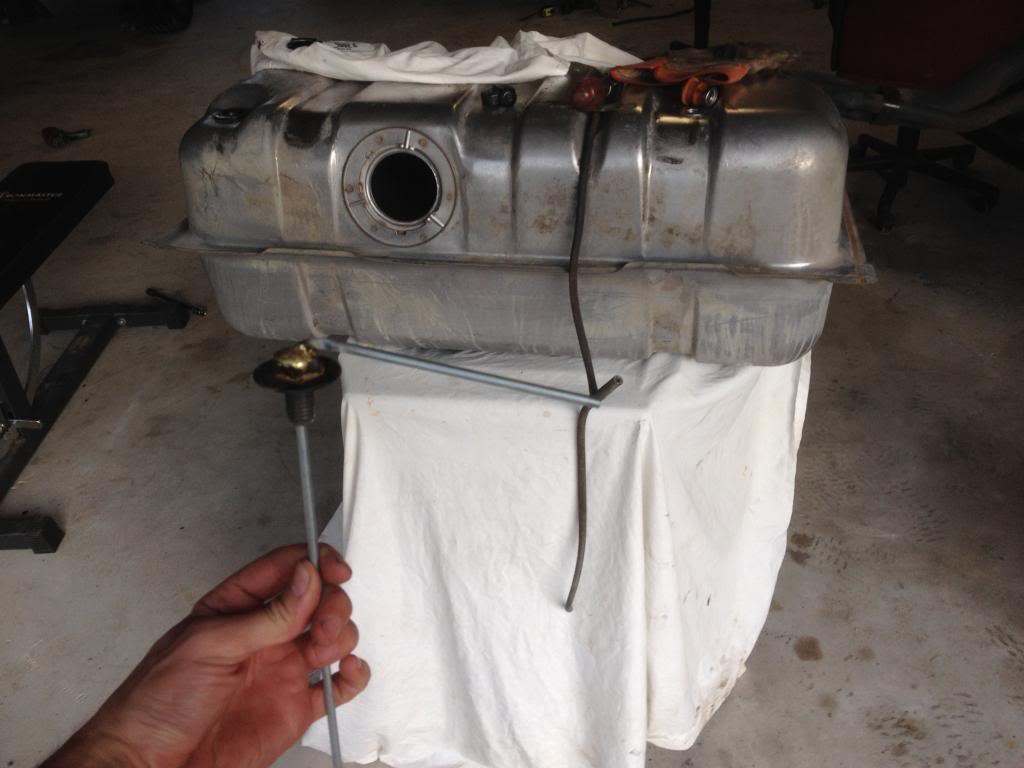
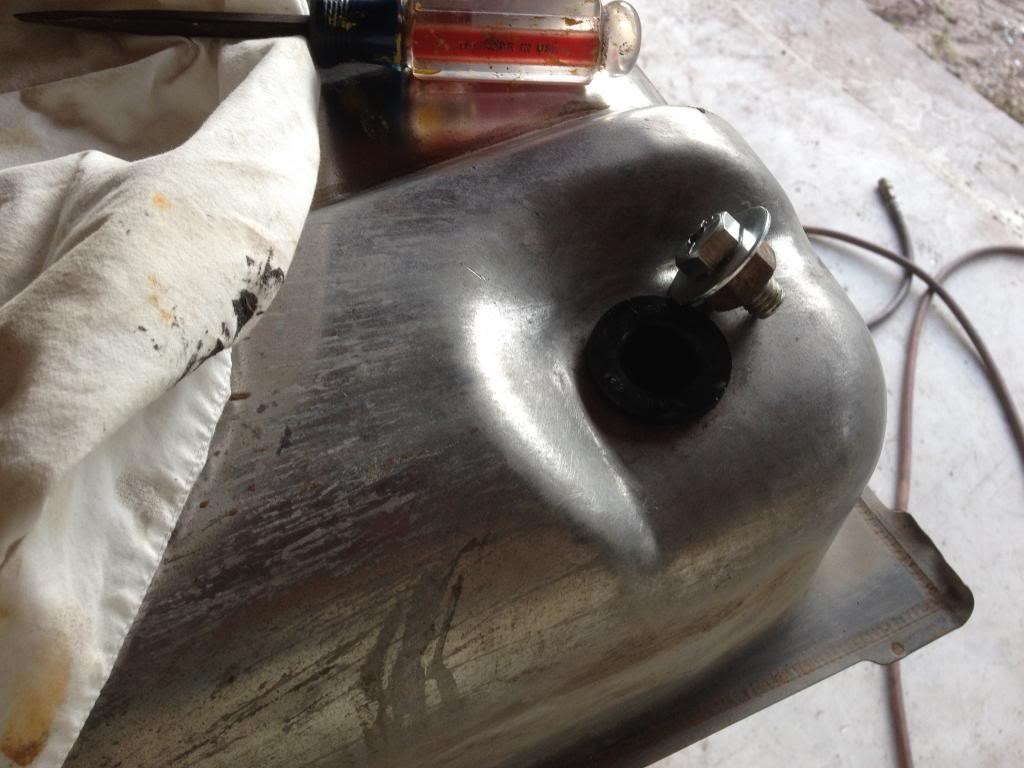
Finished return assembly ready for installation.
It is important to run this hard line to an 1" of the bottom of the tank to prevent aeration of the fuel, again some have not done this and reported no ill effect. Fuel aeration is a well documented problem and will cause power loss at the least, I did not want to chase this gremlin later on. As stated above the Mercedes pump returns allot of fuel to the tank compounding the problem, I believe the strength of the pump is why these engines can run straight vagatable oil ( I don't recommend).
---AutoMerged DoublePost---
Homemade sound deadening/heat barrier undercoating, 1 gallon can of gloss black oil based Rustoleum $29.99, 1 gallon bag micro-sphere's from Spruce Aircraft, Schutz gun from Amazon $10.99, 5' clear vinyl tubing for schutz gun $2 Home Depot.
Prep the frame as you feel fit, I sprayed it down with Dawn dish soap and pressure washed and repeat x 3.
Mix 1/2gal micro-spheres with 1gal Rustoleum, thin just enough with acetone to allow the mix (mix gently and as little as possible to prevent breaking the tiny hollow glass spheres) to flow through the 5' tubing attached to the schutz gun( gonna need lots of air). Spray this mixture on as thick as possible, I got it over an 1/8" thick, it's almost impossible to get this stuff to run. The only reason it's not thicker than an 1/8" is because I sprayed the entire 1 3/4 gallons of mixture and ran out. It took over a month for this to dry to what I call durable and perhaps longer to fully cure. The noise reduction from this was obvious and immediately noticeable. Rustoleum is rated to like 300* the ceramic glass beads are practically burn proof. As a test I took a large semi-dry piece of this mixture and torched it, it only smoldered then turned red hot but remained intact, I presume the oil and acetone quickly evaporate out leaving carbon binding the ceramic beads together thus creating a burn resistant coating.

Clean frame before undercoating
After undercoating

Close-up of texture (dry)
Sprayed (wet)
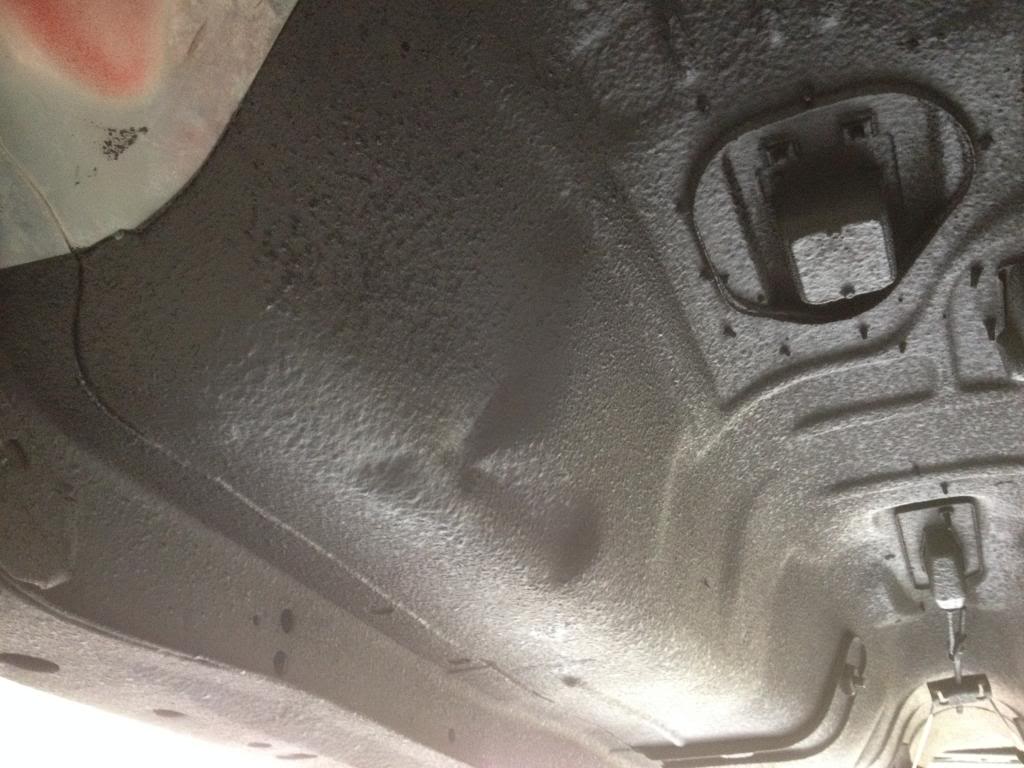
It dries looking dull, if I where to do this again I would give it a final coat of straight gloss Rustoleum to make it look great, like when it was wet.

Remove electric fuel pump from pickup assembly and replace it with said filter. In other words your filling the space where the pump went with the filter, it should just puch right on the the stock tank screen/pickup.

---AutoMerged DoublePost---
The return line is very important and must be large enough to return the fuel to the tank under minimal pressure. My first rendition of the return line employed the stock jeeps 3/16" hard vent/vacuum line, some have used this and reported no ill effects however that was not my experience. The back pressure with the 3/16" hard line was enough to create power surges and blow return lines off, I ended up replacing my return line with 5/16" hydraulic line all the way to the tank and pickup. The engine runs and idles much smoother now, just to see I pulled the return line and placed it into a half gallon can, at idle it filled it in under 3 minutes.
These pictures show my original 3/16" hard line I used as the tank return I have since dropped the tank and replaced with 5/16" hard lines, however the procedure is the same.
Pull out one of vapor return check valves leaving the sealing grommet in place. You will need the softest 3/4" nut bolt and 2 washers you can find. The idea is to place the bolt in place of the check valve and tighten to seal hole. Drill a hole through the center of the bolt large enough to feed 5/16" hard line through the hole stopping about an inch shy of the bottom of the tank. Cut the remaining hard line to about 4" and carefully bend at 90* toward the front of the tank, you will be attaching the soft return line to this. Braze one of the washers to the bottom of the bolt head and then braze the 5/16" hard line in the hole you created in the bolt sealing it in place. The Remaining washer and nut will then be fed onto the line inside the tank and tightened from inside the tank with the nut.

Vapor check valve

Check valve grommet


Finished bolt assembly with hole drilled, this is how it will be assembled in the tank.

Finished return assembly ready for installation.
It is important to run this hard line to an 1" of the bottom of the tank to prevent aeration of the fuel, again some have not done this and reported no ill effect. Fuel aeration is a well documented problem and will cause power loss at the least, I did not want to chase this gremlin later on. As stated above the Mercedes pump returns allot of fuel to the tank compounding the problem, I believe the strength of the pump is why these engines can run straight vagatable oil ( I don't recommend).
---AutoMerged DoublePost---
Homemade sound deadening/heat barrier undercoating, 1 gallon can of gloss black oil based Rustoleum $29.99, 1 gallon bag micro-sphere's from Spruce Aircraft, Schutz gun from Amazon $10.99, 5' clear vinyl tubing for schutz gun $2 Home Depot.
Prep the frame as you feel fit, I sprayed it down with Dawn dish soap and pressure washed and repeat x 3.
Mix 1/2gal micro-spheres with 1gal Rustoleum, thin just enough with acetone to allow the mix (mix gently and as little as possible to prevent breaking the tiny hollow glass spheres) to flow through the 5' tubing attached to the schutz gun( gonna need lots of air). Spray this mixture on as thick as possible, I got it over an 1/8" thick, it's almost impossible to get this stuff to run. The only reason it's not thicker than an 1/8" is because I sprayed the entire 1 3/4 gallons of mixture and ran out. It took over a month for this to dry to what I call durable and perhaps longer to fully cure. The noise reduction from this was obvious and immediately noticeable. Rustoleum is rated to like 300* the ceramic glass beads are practically burn proof. As a test I took a large semi-dry piece of this mixture and torched it, it only smoldered then turned red hot but remained intact, I presume the oil and acetone quickly evaporate out leaving carbon binding the ceramic beads together thus creating a burn resistant coating.

Clean frame before undercoating

After undercoating

Close-up of texture (dry)

Sprayed (wet)


It dries looking dull, if I where to do this again I would give it a final coat of straight gloss Rustoleum to make it look great, like when it was wet.
Last edited by Evenglass; 02-06-2014 at 07:22 PM. Reason: Automerged Doublepost
#18
02-07-2014, 04:25 AM

Newbie
Join Date: Jan 2014
Location: new york city, NY
Posts: 9
Likes: 0
Received 0 Likes
on
0 Posts
#19
02-08-2014, 11:17 PM
At this point of the build I started to get lazy and the quality and amount of pictures I took where reduced.
EGT probe placement
EGT probe placement
Modified 700r4 dipstick tube. Heat with torch bent carefully and cut to length.
Modified 700r4 dipstick tube. Heat with torch bent carefully and cut to length.
Cut the dipstick tube so that the stock jeep dipstick full mark lines up with the 700R4 pan gasket. The top of the 700R4 pan gasket is the correct full level per GM. If full mark on dipstick does not line up do to lengths being cut incorrectly a mark will have to be filed on the dipstick marking the new "full' location.

I wish I had taken better pictures of this mount. A 4" x1/4" plate is directly epoxied directly to the flat spot on the 700r4, there is also an extension that comes down and is bolted to the trans case via un-used bolt hole. Two bolts are welded to the first plate to allow mounting of the second plate that has been drilled to accept the stock Jeep carrier bearing. The pivoting rod has been shortened to accommodate the increased width of the new transmission. The actuating rod the connected to the transfer case was shortened in this application due to switching to the NP231 from NP242 as it utilized a longer rod.
---AutoMerged DoublePost---
Thank you all for the encouragement and kind words, please feel free to ask any questions/comments, I'm looking forward to them.
---AutoMerged DoublePost---
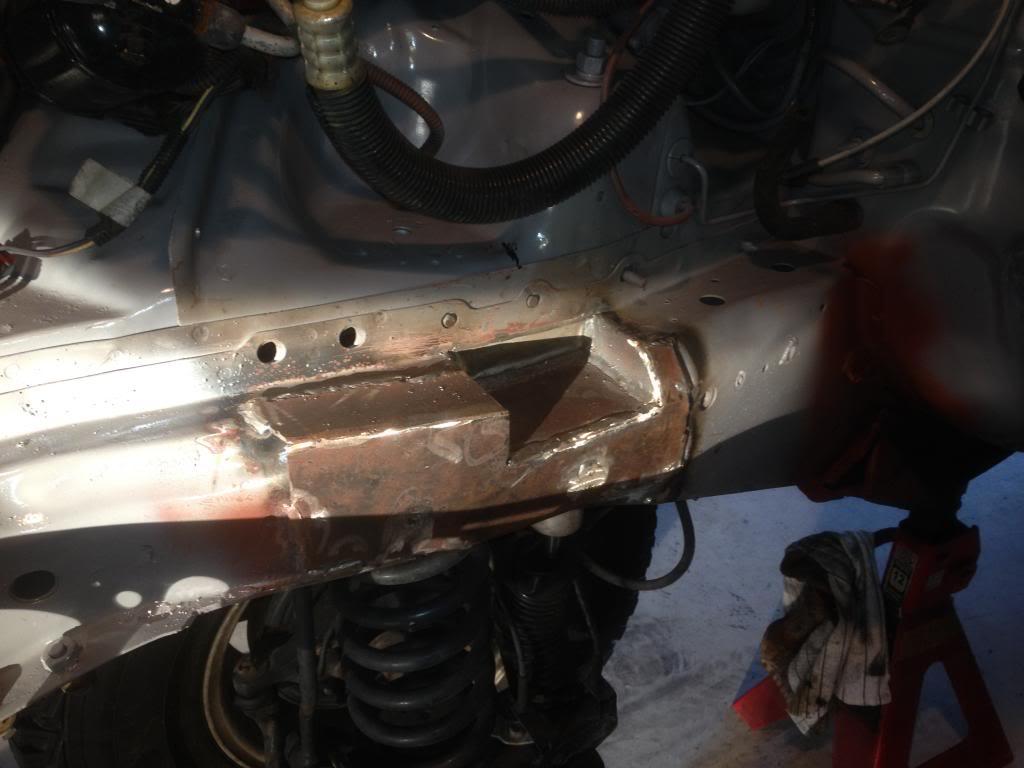
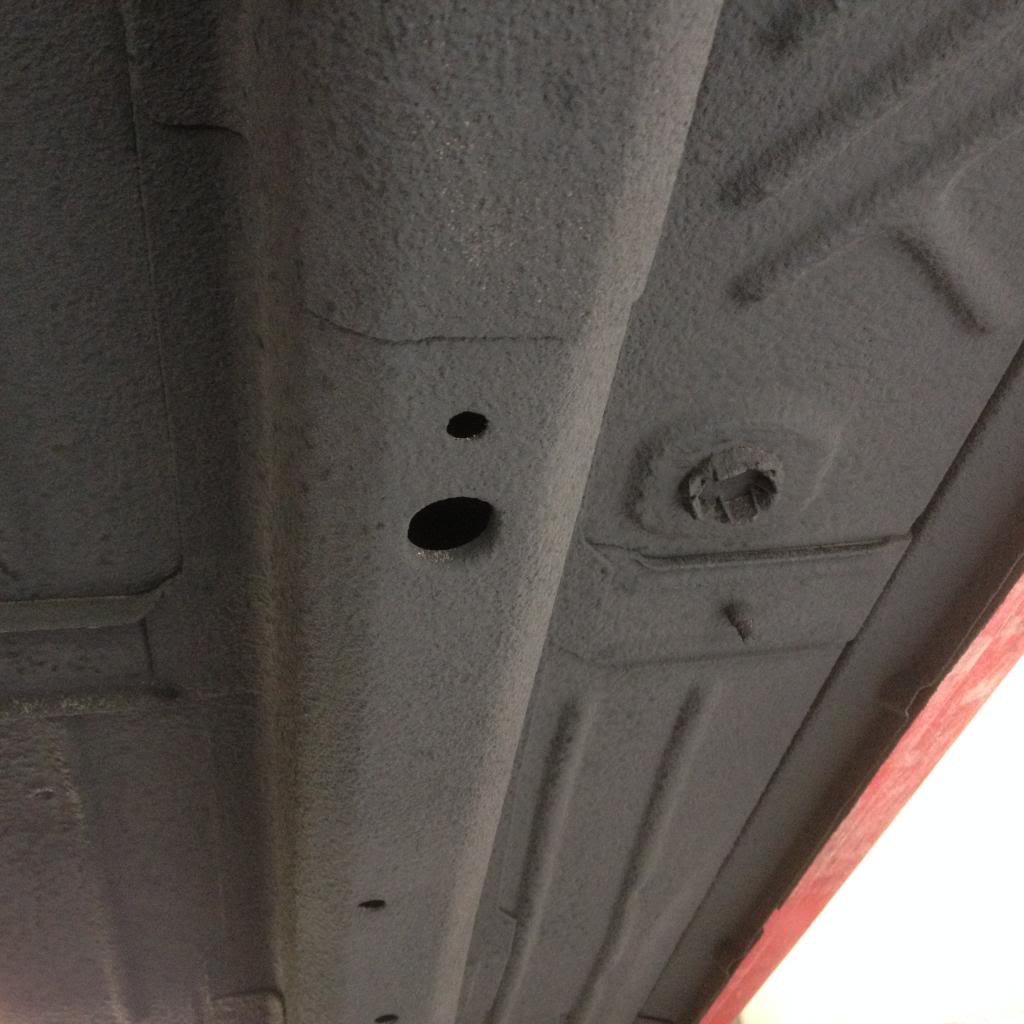
If your engine is equipped with the KKK turbo the passenger side frame rail will have to be notched and reinforced to accommodate it as it sticks out further the Garret.
XJ's have been known to pull the bolts that connect the power steering pump to the frame right through the frame rail and will fracture and role the frame even with stock steering and tires. The use of an extended pitman arm will only amplify this problem. While you here take the time to plate the frame in this area, kits can be bought or made as I did. I ended up using a Skyjacker drop pitman arm advertised for 4.5" of lift.
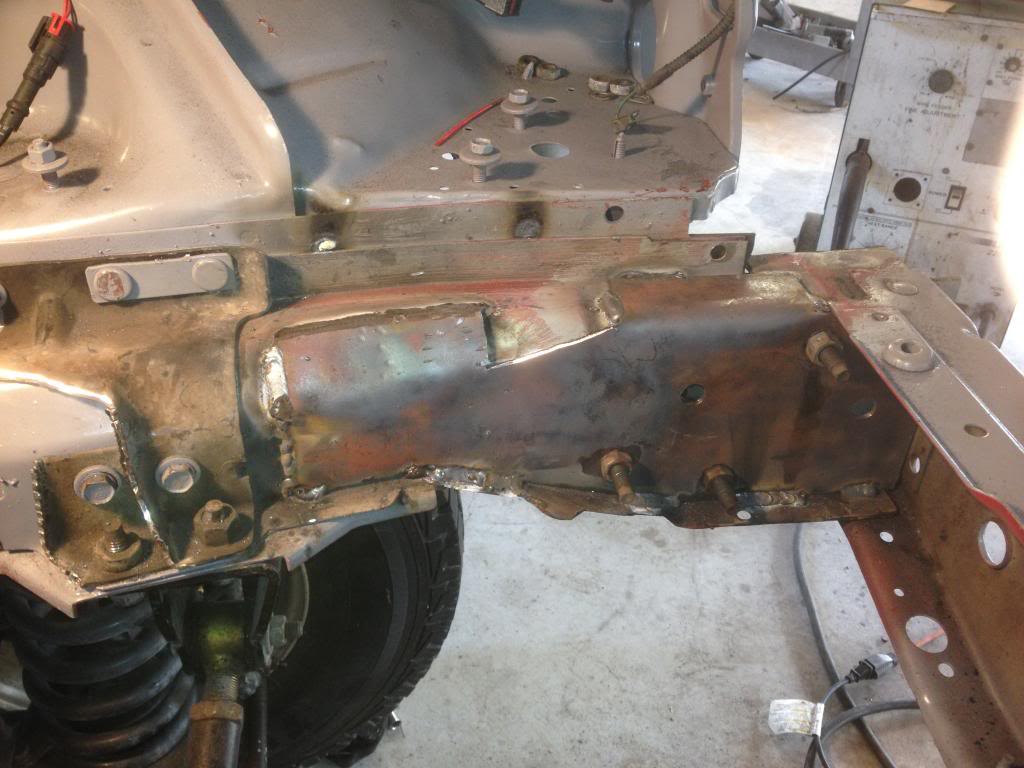
Inside frame plate
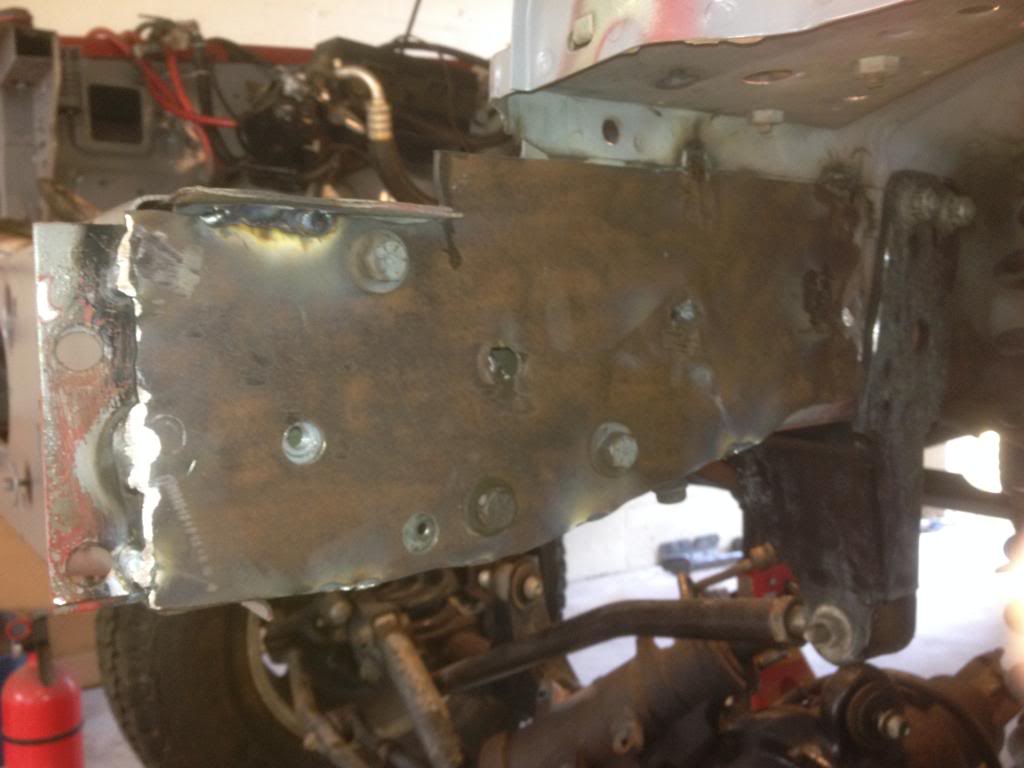
Outside frame plate
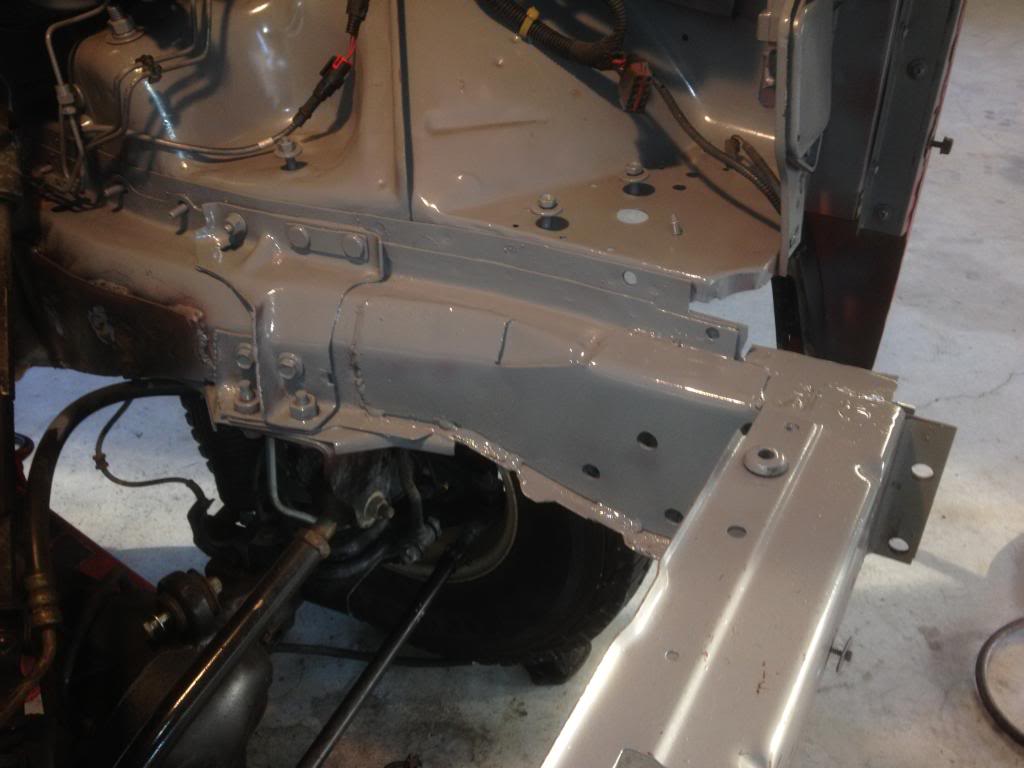 Painted
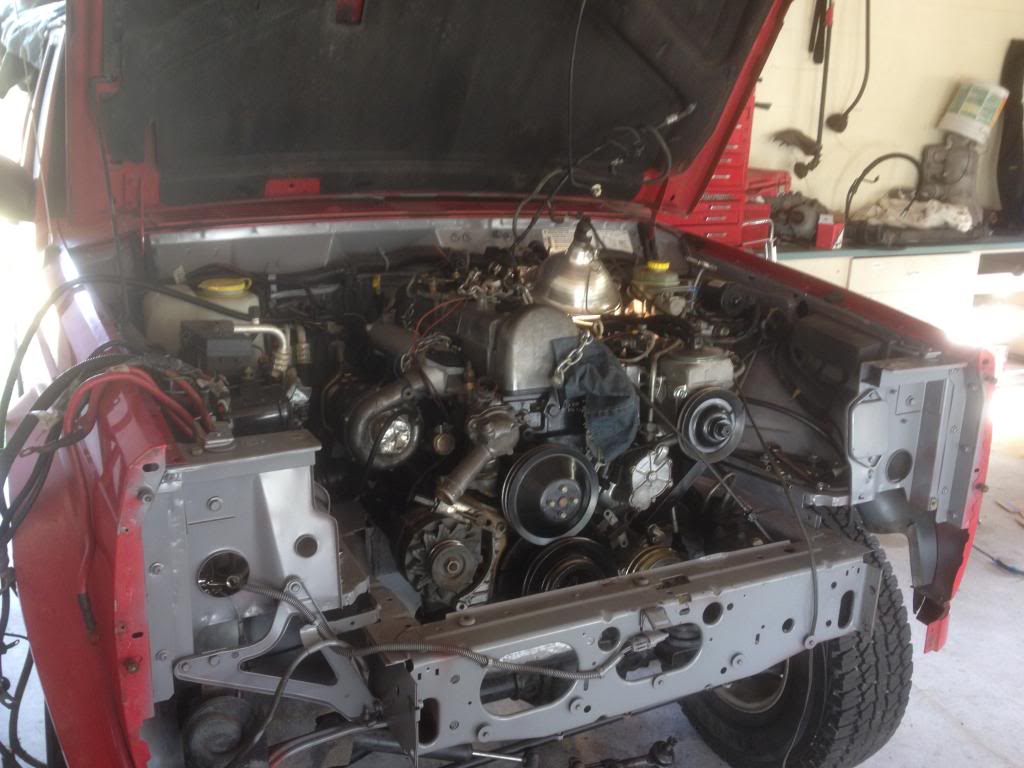
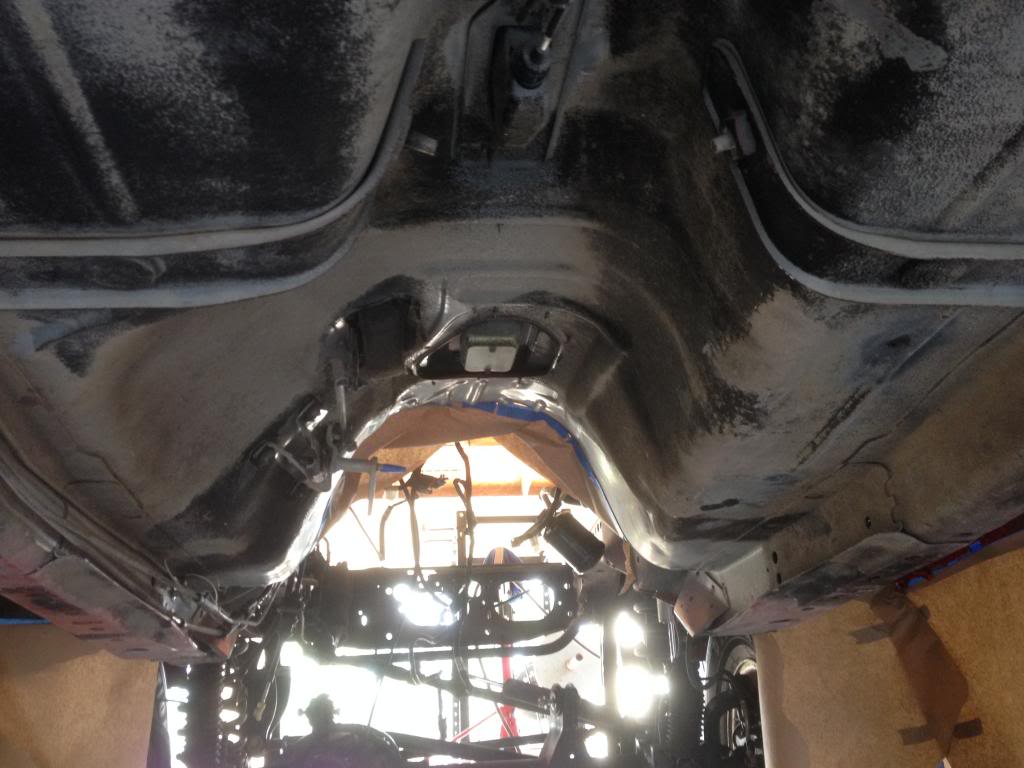
Engine installed
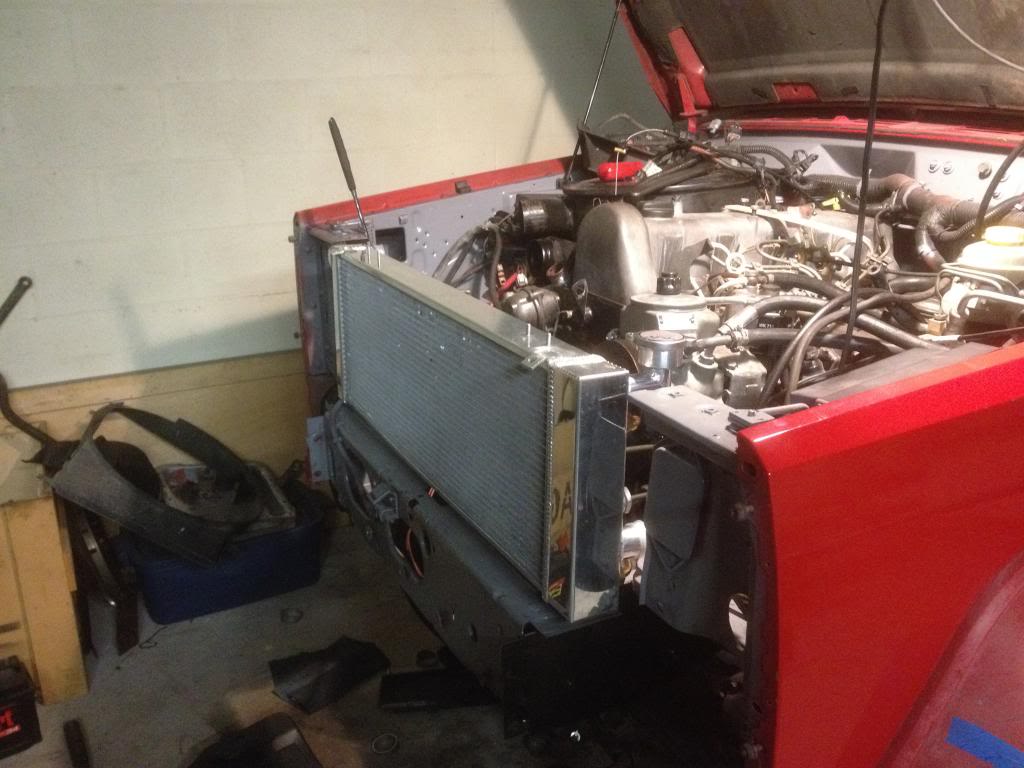

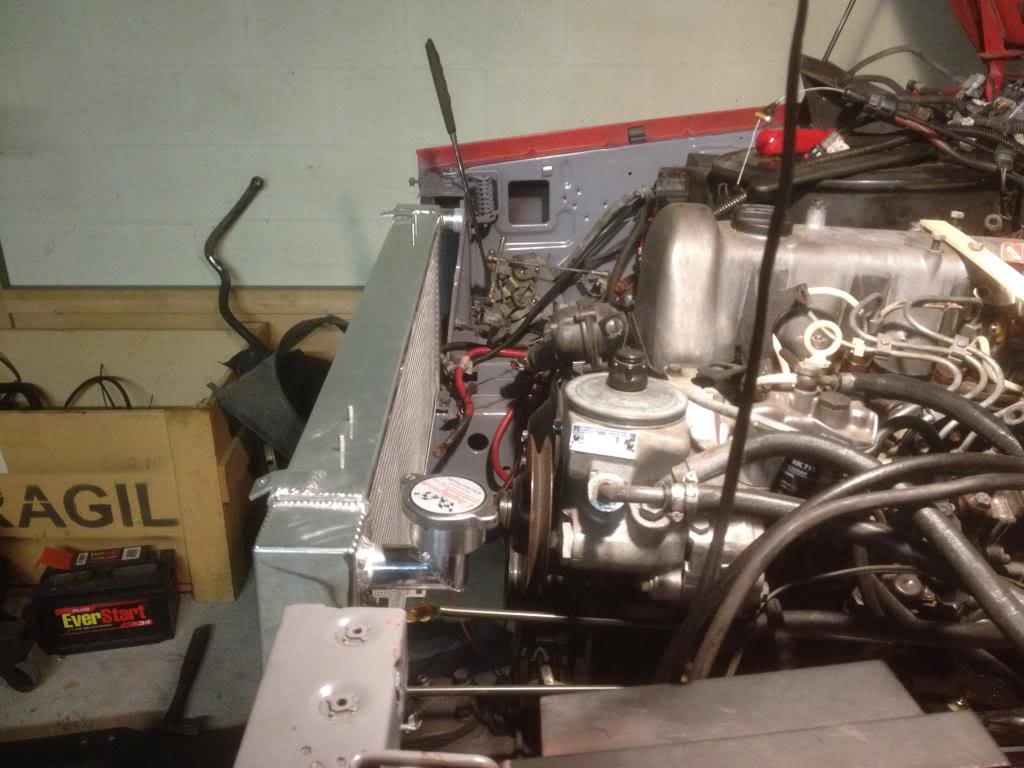
Champion CoolIng Systems, CC1193, 3 row all aluminum radiator, advertised good to 600hp.
EGT probe placement

EGT probe placement
Modified 700r4 dipstick tube. Heat with torch bent carefully and cut to length.

Modified 700r4 dipstick tube. Heat with torch bent carefully and cut to length.

Cut the dipstick tube so that the stock jeep dipstick full mark lines up with the 700R4 pan gasket. The top of the 700R4 pan gasket is the correct full level per GM. If full mark on dipstick does not line up do to lengths being cut incorrectly a mark will have to be filed on the dipstick marking the new "full' location.


I wish I had taken better pictures of this mount. A 4" x1/4" plate is directly epoxied directly to the flat spot on the 700r4, there is also an extension that comes down and is bolted to the trans case via un-used bolt hole. Two bolts are welded to the first plate to allow mounting of the second plate that has been drilled to accept the stock Jeep carrier bearing. The pivoting rod has been shortened to accommodate the increased width of the new transmission. The actuating rod the connected to the transfer case was shortened in this application due to switching to the NP231 from NP242 as it utilized a longer rod.
---AutoMerged DoublePost---
Thank you all for the encouragement and kind words, please feel free to ask any questions/comments, I'm looking forward to them.
---AutoMerged DoublePost---

If your engine is equipped with the KKK turbo the passenger side frame rail will have to be notched and reinforced to accommodate it as it sticks out further the Garret.
XJ's have been known to pull the bolts that connect the power steering pump to the frame right through the frame rail and will fracture and role the frame even with stock steering and tires. The use of an extended pitman arm will only amplify this problem. While you here take the time to plate the frame in this area, kits can be bought or made as I did. I ended up using a Skyjacker drop pitman arm advertised for 4.5" of lift.

Inside frame plate

Outside frame plate
 Painted
Engine installed


Champion CoolIng Systems, CC1193, 3 row all aluminum radiator, advertised good to 600hp.
Last edited by Evenglass; 02-08-2014 at 11:17 PM. Reason: Automerged Doublepost


