Cummins 12 valve electric fan install write up
#1
 02-13-2010, 10:21 PM

well everyone, just got done with my electric fan install from a ford taurus. they use a 2 speed electric fan that flows 3800 CFM. the fan is available from a 88-95 i believe ford taurus with a 3.8L V6 in it. (make sure its the 3 wire version). they were also available in the lincoln continentals and mercury's as well and some flow around 4300 CFM.
This was a pretty straightforward swap and it made a heck of a difference on the cooling as well. i had to do a few things in my swap that you guys wont have to because mine is a chevy with the cummins.
i will include a parts breakdown and part numbers and a very simple wiring diagram for those of you who wish to do this on your own.
Hayden Imperial fan controller part #3647 available at kragen or napa: runs around 35 dollars
Borg Warner s55 starter solenoid: Kragen (O'Reilly) part number: S55- 30 bucks at kragen
ford taurus fan: 65 shipped on ebay. (you can find them way cheaper at a junk yard)
miscellaneous wire and connectors:60 bucks (i bought large boxes of everything to fill up my bin at home, you could probably do it for about 20 bucks if you only bought what you needed)
the solenoid is a tad bit of overkill, but will work fine with the fan. since the fan controller is only a single speed fan controller, i just put the output for the solenoid to the high wire of the fan and left the low side disconnected. the only 2 speed controllers i could find were several hundred dollars so i decided against that. almost every year they changed the colors of the fan wires so just hook it to a battery to determine the high side. on mine, all black was ground, black with a red stripe was low, and black with a green stripe was the high side. if you get it hooked up and it is blowing towards the radiator and not towards the engine, you have the polarity backwards.
first things first. remove the mechanical clutch fan. if you can not do this step, you probably shouldnt be attempting this project. also remember, the thread of the fan clutch bolt is LEFT HAND THREAD, opposite of a normal bolt. if your tugging and tugging wondering why it wont loosen, you probably havent realized its opposite thread pattern.
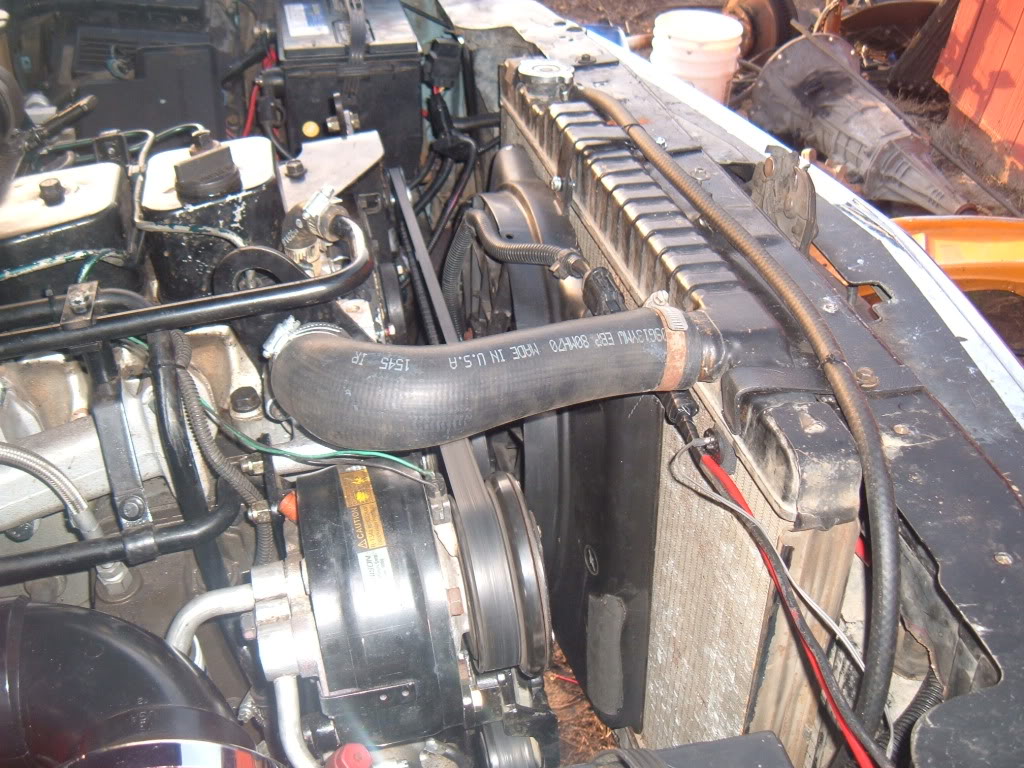
i had to remove the intercooled radiator and put a non intercooled radiator in there. (the extra 1/4" of thickness in the radiator was the difference in the fan fitting or now. DODGE OWNERS WILL NOT NEED TO DO THIS!!!
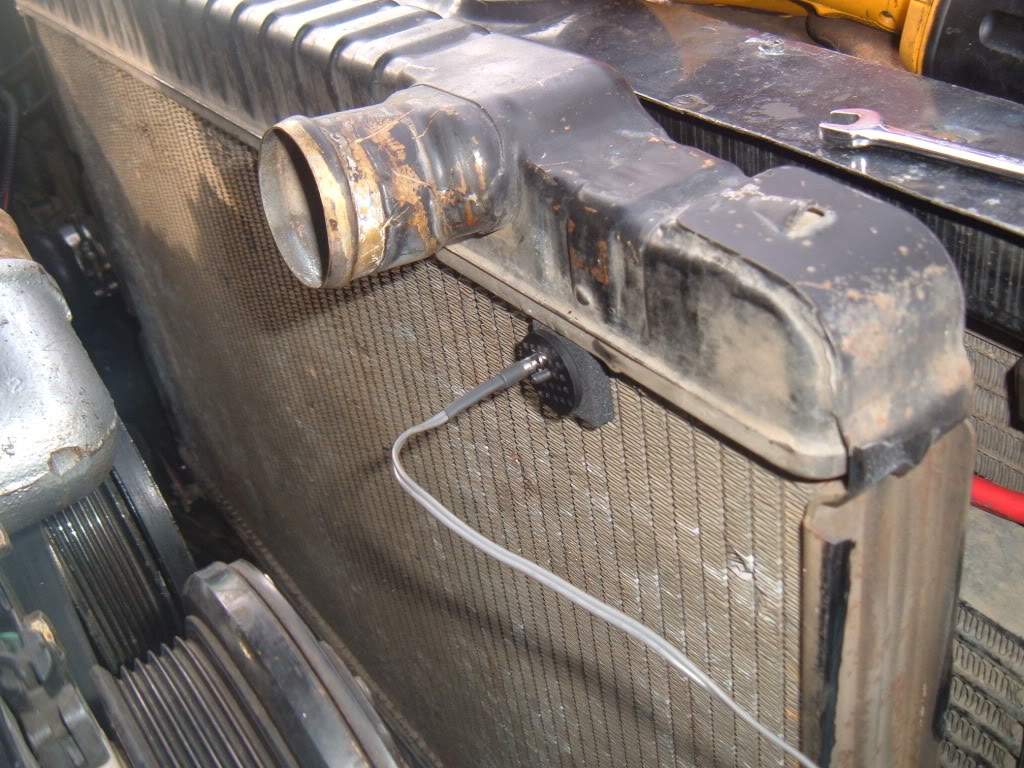
then i took a very small and long flathead screw driver and wiggled it through the radiator fins. you need to be VERY CAREFUL that you dont jam it in there and take out a cooling row. i just used the screwdriver to pry the fins out a little in order to insert the temp probe.
insert the temp probe that comes with the hayden controller. (instructions for this come with the controller and are very simple
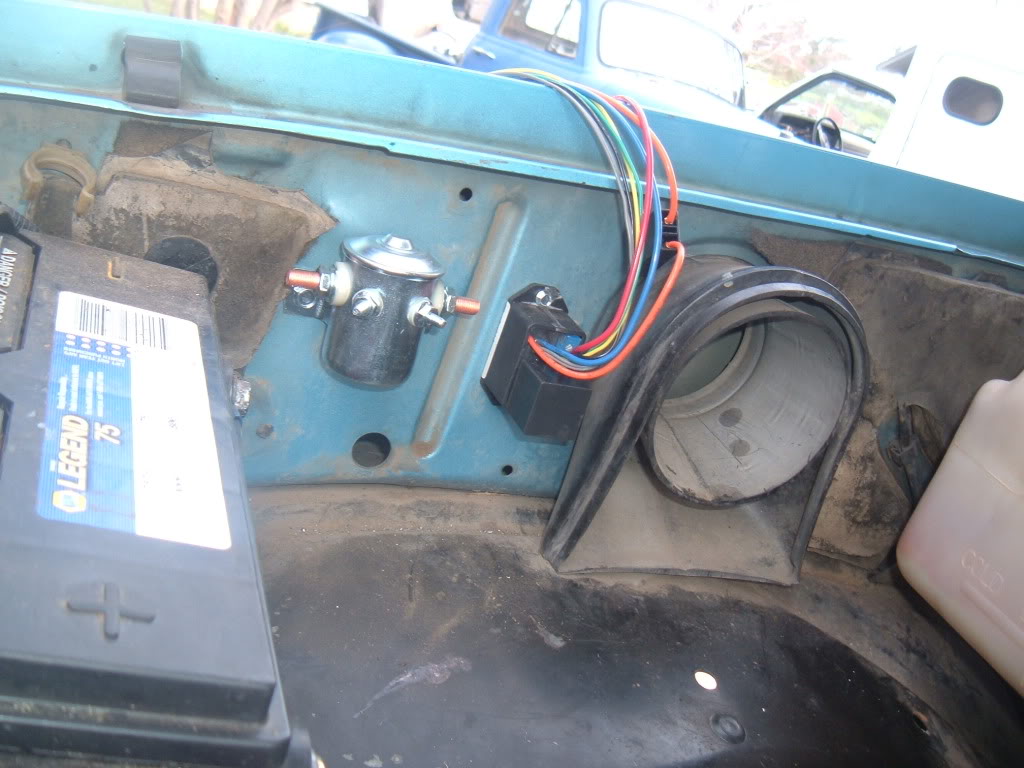
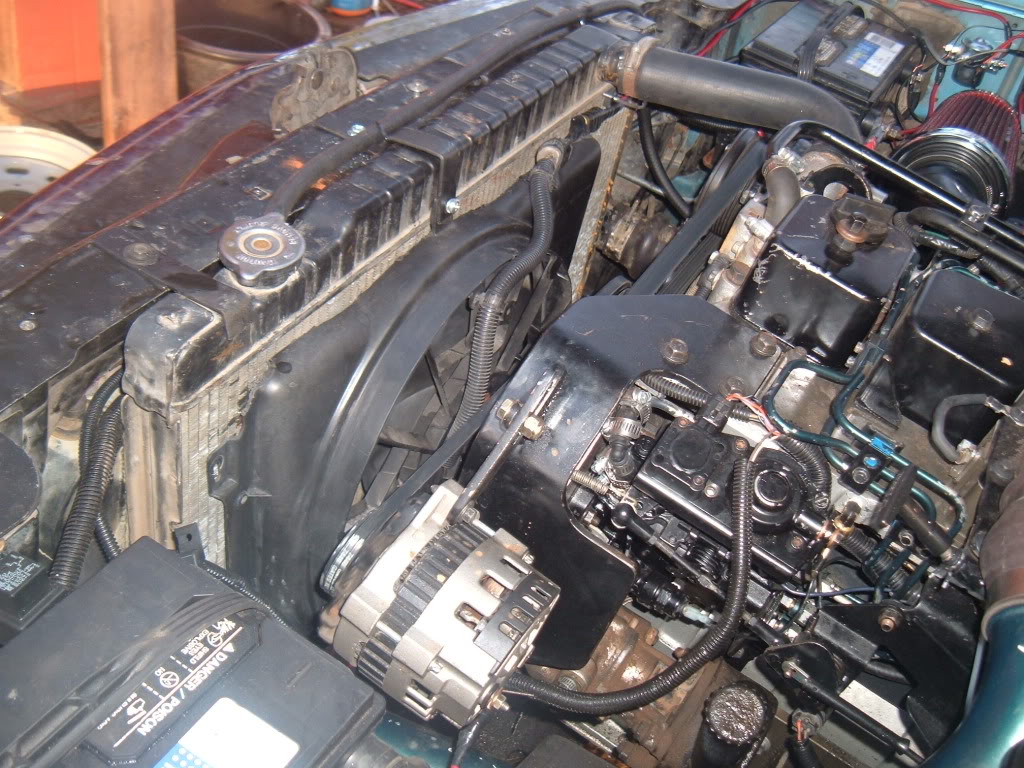
next in line was to mount the relay and fan controller. i chose to put it on the passenger fender because i had plenty of room there next to my 2nd battery. for you dodge guys, you can put them anywhere else you desire. the only thing it will change is how long or short of wires youll be running.
once you get those mounted, start on the electrical side of things. i just ran my wires out in the "general" direction to get an idea of where to start trimming wires before i loomed everything up. i recommend leaving everything exposed until your sure it works right (it makes troubleshooting much easier).
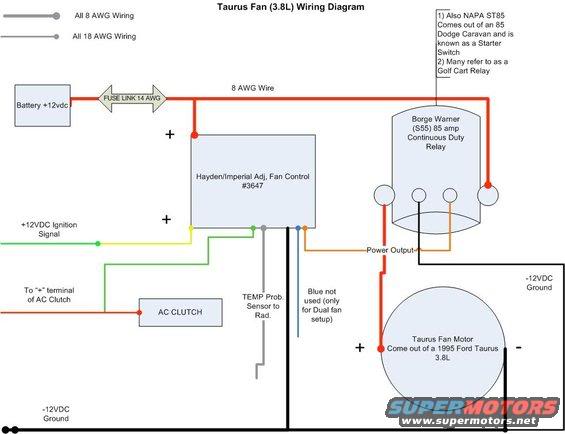
here is a very simple wiring diagram i found (credit to fullsizebronco.com) for the guys who arent to savvy on electrical this is a very simple to understand schematic.
after starting on the wiring, this is the mess i started workin with.
after i got my wiring all laid out, i started mounting my electric fan up again the radiator. you guys should have much more clearance than i did in my chevy. i fabbed up some nice little table to suck it up clean against the radiator. a little trimming was involved for me, but some more than other will want more or less trimming depending exactly how you want it mounted.
I used the bottom lip of the fan and slipped it into the tab that sticks out along the bottom side of the radiator so that it wouldnt jiggle around down lown and bolted it in up top with a tab i made.
here is what mine looked like all mounted up
after getting it all wired up, i decided i wanted to run a manual switch on the dash bezel to override the system in case the controller crapped out. if you also would like to do this, just tap the switched wire into the orange output wire that goes from the controller to the starter solenoid.
the fan controller is adjustable from 90*F to i believe 230*F i set mine to kick on around 200*F.
i fired my engine up and let it run, flicked the manual switch and it came right on, so i turned it off and let it warm up. right around 200 or so it kicked on by itself and cooled it down to about 185 almost instantaneously.
this fan runs anywhere from 30-40 amps continously and did put a little bit fo a strain on my charging system, so i would recommend running a 130 amp or so alternator (for my chevy) and a little larger than what the stock dodge ones are probably around 110 or 115 would be good since first gens use less electronics than mine does.
they say you will gain approximately 15 HP and about 2 MPG increase now that your not turning that big heavy clutch fan. dont quote me on that but thats what ive heard.
overall it was a great install. took me about a full day to do the swap. should not take you as long as that since you dont have to deal with radiators and thermostat housing changes and whatnot.
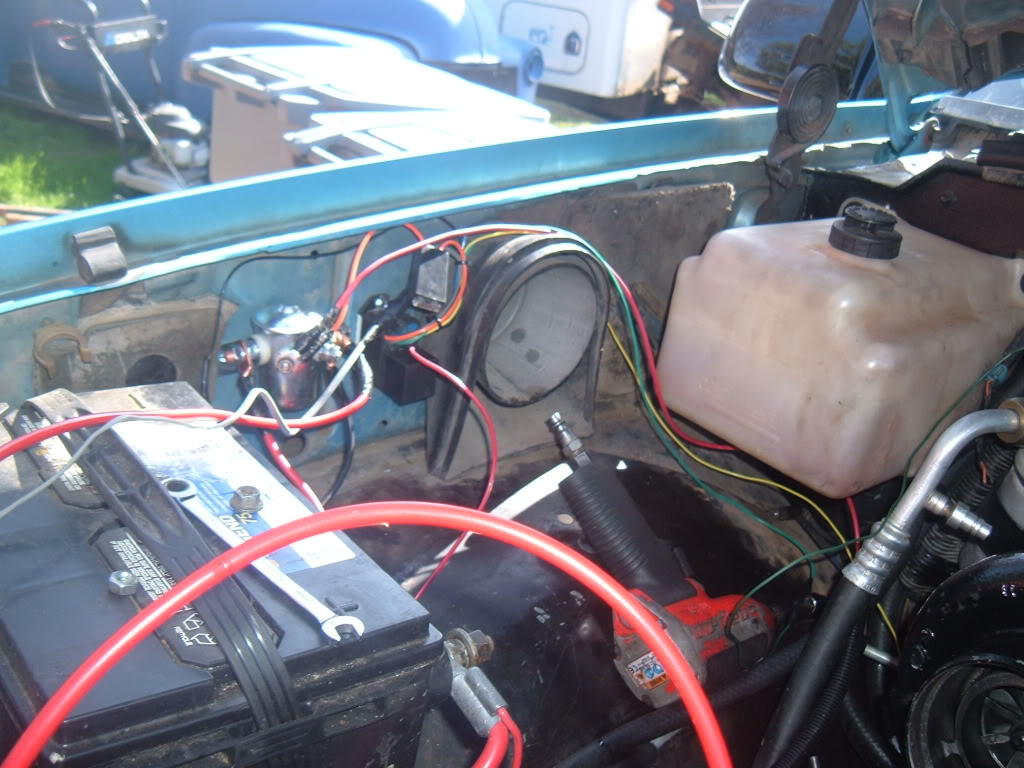
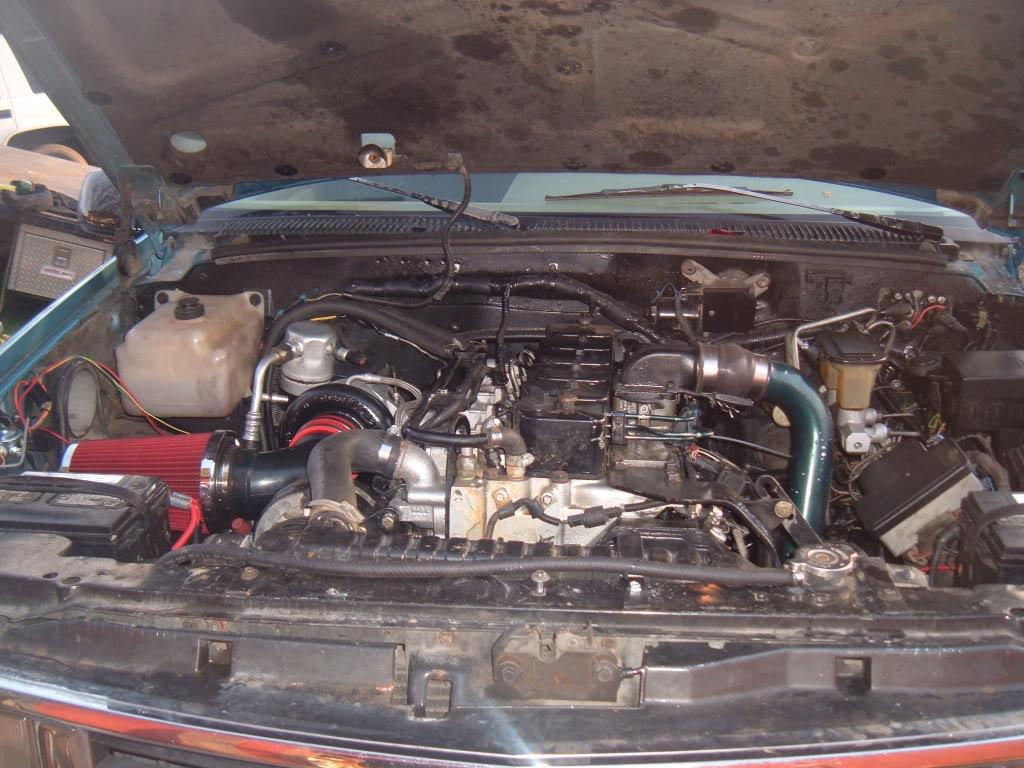
here is what my engine bay looks like all done finalized with my intake back on. i still need to loom the wiring but thats no big deal
if i missed anything please let me know, as its hard to remember to write everything down as i go. hope this will help some of you go this route i think its a great idea. enjoy!
This was a pretty straightforward swap and it made a heck of a difference on the cooling as well. i had to do a few things in my swap that you guys wont have to because mine is a chevy with the cummins.
i will include a parts breakdown and part numbers and a very simple wiring diagram for those of you who wish to do this on your own.
Hayden Imperial fan controller part #3647 available at kragen or napa: runs around 35 dollars
Borg Warner s55 starter solenoid: Kragen (O'Reilly) part number: S55- 30 bucks at kragen
ford taurus fan: 65 shipped on ebay. (you can find them way cheaper at a junk yard)
miscellaneous wire and connectors:60 bucks (i bought large boxes of everything to fill up my bin at home, you could probably do it for about 20 bucks if you only bought what you needed)
the solenoid is a tad bit of overkill, but will work fine with the fan. since the fan controller is only a single speed fan controller, i just put the output for the solenoid to the high wire of the fan and left the low side disconnected. the only 2 speed controllers i could find were several hundred dollars so i decided against that. almost every year they changed the colors of the fan wires so just hook it to a battery to determine the high side. on mine, all black was ground, black with a red stripe was low, and black with a green stripe was the high side. if you get it hooked up and it is blowing towards the radiator and not towards the engine, you have the polarity backwards.
first things first. remove the mechanical clutch fan. if you can not do this step, you probably shouldnt be attempting this project. also remember, the thread of the fan clutch bolt is LEFT HAND THREAD, opposite of a normal bolt. if your tugging and tugging wondering why it wont loosen, you probably havent realized its opposite thread pattern.
i had to remove the intercooled radiator and put a non intercooled radiator in there. (the extra 1/4" of thickness in the radiator was the difference in the fan fitting or now. DODGE OWNERS WILL NOT NEED TO DO THIS!!!
then i took a very small and long flathead screw driver and wiggled it through the radiator fins. you need to be VERY CAREFUL that you dont jam it in there and take out a cooling row. i just used the screwdriver to pry the fins out a little in order to insert the temp probe.
insert the temp probe that comes with the hayden controller. (instructions for this come with the controller and are very simple
next in line was to mount the relay and fan controller. i chose to put it on the passenger fender because i had plenty of room there next to my 2nd battery. for you dodge guys, you can put them anywhere else you desire. the only thing it will change is how long or short of wires youll be running.
once you get those mounted, start on the electrical side of things. i just ran my wires out in the "general" direction to get an idea of where to start trimming wires before i loomed everything up. i recommend leaving everything exposed until your sure it works right (it makes troubleshooting much easier).
here is a very simple wiring diagram i found (credit to fullsizebronco.com) for the guys who arent to savvy on electrical this is a very simple to understand schematic.
after starting on the wiring, this is the mess i started workin with.
after i got my wiring all laid out, i started mounting my electric fan up again the radiator. you guys should have much more clearance than i did in my chevy. i fabbed up some nice little table to suck it up clean against the radiator. a little trimming was involved for me, but some more than other will want more or less trimming depending exactly how you want it mounted.
I used the bottom lip of the fan and slipped it into the tab that sticks out along the bottom side of the radiator so that it wouldnt jiggle around down lown and bolted it in up top with a tab i made.
here is what mine looked like all mounted up
after getting it all wired up, i decided i wanted to run a manual switch on the dash bezel to override the system in case the controller crapped out. if you also would like to do this, just tap the switched wire into the orange output wire that goes from the controller to the starter solenoid.
the fan controller is adjustable from 90*F to i believe 230*F i set mine to kick on around 200*F.
i fired my engine up and let it run, flicked the manual switch and it came right on, so i turned it off and let it warm up. right around 200 or so it kicked on by itself and cooled it down to about 185 almost instantaneously.
this fan runs anywhere from 30-40 amps continously and did put a little bit fo a strain on my charging system, so i would recommend running a 130 amp or so alternator (for my chevy) and a little larger than what the stock dodge ones are probably around 110 or 115 would be good since first gens use less electronics than mine does.
they say you will gain approximately 15 HP and about 2 MPG increase now that your not turning that big heavy clutch fan. dont quote me on that but thats what ive heard.
overall it was a great install. took me about a full day to do the swap. should not take you as long as that since you dont have to deal with radiators and thermostat housing changes and whatnot.
here is what my engine bay looks like all done finalized with my intake back on. i still need to loom the wiring but thats no big deal
if i missed anything please let me know, as its hard to remember to write everything down as i go. hope this will help some of you go this route i think its a great idea. enjoy!
Last edited by tltruckparts; 02-14-2010 at 12:22 AM.
The following 3 users liked this post by tltruckparts:
#2
02-13-2010, 11:15 PM


#3
02-13-2010, 11:29 PM
Diesel Bomber
#4
02-13-2010, 11:33 PM
if the fan is out of the car i wouldnt know the difference between the two. but i knoinw g out of the car i believe the fords and mercs are 3800 and the lincolns are the 4300. it seems to be cooling my motor off just fine.
as for a pusher and puller i have no idea. i just ran this one because im limited on space and theyre only about 4 1/2" deep pretty low profile
as for a pusher and puller i have no idea. i just ran this one because im limited on space and theyre only about 4 1/2" deep pretty low profile
#5
02-13-2010, 11:41 PM
Diesel Bomber
#6
02-14-2010, 12:21 AM


#9
02-14-2010, 09:05 AM


